DIY Spring Ombre Blouse!

Wednesday, April 3, 2013

Hey guys! It's finally spring time!!! (Yaaaaaaaay! *awkward dance*) I was shopping around and saw ombre EVERYTHING. I conveniently had a blouse that needed a stain covered up (darn you sketti red sauce!!!) So I decided to ombre my blouse!
SUPPLIES:
  First, make sure you cover up your surface with a garbage bag and your hands with gloves! Tie Dye is not very friendly! Next, generously squeeze the dye on the bottom of the damp shirt. (This is going to be the darkest part) If you want it darker, Black dye at the bottom should do the trick!

Next, dip the brush in the water and spread the dye up. Do this each time so it gradually looks lighter.


After this, lay the garbage bag down and hang your shirt to dry. If you just leave it flat, the color will start to crawl up!


Super Simple Star Wars Tees

Tuesday, April 2, 2013
My boys have recently really gotten into Star Wars and they were begging to make some of their own Star Wars tees.  Here's what we came up with.  They were pretty quick and easy to make.


I googled to find an image that would work for each shirt.


For the Darth Vader tee I cut out his silhouette on freezer paper and ironed it onto the shirt.  (If you are new to freezer paper stenciling you can find a video tutorial HERE.)  I painted Vader with my Tulip soft fabric paint.


After Vader was dry it was time to give him a light saber.  The new Tulip Holographic Transfer sheets are actually what inspired these tees in the first place.  When I saw them they just screamed, "Light sabers!" to me.  All you do is cut out the sword, place it where you want it on the shirt, lay a thin piece of fabric over it and iron it for 40 seconds.  Then you're set.


We've already washed the tees a couple of times and the swords are holding strong.  They've been a hit.


For the Yoda tee I cut out his silhouette and then used the silver Tulip spray paint to spray around the edges of Yoda.


It didn't take much.  After it dried we peeled off the paper and added a green light saber.


My little man was quite pleased with his Yoda tee.


And there you have it.  Two quick, easy tees for the Star Wars love in your life.


May the force be with you.

DIY Collage Pendants

Monday, April 1, 2013
These boutique chic collage pendants are easy peasy lemon squeezy to create!  Collage Pauge, Aleene's jewelry glue and some pretty vintage inspired papers and decorative elements from Cosmo Cricket are adhered to light weight wooden tags and sealed for durability with Aleene's Spray Acrylic Sealer.  This is a great girl's night in project and a fun DIY to do with your teens.  And the best part, you can share your own unique message in a pretty pendant you can wear!
What you need:
Aleene's Jewelry and Metal Glue
Wooden jewelry tags with drill holes
Decorative papers (Cosmo Cricket)
Decorative fabric brads (Cosmo Cricket)
Tiny text stickers or print your own (Cosmo Cricket)
Jump rings
Chain
Clasp
Scissors
Bent and chain nose pliers
Flush cutters
Pencil
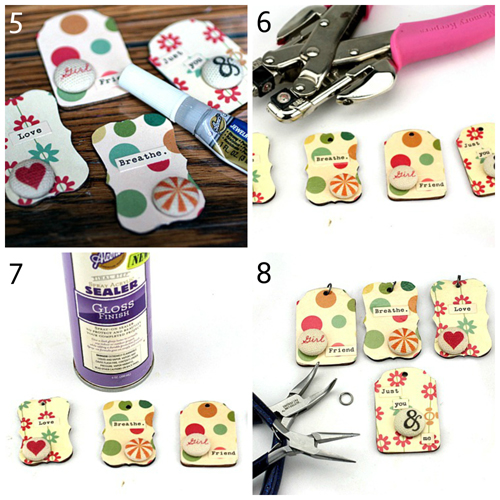
1.) Gather materials.  2.)  Trace and cut papers to fit tags.  3.  Attach paper to wood with decoupage medium.  Add tiny text to tags.  Make sure you line up items on front so tag hole is at the top! Paint two coats of medium on top.  Allow to dry.  4.  Cut metal shanks off of brads.  
5.) Attach brads to tags with jewelry glue.  Allow to dry. 6.) Punch hole in paper, carefully working the hole punch into the pre-existing hole in the back of your pendant.  7.)  Spray one coat of acrylic sealer on pendants.  Allow to dry.  8.) Attach jump rings. 
These turned out so cute, I can't wait to make more.  Adding that acrylic sealer means you won't have to worry about the decoupage medium being sticky on humid days.  I live in the Southeast, it gets hot around these parts!  Try making these with buttons, old jewelry pieces, cabachons, crystals...collages are little miniature artworks and each one should be a reflection of you!