Showing posts with label lips shirt. Show all posts

CRAFTY CHICA: Glittered Kisses Shirt (Inspired by Carrie Diaries)

Friday, February 1, 2013
Are any of you watching THE CARRIE DIARIES on The CW?
The series stars teen actress AnnaSophia Robb as the teen version of the iconic Carrie Bradshaw from Sex and the City!
Photo from tv.yahoo.com
Not only am I fan of the original HBO series, I'm also in love with this version as well (yes, I was skeptical at first). The Carrie Diaries is all about high schoolers, I'm in my 40s. BUT - it takes place in NYC in 1984. Hello? some of the best times of my life were in the 80s, right?

Every week we're treated to crazy, juicy fashion, DIY ideas, pop songs and kooky-yet-self reflective Carrie-esque plot lines. The show is based on the novel by Candace Bushnell, so it has a lot of the same zingy spirit that made SATC so fun to watch.

In the first episode, Carrie's beloved purse was ruined by her sister and a rogue bottle of nail polish. But in true Carrie Bradshaw style, our girl transforms it into a splattered, personalized bag that serves as a central plot line in the story - it catches the eye of an editor from Interview Magazine and Carrie is drawn into the world of writing and fashion.

Here is the scene, and if you look on YouTube, you'll see all kinds of videos from the show's fans who have made their own bag.

Not only that, but scores of other DIY projects are popping up from other crafty fashionistas. Let's circle this back around to my project this week. On Monday's episode, Carrie wore an adorable lip-smacked sweater.
I found a cute t-shirt at Target that had the word LOVE already across the front, so I added to it by using Tulip Shimmer Sheets kisses, inspired by Carrie's sweater.

If you want the look of the sweater, you can use a fabric stamp or cut a stencil. I wanted something fun for Valentine's Day for Maya, so here is what I came up with!


Supplies:
Cotton shirt
Tulip® Fashion Glitter™ Shimmer Transfer Sheets: Hot pink, light pink and purple.
Scissors
Iron
Parchment paper
Peel off the front protective covering. Cut the sheet into squares about 2x3" in size.
Fold in half and cut lips.

Cut a lot of them in the different colors, I'd say about 15 of each in different sizes.


Sort them into piles. Set the shirt on an ironing board, heat your iron to high. Arrange the lips randomly and balanced. Set apiece of parchment paper on top and iron in place for about 30 seconds until the kisses are bonded to the fabric.

When it comes to washing, turn your shirt inside out and wash in gentle cycle, hang dry.

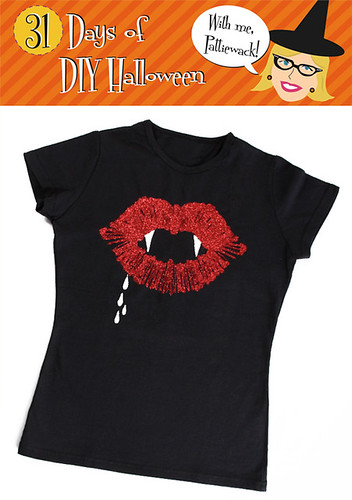
31 Days of DIY Halloween – Love Hurts Vampire T-shirt

Thursday, October 7, 2010
halloween-vampire-shirt

This is my all-time favorite Halloween shirt! Cheryl Ball made it after we brainstormed how to use the technique where you paint one half of the design and then fold the shirt in half. When you unfold it you’ll see PERFECT LIPS! It really IS fabulous and fun to do, and you’ll make all the other girls jealous at the party when you show up in this glittery shirt. Love hurts.

Materials
Tulip® 3D Fashion Paint™
Deep Red Slick
White Slick
Tulip® Fashion Glitter™
Red Fine Jewel
Silver Fine Jewel
– Black t-shirt
– Pink chalk sharpened to point
– Scissors
– Iron
– Freezer paper
– Stiff brush
– Paper towels
– Scratch paper

Instructions:
For best results, please read all instructions before beginning project. Refer to photo for color and design placement.

1. Wash shirt without softener to remove sizing. Dry in dryer then iron smooth.
2. Cut a piece of freezer paper to fit inside shirt then insert to shirt. Fold shirt in half lengthwise pressing fingers along fold for stiff crease then open shirt.
3. Cut out lip design from pattern sheet. Line up edge along fold on shirt then use chalk to lightly trace around pattern. Remove pattern.
4. Start Flow of Deep Red 3D paint on paper towel using an even pressure on bottle for a smooth line. Starting at upper lip next to fold, squeeze a continuous line of paint within area in a back and forth motion squeezing up and down following the couture of lips. To create ink blot effect, immediately fold shirt over along fold line lining up sides of shirt. Use fingertips to press over paint making sure to work right up and over fold. Open shirt to reveal design.
5. Immediately sprinkle Red Glitter over wet paint. Wait a few minutes, and then carefully pounce off excess glitter onto scratch paper. This glitter can be put back in bottle and re-used.
6. Use chalk to lightly draw teeth where shown then fill in with White Slick.
7. Use White Slick to add drops from lips if desired then sprinkle with Silver Glitter. Let paint thoroughly dry – thicker paint may take a little longer.
8. Pounce excess glitter onto scratch paper then lightly brush with hand to remove excess.
9. Wait 72 hours to wash. Machine wash warm on gentle cycle. Do not use harsh detergents or bleach. Remove promptly and line dry. To iron, turn garment inside out, being careful not to touch design with iron. Do not dry-clean.

Craft on! Click here for today's daily giveaway!