Cool2Craft TV for January 2, 2012: EcoHeidi EcoHome - Join host Heidi Borchers for a new episode of EcoHeidi TV on the Cool2Craft TV Network. This week's show theme is EcoHome. Today's featured projects are: Vintage Aleene Fabric and Wire Flowers, Soda Can Fish Sculpture, Glue Art Canvases by Candace Jedrowicz, and a Water Bottle Room Divider. It's a terrifically tacky and creatively cool show! It’s easy to watch the Cool2Craft TV Channel right from your computer. Airing Monday January 2, 2012 9am Pacific/10am Mountain/ 11 am Central/ Noon Eastern. Go to http://cool2craft.com and find the Livestream player and chat box. See you Monday!
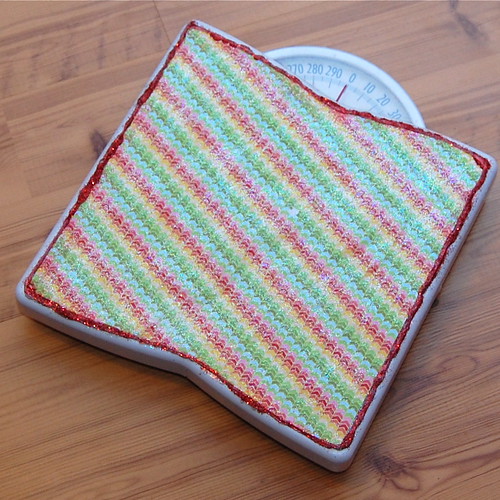
Every January most of us make the same resolution - to lose a little weight. For me, losing the baby weight is on the top of my list. I thought if my scale and I are going to be spending a lot more time together in the near future I might as well make it a little easier on the eyes.
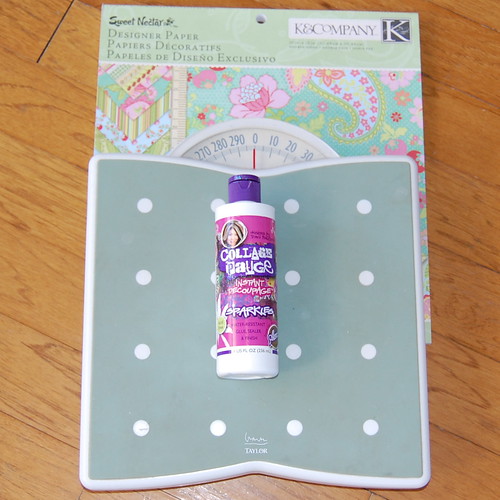
SUPPLIES Scale Scrapbook Paper Collage Pauge Fast Grab Tacky Glue Crafty Chica Glitter Paper Glaze Scissors
After you choose a decorative paper that tickles your fancy cut it out to the size of your scale. Using Collage Pauge adhere your paper to your scale.
Next trim the paper in Fast Grab Tacky Glue. While the glue was still wet sprinkle red glitter. You might want to try and get your lines a little straighter than I did. Allow the whole thing to dry completely.
When everything is dry give the scale a top coat or two of paper glaze.
Every week when I weigh in to try and reach my goal I'll get to look at bright colors and glitter. Sparkles make everything better, even my weight.
Crayons are a childhood staple, and many times they end up broken mess all over the house. The Crafty Chica shows us how to get more life out of your crayons with this fun and easy video tutorial using silicone cupcake/candy molds! And of course, she adds her signature touch of glitter using her very own Crafty Chica® Glitters. The kids will love drawing with their their crayon and glitter creations!
These little felt rosettes are so simple and easy to make and they are absolutely darling for your décor and cute hair accessories. Pattiewack shows you how to make them in this quick video tutorial!!!
New Year's Necklace Avalon Potter for iLoveToCreate Teen Crafts "Teen crafted, mom approved."
My mom has been working a new video tutorial using black and white scrapbook papers. I loved her project and wanted to do a variation. Since it's almost New Year's, I added lots of sparkles so it would feel just like the day itself. This project is very easy to make and when you are done you will have something that you can wear on New Years or any day of the year!
1.Take your black and white paper and cut out a piece that is 2.5"x6.5".
2.Take the piece and start to fold back and forth on the long side making each fold about a .5" wide. use a bone folder to make strong creases.
3.Once you have folded the whole piece fold the ends together from the center point making a fan.
4.Where the fan edges meet adhere Tacky Line Roll all the way down then pinch the middle pieces together.
5.Next put a thin line of Dimensional gold glitter on the folds and on the bottom. Then shake more gold glitter on top of that, tap off excess and allow to dry.
6.On the top attach a little white bow using Tacky Line Roll.
7. Take a large jump ring and string it through the top where the fan meets.
8. Slide a chain through the jump ring. You now have a fun and festive New Year's necklace!
This is Fahtz with glittered nails, a handmade bracelet and an art tiara - all of which she made at the Phoenix Craft Rave earlier this month!
This adorable little girl named Fahtz came out to our Phoenix Craft Rave last month and stayed for hours crafting! iLovetoCreate was one of our sponsors - which meant everyone got a FREE Crafty Chica Empowerment Guardian in their swag bag.
Here is a video of Fahtz decorating her guardian - it is soooo cute, it will surely make you smile! And she certainly has the Crafty Chica spirit - from adding lots of glitter to cheetah print trim! Right on!
Here is a bonus craft that I wanted to share before New Year's Eve - Sparkly Mittens! This is for you ladies who plan to wear some glitz on your fancy night out - maybe to the movies, or a party or a street festival. Why not glam up your gloves too? It's super easy!
You'll also need something to slip your gloves over while you add the crystals - like a soup can. This is so that the crystals won't come off when you stretch the gloves to insert your hands. You want to glue the crystals on while the gloves are stretched.
You'll want to pick up the crystals one-by-one with the tweezers, set in place and then use the heat tool to apply them.
Join host Tiffany Windsor for a new episode of Cool2Craft TV. This week's show theme is Best of 2011. Tiffany creates a Wax Resist Art Canvas, EcoHeidi Borchers crafts a Water Bottle Felt Bracelet featuring Aleene's Original Tacky Glue and special guest Candace Jedrowicz crafts a Kitschy Pedestal. It's a terrifically tacky and creatively cool show!
It’s easy to watch the Cool2Craft TV Channel right from your computer. Airing Monday December 26, 2011 9am Pacific/10am Mountain/ 11 am Central/ Noon Eastern. Go to http://cool2craft.com and find the Livestream player and chat box. See you Monday!
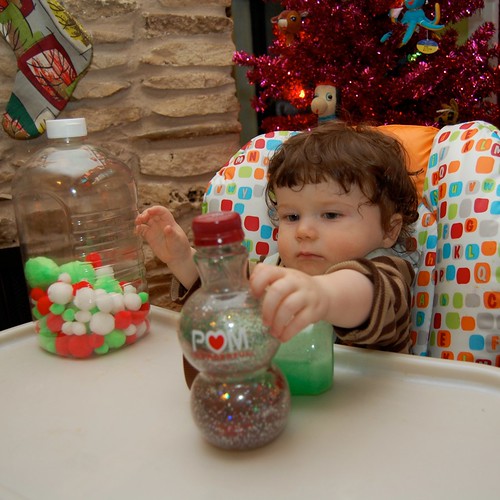
Last week when I did my series on handmade stocking stuffers I realized most of them were for toddlers. What about the babies? They need some handmade love too right? Don't worry I whipped up something fun and festive for Baxter too. Sensory bottles!
SUPPLIES Empty Plastic Containers Tacky Glue Crafty Chica Glitter Various small Toys
I had been saving clear plastic jars for awhile waiting for just the right craft moment. Seasonal sensory bottles were the perfect use for them.
Fill your bottles with various items. I put red, white and green pom poms in one. Another had oil, water and glitter. The third was full of red, silver and green glitter.
Once your jars are full add some tacky glue to attach the lids. We don't want baby swallowing any pom poms.
When the glue is dried completely park baby in front of the Christmas tree and watch him twirl and twist his new toys with delight. Not just for babies. These sensory bottles were also a big hit with the toddler set.
Preheat the oven to 300F. Line the cookie sheet with parchment paper. Remove plastic wrapper from each candy cane and set them as hearts on the cookie sheet. Let them heat up for three minutes. always use caution when using the oven, I suggest kids have an adult around to help them.
Remove the tray from the oven. Press the ends together so they set and the joints are secure. Use a steak knife to trim away excess candy cane. You want to have clean edges so it looks nice! Let cool.
Cut up the Tacky Sticker Sheets into strips and apply to the back of the candy cane - don't forget to add string to hang your ornament!
Set the candy cane on top of the picture. Cut away excess.
This is what I ended up with, but I thought they looked BLAH. They needed some sparkle power. I found some glittered cardstock and cut out hearts. I added more Tacky Sticker Sheet adhesive and pressed them to the back of the ornament. Much better!
As a way to say Merry Christmas (and Happy Hanukkah too!), I'm sharing a little song I sang! It's Christmas Waltz and I hope it makes you smile. Have a wonderful, magical, glitter-filled holiday! Click below to watch, I hope you like it!
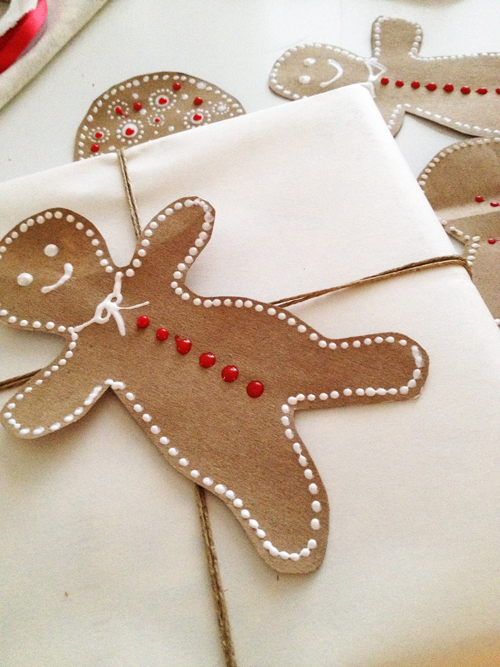
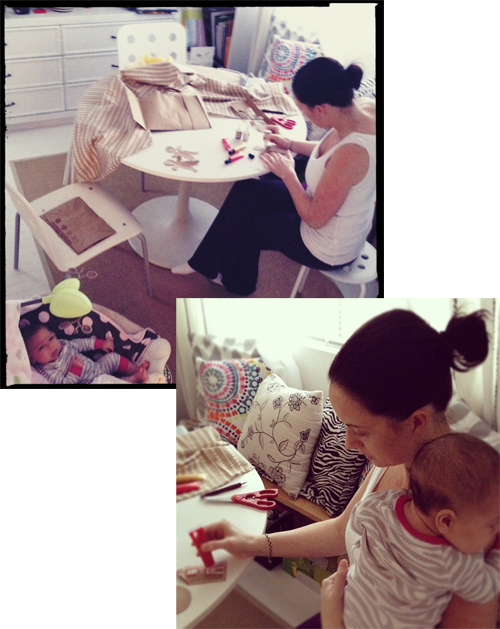
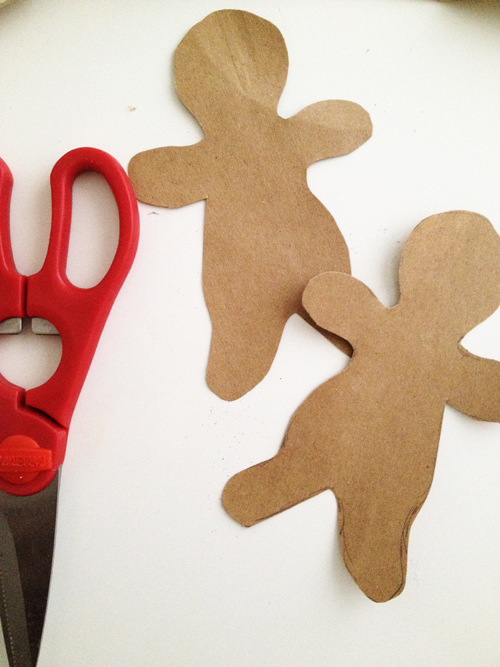
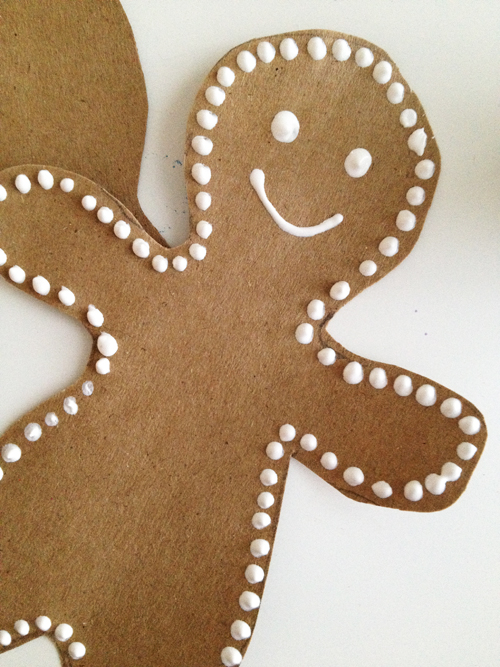
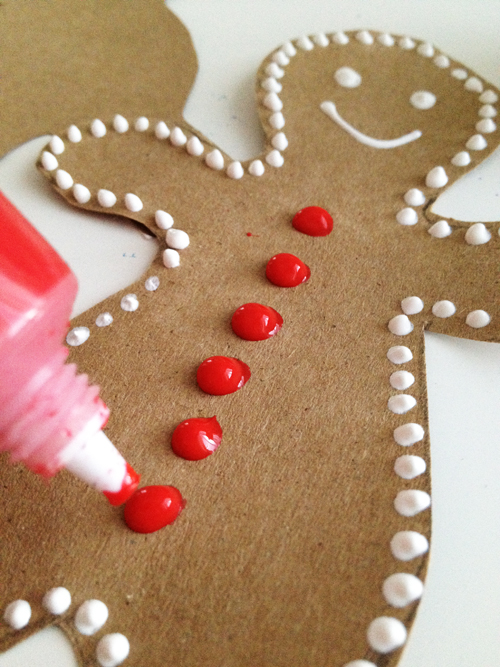
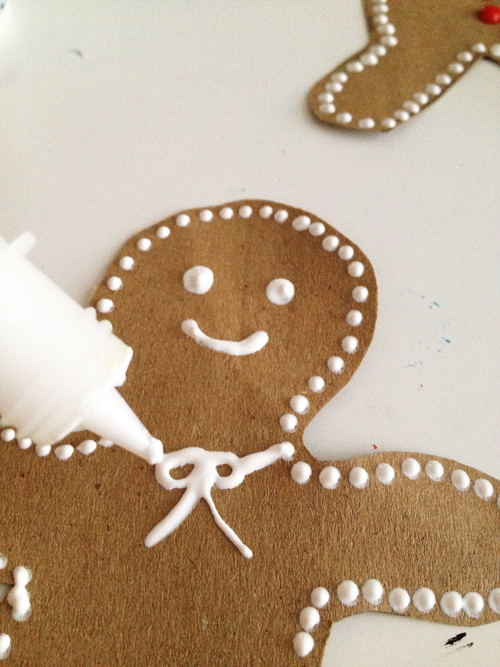
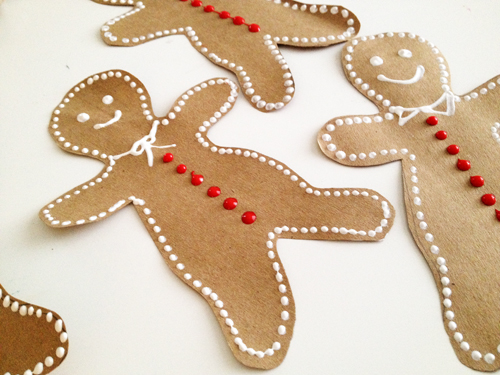
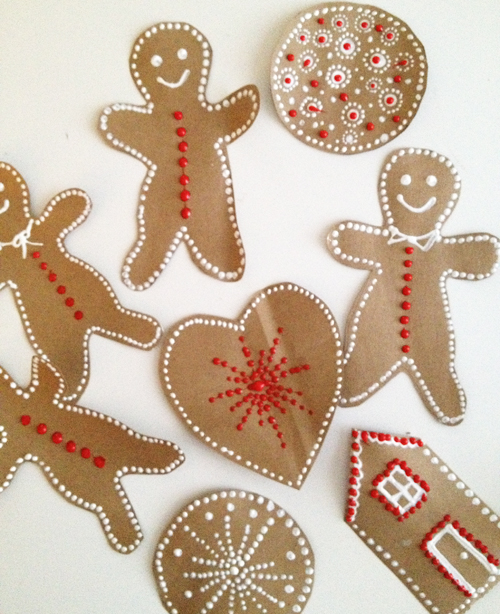
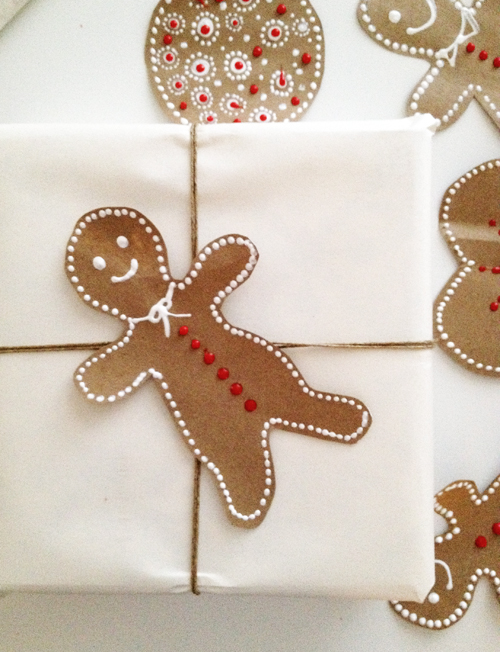
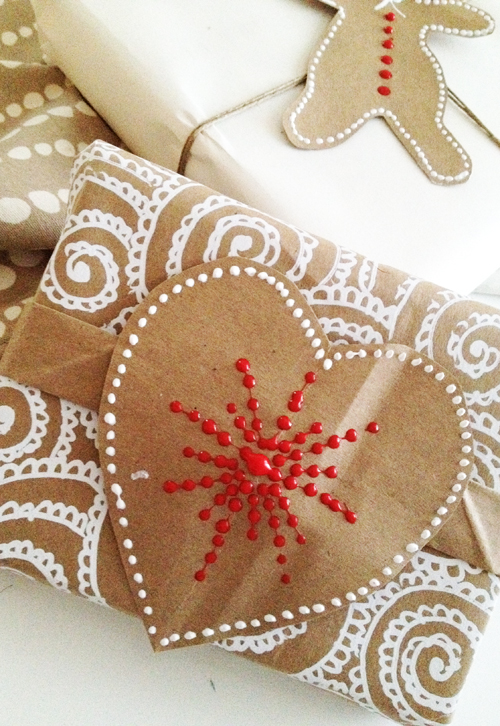
I am still creating from the brown paper bags we have on hand (see last week's post) and I came up with the idea to make simple gingerbread men to use as tags and to top my gifts. The brown paper is the PERFECT color to resembles gingerbread!
This is such an easy little project that even I was able to whip up a batch of gingerbread men while taking care of little Lucy!
I started by drawing the outline of a gingerbread man on brown paper bag- if you have a cookie cutter you could also trace around it.
My son has two awesome teachers at his preschool and I wanted to make them something special for Christmas. I decided to buy a comfortable blanket for one teacher and monogram it for her. I like semi-homemade gifts because they don't take as much time as fully handmade, but they still have a personalized feel to them. I purchased this blanket at Target.
Then I cut a freezer paper stencil. (If you haven't tried freezer paper stenciling you can watch my video tutorial of it HERE.) I ironed on the stencil and painted the letter black, using my Tulip soft fabric paint.
Since the blanket had a little texture to it I was really careful with the brushing. I blotted more than brushing.
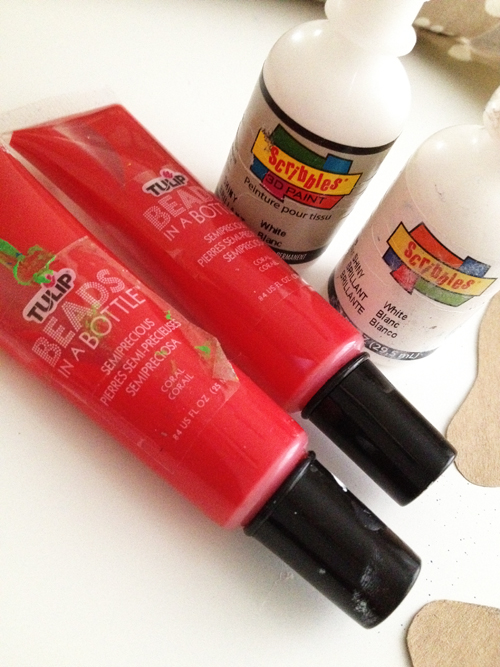
I removed the stencil and decided to add a little bling with Beads in a Bottle. I think this product is so fun. I've used it on a clutch, on a pumpkin, and on a Viking t-shirt. It's easy and fast, but gives you the look of sewing on a lot of beads or sequins.
I wrapped the blanket back up like it came, showing the monogram on the outside.
I think it'll look pretty draped over her couch.
So, if you need a last minute gift idea this one is pretty quick.


 Crayons are a childhood staple, and many times they end up broken mess all over the house. The Crafty Chica shows us how to get more life out of your crayons with this fun and easy video tutorial using silicone cupcake/candy molds! And of course, she adds her signature touch of glitter using her very own Crafty Chica® Glitters. The kids will love drawing with their their crayon and glitter creations!


