Naughty or Nice?

Monday, November 30, 2009


I put the "wack" in a pair of snuggies for our site at iLoveToCreate, and I totally LOVE them!

Of course, when I saw that the snuggies were everywhere for Christmas, I had to embellish them with my own wackiness. You can decide if you want yours to be Naughty or Nice, or maybe you just want to add your name.

And what a perfect idea to personalize a snuggie for your boyfriend! I can just see it now... the sorority sisters with all matchie-matchy snuggaroonies with their Greek letters! Or how about with the name of their fave football team? The possibilities are amazing!!

Here's what you need:

Instructions

  1. Use felt pen to trace “Naughty” or “Nice” pattern onto contact paper.
  2. Place contact paper onto cutting mat or piece of cardboard, shiny side down. Cut out letters with craft knife to create stencil.
  3. Place stencil shiny side down onto black or white fabric and iron on.
  4. Squeeze a puddle of Fashion Glitter Bond onto foil. Working quickly, tap flat end of makeup sponge into Glitter Bond and dab a generous amount into stencil openings. Immediately sprinkle glitter over Glitter Bond and use finger to press down on glitter to set. Let dry then peel away stencil and shake off excess glitter.
  5. Peel backing from Santa Hat Iron-On Transfer and place plastic side up where desired next to wording. Cover with a thin cloth and iron onto fabric following package instructions.
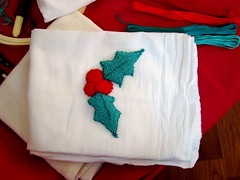
  6. Cut fabric around word and Iron-On Transfer, leaving a 1” border. Refer to photo.
  7. Place fabric piece on Snuggie™ where desired and sew in place leaving a ¼” seam.
Now, I don't know if you have read my sad story about MY adventures in SNUGGIES about 10 years ago, and how I COULD HAVE BEEN a Buh-JILLIONAIRE, but my girlfriend and I didn't have the cash to start the business.

If you're interested, check it out at:
Pattiewack Sleevies


Oh, and if you want MORE Crafty Christmas Tips, go to:
Pattiewack Christmas Tips

Sassy Sneakers

Friday, November 27, 2009

Every time I'm at Target and I walk past the Converse sneakers, my hands shake. I can't handle seeing boring white shoes. Canvas shoes. I couldn't take the craving, I had to get my fix!

Supplies

1 pair of white canvas sneakers
Crafty Chica™ Tango Permanent Fabric Markers™
Crafty Chica™ Little Chica Paint Packs™
Crafty Chica™ Mojito Papers™
Collage Pauge Instant Decoupage™
Small circle stickers (found at office supply store)
Paint brushes
Awl or hand held rotary tool

Directions:

1. Remove the shoe laces, color them black.
2. Color the shoes (and the tongue) with the markers and/or paints. Let dry.
3. Use the Collage Pauge Sparkles to affix the images from the Crafty Chica Mojito papers.
4. Create holes around the top of the shoe all the way around.
5. Thread the shoes laces around all the holes.
6. Coat the shoes with Collage Pauge Sparkles. Let dry.

Peace, love, and glitter!
Kathy :-)

Knit-Print Wrapping Paper

Wednesday, November 25, 2009

DSC04175

Recently on I Love to Create, I experimented with painting on knitwear. This got me to thinking; why not reverse the process and use the knitwear to paint with? It's that time of year when we all need wrapping paper and customizing your own is simple to do and with this method, also a great way to recycle those swatches us knitters have stashed away in boxes.

Here's the holiday how!
DSC04166

Materials
Brown, Craft Paper
Knitted or Crocheted Swatches
Little Chica Paint Pack (Which conveniently includes both Christmas AND Hannukah colors!)
Sponge Brush

How-To
  • Spread a thin layer of paint over your swatch. Press swatch face down, on your craft paper. Repeat until paper's covered. Let dry.

  • For a little extra razzle dazzle, add a layer of glitter paint by covering your swatch then pressing it down at random places over your paper.
Granny Square Print
Granny Square Printing


Stockinette Swatch Print
DSC04179

Ribbed Swatch Print
DSC04176

Tip: Top your knit-print wrapping paper with handmade, yarn ribbons!
Swatch Painted Wrapping Paper

Craft.Rock.Love,
Vickie

iLoveToCreate Teen Retro Christmas Photo Frame

Tuesday, November 24, 2009


iLoveToCreate Teen Retro Christmas Photo Frame
Grandma’s Gift Idea
Copyright Margot Potter
“Mom crafted, kid approved.”


I’ve been collecting vintage goodies for over 26 years now. Much of my collections have been pared down due to the lack of storage here at our little school house and my many moves. The one collection I can keep expanding (and justify for my work) is my ephemera. That’s a fancy word for vintage paper and bits of things that shouldn't last. I just scored a little stash of 1950s era Christmas cards and I knew I had to use them for an iLoveToCreate project. (Truth be told these aren’t much older than me...which of course makes me vintage but I’m in denial so let's leave it at that.)

This frame cost a buck and the rest of the supplies are very affordable. You can find vintage cards on Etsy or eBay. They’re super cheap and super fun for your artwork. My daughter finally fessed up to knowing the 411 on the jolly old elf, but we’ve known for a while she had it figured out. I just wanted to keep that Christmas magic alive as long as possible. This is a great holiday pic of Avalon from a few years back and I thought it could make a terrific gift for one of her Grandmothers or for us to use in our regular holiday décor. Teens can have a lot of fun with this project, and they get to enjoy a little bit of Christmas past if you use vintage cards. (Note: Don’t scan and copy the images from the cards and use them again, these images are under copyright. You can cut them out and use the physical card, but you can not reproduce the images. US copyright protection lasts 100 years.)

Materials
One wooden frame with heart shaped opening
Wired tinsel
Image from vintage greeting card
Text from vintage greeting card
Green cardstock
Aleene’s Fast Grab Tacky Glue
Aleene’s Liquid Fusion
Crafty Chica Little Paints White
Tulip Fashion Glitter White Pearl
Archival ink jet black
Adirondack ink red pepper
EK Success clear snowflake stamp
Inkadinkado flourish stamp
Dimensional foam stickers
EK Success metallic writer pen in silver

Tools
Martha Stewart lace edge punch
Scissors
Paper cutter
Tracing pen or pencil
Paint brush


1. Paint frame white. Sprinkle a fine layer of glitter over paint. Shake off excess. Allow to dry.

2. Randomly stamp snowflake over frame (try not to overlap) using archival ink in jet black.

3. Randomly stamp flourish over frame (try not to overlap) using Adirondack ink in red pepper.

4. Select image you like for bottom right corner of frame and cut it out. Use writer pen in silver to accent parts of image.

5. Spread a thin layer of glue on parts of image you’d like to coat with clear glitter. Sprinkle glitter on image and shake off excess. Allow to dry.

6. Cut out words you want to use. Using cardstock make a frame for the words. Use the scallop edge punch to decorate the edges of your frame. Adhere words to paper frame using two dimensional foam stickers.

7. Run a thick bead of Liquid Fusion along edge of frame. Place tinsel on edge, cut off excess. You can put some small glue bottles on the tinsel to secure it while it dries.

8. Adhere Santa to bottom right of frame using dimensional foam dots with a layer of Liquid Fusion under them.

9. Adhere text to top left of frame using dimensional foam dots with a layer of Liquid Fusion under them. Allow glue to dry overnight on images, text and tinsel.

10. Select and size a picture to fit the frame. Keep the cardboard insert to trace and cut image to fit inside of frame and to secure image inside of frame.

Tacky, But CUTE Thanksgiving!

Monday, November 23, 2009

Oh no- - -ooooooh, Thanksgiving is Thursday, and you need a centerpiece, candlelight, and cute little party favors. What to do????


Well, I've got it right here. This Thanksgiving centerpiece is way wacky, but it makes a great impression.

I made a big pot for my mum centerpiece, then the little pots hold candles and then I put candy corn in polka dot tulle and dropped it into little pilgrim hats.
Preeety cute, a little tacky because of the tacky glue, and easy, too.

Grab These Supplies:

Clay pot
Black spray paint
Black foam board
Pencil
Compass
Craft knife
Aleene's Fast Grab Tacky Glue
Craft metal, felt or cardstock for buckle
Black velvet ribbon (same width as the rim on the clay pot)

Follow These Steps:

1. Spray paint the clay pot black, let dry completely.
2. Turn the pot upside down on foam board. Trace around the rim, then set aside. Use a compass to draw a line 4 inches from the traced circle.
3. Cut around the outside circle with a craft knife, being careful to cut a nice, smooth edge.
4. Cut out the inside circle, 1/2-inch smaller than the traced line. If you plan to use the pot as a tray instead of a flowerpot, don’t cut out the center hole.
5. Glue the brim to the top of the pot with Aleene's Fast Grab Tacky Glue.
6. Cut out a buckle from craft metal, felt, or cardstock.
7. Thread black velvet ribbon through the buckle and glue to the rim of the pot.

You can plan your Thanksgiving centerpiece around a pilgrim theme with Pilgrim Party Hats. Place a pot of mums or fresh flowers in one large pot. Don’t cut a hole in the brim of another pot, and you can use it to display cupcakes or other goodies!


Happy Thanksgiving, Crafty Pilgrims!

Hugs & Blessings,
Pattiewack

Customized Ice Cream Cartons

Thursday, November 19, 2009


Today is an ice cream double whammy. First up you can pop over to Craft Magazine and read my post about how to make homemade pumpkin pie ice cream. My husband and I make this frozen treat every fall and it is always a big hit. So much of a hit we sometimes give it as a gift which brought about today's I Love to Create post. How do you customize and gift wrap ice cream? Well luckily it starts with eating ice cream.


SUPPLIES
Empty Ice Cream Carton
Crafty Chica Little Chica Paint Packs
Sponge Brush
Fabric Scraps
Ice Cream Cone Applique from Sew Darn Cute
Scissors
Collage Pauge
Rick Rack
Aleene's Tacky Glue


EAT ICE CREAM
If you are like me you always have a carton of ice cream in the freezer. When the carton is empty rinse it out, dry it off and set it aside for revamping.


PAINT
Using a Crafty Chica Paint and sponge brush paint your empty ice cream carton. This may take several coats. I went with a warm fall color palette since my carton was going to hold pumpkin pie ice cream. Allow to dry completely.


DECORATE
I used the applique pattern of an ice cream cone from Jenny Ryan's book Sew Darn Cute to adorn my carton, but feel free to create your own. I traced the image onto 3 different types of fabric in fall pumpkiny colors and cut out. Using Collage Pauge I adhered my ice cream cones to the carton

For extra spice using Aleene's Tacky Glue I also applied gold colored rick-rack to the rim of the carton lid.


VARIATION
I just so happened to have some vintage ice cream themed wrapping paper laying about that begged to be used. I cut the paper to the size I needed and using Collage Pauge Sparkle I applied it to another empty ice cream carton.

Now all that is left to do is make some homemade loquat or pumpkin pie ice cream to fill my cartons with!


Looking for more ice cream goodness? Check out a round up of my Top 10 Favorite Ice Cream Related Blog Posts!

25 Signs That You Love to Create: Holiday Edition!


25 Signs That You Love to Create for the Holidays

1. Red & Green, Blue & Silver or Turquoise & Hot Pink (if you're feeling retro), are suddenly your favorite colors.

2. You think "Black Friday" sales at the mall are for losers; you started shopping for gift-making supplies in July.

3. Your secret love of packaged jingle bells can now be unleashed without embarrassment.

4. You sacrifice your mani/pedi AND hair budgets to get a Yudu, so you can screen print catchy (yet ironic) holiday tees for all of your friends. Here are a couple of suggestions:"Yule be hearing from my people!" or "It 'tis what it 'tis".

5. You notice how the flat sides of a dreidel are the perfect canvas for some Glam-it-Up Crystals!

6. Anything in your house that can be folded, printed or painted on suddenly becomes wrapping paper.

7. You lay awake nights thinking about Christmas card themes and whether or not to actually make the individual cards yourself OR just stage a holiday photo for all of them, which would then include handmade costumes for all subjects involved. It's a really tough decision.

8. You buy knitting needles in sizes that you already own, because they're offered in candy cane colors. You feel that you neeeeeeed them, before you can cast-on for that Fair Isle stocking you want to knit. It just makes sense.

9. Although you're not normally a tea towel kinda gal, you must admit that they're pretty adorable with punch-embroidered holly on them. You then purchase a punch embroidery set and RSVP yes to all of the parties that will require host gifts. Your towels are going to be awesome.

Lifetime Project: Tea Towell

10. You coordinate all of your holiday home decor around ornaments you've made, using Crafty Chica's Rockabilly Ruby glitter.

11. Your excited about the over abundance of advertisements in your mail this time of year, because it means more newspaper for you to turn into yarn to make Extra-Eco Frames for everyone on your gift list.

extraeco

12. If you can Dremel a hole in it, no item is safe in your house from becoming a tree ornament.

13. You change the organization of your Tulip Fashion Paints so that the holiday colors are in front, thereby including your craft supplies in your decor aesthetic. Oh, you love them so!

14. Instead of reading 'Twas the Night Before Christmas" to your children, you gather them 'round to flip through the Holiday Issue of Martha Stewart Living Magazine.

15. It makes absolute sense to you that the aisles in Michaels stores are filled with wreaths, pine cones and flocking spray as of June 1st--as long as there's also a 50% off coupon to buy them with.

16. Instead of taking vacation days off to visit your out-of-town family for the holidays, you reserve them for December trips to the Bust Craftacular in New York, the Blue Genie Art Bazaar in Austin, and the Renegade Craft Fair in Chicago.

17. Instead of tree decorating parties, you throw Make-Your-Own-Merriment soirées. People unwilling to use Fabric Markers or Collage Pauge, are not invited.

18. You feel that the best pairing with spiked, Spiced Cider is crochet.

19. This is your favorite television season, because there tends to be a lot of knitwear in winter episodes.

20. "The Festival of Lights" seems like an open invitation to incorporate LEDs into that cape pattern you saw on Burda Style. You're pretty sure there'll be instructions on how to do that over on the MAKE website.

21. You're campaigning to change the saying, "Give the gift of giving." to, "Make the gift of making." Wait, what?

22. Instead of trolling the pages of Amazon for ideas of gifts to buy, you spend hours looking on Etsy for ideas of gifts to make. You feel better knowing that if you run out of time, you can always purchase something from their that's been handmade by someone else.

23. It's sequin season, right?

24. Starting at around October, your kids' teachers start dropping color hints just in case you should decide to make them a scarf instead of getting them another Starbuck's gift card. They usually bat their eyelashes at the same time.

25. You have a bumper sticker on your car that says, "Honk for Handmade Holidays!" or "Deck the Halls with D.I.Y."

Craft.Rock.Love,

iLovetoCreate Teen Crafty Rockstar Necklace

Tuesday, November 17, 2009

Teen Crafty Rockstar Necklace copyright Margot Potter for iLoveToCreate

iLoveToCreate Teen Crafty Rockstar Necklace
by Margot Potter

"Mom Crafted, Teen Approved."

Fall is upon us and winter isn’t far behind. I was thinking about fall friendly jewelry for teens and this idea popped into my head. I love the unexpected addition of soft blue with the traditional fall colors. You could easily make this same idea in other color palettes, but I really liked these earthy tones. My daughter Avalon thought this was super cool, and I trust her sense of teen style implicitly. And just for the record, I’d sport this myself in a hot second...in fact I may just sport it today!

Think about this for Christmas with holiday themed charms and papers...

...I’m just sayin’!

Materials
Traci Bautista’s Collage Pauge Glossy
Aleene’s Liquid Fusion Glue

Crafty Chica Little Paint Pack Paints Red and Yellow
3 Tim Holtz Acrylic Fragments charms
Die Cuts With a View The Rockstar Stack
8 frosted orange Lucite leaves (The Beadin' Path)
5 frosted green Lucite leaves (The Beadin' Path)
8 8mm olive green moonglow vintage Lucite rounds (The Beadin' Path)
2 frosted orange Lucite flowers (The Beadin' Path)
6 6mm cracked blue Czech glass rounds
Silver plated rolo chain
Silver plated swivel lobster
13 silver plated head pins
3 10mm silver plated jump rings
21 6mm silver plated jump rings
Flourish stamp

Tools
2 pairs chain nose pliers
Round nose pliers
Wire cutters
Foam brush
Paint brush
Pen or pencil for tracing shapes


Place pendent over segment of paper you desire and trace. Repeat for all three pendants.
Cut out papers. Spread a thin layer of Collage Pauge on pendants and adhere paper. Gently press on the back to remove any air bubbles. Paint collage pauge on back of tile. Allow this to dry for several hours.

Mix a small amount of red and a much larger amount of yellow Crafty Chica paints to create a warm pumpkin orange. Stamp into paint and stamp flourish on edges of your pendants. Allow to dry.


Attach an orange flower and a blue bead on to the top left corner of the largest pendant using Liquid Fusion. Allow to dry.

Create coil topped dangles for your blue and green round beads. Thread a blue bead, a flower and a green leaf on a head pin, then coil the back and bend it flush to the back of the leaf to create a small pendant for the back of your chain. (See this video for a quick and easy head pin coiling how to!)


Attach the largest pendant to the center of an 18” length of rolo chain using a 10mm jump ring. Move over 4 links and begin to attach elements on every other link using 6mm jump rings for beads and leaves and 10mm jump rings for the pendants, make sure they’re all falling to the bottom of your chain. The pattern on both sides is: orange leaf, green bead, green leaf with blue bead, green bead, orange leaf, pendant and the same pattern established in the first section of beads and leaves. (For a quick and easy tutorial on opening and closing jump rings see this video how to!)

Attach a lobster clasp to one end of your chain using a 6mm jump ring. Attach the flower pendant you created to the opposite end using a 6mm jump ring.

(Most of the products used in this design were donated for promotional purposes with the exception of the scrapbook paper and the rubber stamp.)

I Can't Believe It's Bread & Glue!

Sunday, November 15, 2009


Aleene's Tacky Glue Dough -


Leaf Bowl & Wine Tags


I know, you're thinking I grabbed some polymer clay and made this darling little leaf bowl, but NO. It is just bread and glue! I had some left-over dough in the frig from a segment we did for the local news station, and you know crafters, we NEVER throw anything away. So, I decided to make a sweet little nut bowl with matchy-matchy wine glass tags for Thanksgiving.

I love how the leaves turned out for the wine glasses. They actually look like fine porcelain in real life. My pics are not the best, but I hope you can see how pretty they turned out.

The leaf bowl is perfect for filling with pistachios or other little snacks to go with the wine while the guests are waiting on that darn turkey to cook!

So, to make your own Tacky Glue Dough, all you need are 3 pieces of white bread with the crusts pulled off, and 3 big spoonfuls of Aleene's Tacky Glue. Pinch up the bread into a disposable cup and add your glue. Mix it with a plastic spoon until it starts to turn into a big lump, and then roll it in your hands until you have a nice ball of dough. Next, pat or roll it out to the size of a pancake.

For the complete steps for Tacky Glue Dough, go to the iLoveToCreate website for the pics and how-tos.

Then grab your scissors and cut a leaf shape about the size of your palm,

Use a spoon to help shape the leaf into a bowl and the press veins into it.

I pinched the edges and softened them with my fingers.

The little leaves are about an inch and a half wide, cut out with scissors, and then a straw was pushed through so I could hang them on the stem of the wine glasses.

To speed up the drying process, I set my toaster oven to 200 degrees, let it warm up and then turned it off. Then I placed the leaves in the oven for about 3 hours to cure. I noticed that the leaves were puffing up with air, so I pressed them with my fingers and placed them back in the oven until they were totally dry. If you can wait until the next day to paint them it will be great.

Autumn leaf colors were what I used to transform the leaves with color. I used paint from my stash. After they were completely dry, they were ready for Scott and I to toast to all of our many blessings.

Happy Thanksgiving!
& Blessings
to all of you
Tacky Crafters!
Pattiewack

Embroidery Hoop Bulletin Board

Friday, November 13, 2009

Can I just say I LOVE, love, love this idea?

This is a large embroidery hoop that is covered in fabric, but wait - there is more! It is actually a corkboard! Ditch your boring rectangle board and add an artsy touch to your office decor!

Supplies:

Large embroidery hoop
Corkboard to fit snug inside back (draw on paper to make a template and then cut cork board)
Fabric
Aleene's® Fabric Fusion™ Permanent Dry Cleanable Fabric Adhesive™
Aleene's® Tacky® Transparent Tape for Crafters™
Foam brush
Clips

Directions:

1. Open the hoop (paint it if desired).
2. Use a foam brush to apply Fabric Fusion inside both hoops.
3. Insert the fabric and replace back hoop. Pull until it is taut and apply clips all around, let sit for 30 minutes.
4. Remove clips and trim excess fabric.
5. Set the hoop right side down on table.
6. Apply Tacky Tape generously around inner areas of taut fabric inside the hoop.
7. Set the corkboard inside so it fits snug up against edge of hoop.
8. Press in place.