Showing posts with label Aleene's. Show all posts

Bedazzled Puff Paint Ornaments

Wednesday, December 4, 2013
Wahoo! It's that fun time of year where we decorate ornaments, bake yummy goodies and shop our brains away. But, if you are like me then you just bake and decorate because I am all about homemade things. The only time I buy something is if I truly can't "make" it! How funny is that. I wanted to show you today how to bedazzle some ornaments and add a tad bit of color to them. They almost look soft and delicate with a twist of FUN! 

Let's go make some Bedazzled Puff Paint Christmas Ornaments! 

Read more »

HOW TO MAKE: FAUX BEADED SNEAKERS

Wednesday, September 18, 2013

 
What's going on people! It's already time for cinnamon-pumpkin candles, veggie soups, football and lot's of Fall and Halloween crafting. I always try to have something in my daily outfit that POPS and the fact is some day's all I want to wear is a cute pair of skinny leg blue jeans and white v neck shirt. What is one to do to make their outfit POP at this point? 

 I know! Make FAUX BEADED SNEAKERS! 

Read more »

Delight in the Seasons + Aleene's Giveaway

Wednesday, August 29, 2012

We are excited to be giving away a great Delight in the Seasons/Aleene's prize pack to one lucky blog reader! This book by Lisa M. Pace is truly fabulous and includes paper crafting projects and techniques that will inspire you any time of the year! It's filled with beautiful how-to photos and instructions that will teach you how to make delightful projects...everything from altered tins to party hats and paper flowers! We're excited about this book because Lisa used a lot of our Aleene's Adhesives to create her amazing projects! Enter to win below! a Rafflecopter giveaway

iLoveToCreate Retrofabulous Crafts: Cheers Cocktail Coasters

Monday, May 21, 2012

iLoveToCreateRetrofabulous Crafts: Cheers! Cork Coasters
Margot Potter
“These are your grandmother’s crafts.  Ya gotta problem with that?”

Nothing says retro like cocktail parties, a delightful custom that is rapidly disappearing.  What could be more festive than a few friends, some fondue, hors d’oevres and a litany of libations?  What indeed.  Whatever your poison, be it leaded or ‘un’, these perky little coasters will turn any occasion from drab to fab in seconds flat!  Cheers!

Materials
Conversation bubble stencil (I used a Shape Template from Fiskars)
Fine tipped black marker
Tulip sponge pouncer
Small flat paintbrush
Small tipped paintbrush

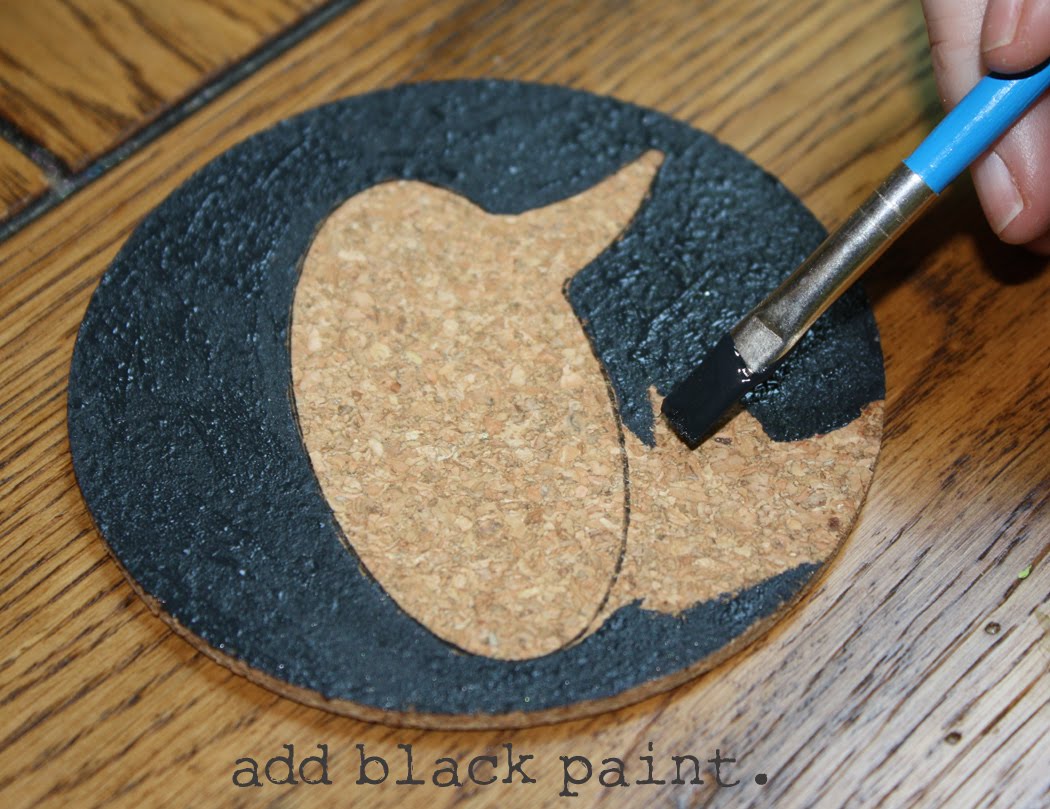
Trace conversation bubble on front of coasters using a fine tipped black marker.

Carefully paint black edges around bubble.  A flat brush is the best choice for this task.'
 

Paint the inside of the bubble white, use flat brush for larger sections and small brush to get into smaller spots.  Allow paint to dry.

Use a foam pouncer to apply a small amount of paint to letter stamp, be careful not to get paint on stamp edge.  Stamp words on each coaster, these can be a little wonky as this is a cocktail accessory! After dry, spray with two coats of matte acrylic sealer. 

Cheers, clink, sip and savor...the four components of a successful toast!

Visit us on Facebook!
Craft on!

iLoveToCreate Teen Crafts: Funky Flower Tank Top

Wednesday, May 9, 2012
iLoveToCreate Teen Crafts
Funky Flower Tank Top
Margot Potter for Avalon Potter
“Mom crafted, teen approved.”

Av is in her final week of school and just got home from a trip to Washington, D.C.  So I stepped in to make this funky tank top.  This was my second painted shirt attempt from yesterday; the first one was so horrid it ended up becoming the paint rag.  By the end of the day, I was starting to think this was heading for the ‘craft fail’ bin too, but now I’m kinda liking it and Av really liked it.  Craftastrophe or crafty triumph...sometimes it’s a fine line, people.  If you really get into a pickle, you can always cut the fabric up and use it for another project or, as I did with shirt number one, turn it into a colorful rag! I used the Paint Canon paints to do a Jackson Pollack influenced splatter background and then the flower stamp added a little touch of girly whimsy.  Still...it needed something...so out came the dimensional paint and some faux gemstones.  What was cool was the fabric was so wet, the dimensional paint sort of faded into it in spots.  The key here is to really get it layered without letting it get muddy and to keep dabbing as you work.  Ideally you’d dry between layers, but I was in a crunch for time, so layers just kept going on and the shirt kept getting wetter.  A lot of my best ideas come from being willing to make glorious messes and ultimately, there are no craft fails, except for the failure to craft. 

Materials
Ribbed tank top in grey
Faux gemstones
Foam flower stamp

Tools
T-shirt or sponge to blot and soak up paint as you work
Tulip sponge pouncer to apply paint to stamp


1.  Wash your shirt first.  Slide the form inside of your shirt.  Use the paint canon paints to drizzle and drip layers of paint straight from the bottles.  As you work, dab excess and keep layering and dabbing until you are happy with the results.  Allow to dry or leave wet while moving to next step for a more faded look.


2.  Apply pink paint to stamp with foam applicator.  Stamp flowers randomly on front of shirt.  Use a pouncer to add pink paint on spaces between flowers for another layer of color. Allow to dry or leave flowers wet for more faded dots.


3.  Use dimensional paints to add dots around flower petals.  This is not meant to be perfectly perfect, vary spacing and placement.  Add a white ring to center dot on each flower.  Carefully glue faux stones to center of each flower using Fabric Fusion.  Allow to dry before wearing. 

Visit us on Facebook!
Craft on!

Aleene's glue gun featured on Portlandia episode!

Monday, January 2, 2012
 Forgive me for just discovering this hilarious series on IFC. It's called Portlandia and is about the eccentric characters of Portland, Oregon. The new season begins this Friday, but you can see a bunch of clips on You Tube from season one. I laughed through all of them! I found this one where Aleene's glue gun is featured!


LINK

Here's another cute, crafty kind of clip called Put a Bird on It:

LINK


Visit us on Facebook!
Craft on!

Recycled Snow Bottles Video - KSEE24 NBC - We Are Fresno Live!

Monday, December 19, 2011

DIY Snow Bottles Video 
as seen on NBC - KSEE24 

Host Stefani Booroojian was so much fun on the LIVE show on Thursday, 

as she shredded foam with a cheese grater 

while I covered recycled bottles 

with Aleene's Tacky Glue.  


You've got to watch and see how easy and cool these bottles turn out, 

and how inexpensive they are for fabulous winter centerpieces. 


Visit us on Facebook!
Craft on!

iLoveToCreate Teen Crafts: Nerds Rule Glasses

Wednesday, September 28, 2011


Visit us on Facebook!
Craft on!Click here for today's daily giveaway!

Avalon Potter for iLoveToCreate Teen Crafts
Nerds Rule Glasses
"Teen crafted, mom approved."

I got these nerd glasses a couple of years ago when I started a nerd club at my old school. I still wear them sometimes for fun and this week wore them for Nerd Day at my new school. Plain nerd glasses were cool, but adding Tulip Glam it Up Crystals made them even cooler! I love these now! You can do this to any pair of glasses you have, even the not so nerdy ones! But hey, let's face it...

Nerds RULE!


Materials
Black plastic 'nerd' glasses
Tulip Glam it Up Crystals in clear
Aleene's Platinum Bond Glass and Bead Adhesive
Sand paper or soft nail file

Tools
Chain nose pliers OR Tulip Fashion Art Tweezers

1. Rough up the surface of the areas where you'll be attaching crystals. Don't go overboard! You may want to tape the lenses of the glasses to prevent accidentally scratching them.


2. Put some glue into a piece of tin foil and dip the crystals into the glue one by one using tweezers.


3. Adhere them evenly around the rims of your glasses. Take your time and if you want to, mark crystal placement in advance.

4. Allow glue to dry overnight and then wear your nerd glasses with pride!

No-Sew Pasties

Thursday, August 18, 2011


No-Sew Pasties by Erica Davidson
BUST Magazine blogger Erina Davidson needed some glam for her upcoming Philly Naked Bike Ride event and decided to whip up a pair of sparkly pasties! She knew she needed a glue she could trust to hold all the important stuff together - so she went with Aleene's Original Tacky Glue!

In the mood to make your own set? Click  here:  New-Sew Nipple Tassels Tutorial
Visit us on Facebook!
Craft on! Click here for today's daily giveaway!

Pretty, Pretty Products on Display at #NAEA

Saturday, March 19, 2011
Fun Duncan Ceramics stuff!!

This weekend we are at the NAEA (National Art Education Association) convention and we are having so much fun showing off our new and beloved products to teachers all over the nation!

We're doing lots of fun make-it-take-its and sharing with teachers and creators in education! They then take the knowledge and ideas from the convention home to their schools and classroom!

Here's a few fun photos we took of our booth showcasing lots of new products and super fun projects!

Duncan products at NAEA

Duncan Concepts at NAEA

I heart Tulip at NAEA!

Aleene's!!

Visit us on Facebook!
Craft on!Click here for today's daily giveaway!

embellished socks

Monday, January 17, 2011
IMG_4934
I have a bit of an obsession with boots- short, tall, vintage, black, brown- I just can't seem to get enough of them! And when you have a huge boot collection you gotta have cute socks to wear.


IMG_6031
Recently, I decided to start embellishing my socks for a little extra whimsy and fun.


hg
Knee high socks are a must when wearing boots and Target has the best deal in town! $2.00 for a pair and a variety of colors and patterns to choose from.


IMG_6011
You can use just about anything to embellish socks- scraps of fabric, beads, embroidery, tassels- I chose to use variety of lace and ribbons for frilly and feminine socks.


IMG_6016
There are also a number of ways to attach your embellishments- with a needle and thread, sewing machine, hot glue or fabric glue. I used Aileene's Fabric Fusion- a durable, washable fabric glue- such a great product to use when you don't want to sew!


IMG_6017
The trick to embellishing knee high socks is to make sure to have them stretched to the size of the widest part of your calf. I recommend using something to keep the top of the sock stretched- THIS IS IMPORTANT!


I used a rolled up magazine that was a little larger than the size of my calf. You could also use a glass, a large jar, a poster tube- pretty much anything that is similar to the size of your leg.


IMG_6018
Apply the glue the back of lace and press onto the surface of the sock. Wrap the lace around the top of the sock, pinning it to the surface as you go.


IMG_6035
Let the glue dry.


IMG_4975


IMG_5005
Wear with knee hight boots, letting the lace peek out of the top :)


IMG_6039
You could also use fun ribbon and create cute bows!


IMG_5040


IMG_6026
You could even try using scraps of ribbon, lace and fabric to create roses- yes, once again I am using fabric roses in another project!


IMG_6025
Glue the roses to the tops of the socks .


IMG_4952 copy
and let the roses peek over the top of your boots.


There are lots of variations for embellishing sock- have fun creating your own pair that are totally unique and totally you!


alisa-burke


Visit us on Facebook!

Craft on!Click here for today's daily giveaway!

ILoveToCreate Pink Splash 3-D Flower Bracelet

Wednesday, August 11, 2010


ILovetoCreate Teen Crafts Pink Splash 3-D Flower Bangle
Copyright Margot Potter
“Mom crafted, kid approved.”

I designed a chain and bead necklace a couple of years ago featuring a similar hot pink die cut flower on it for a class proposal. At the time, this kind of look hadn’t hit mainstream fashion hard and I think it was just a skootch ahead of the curve. Flash forward to 2010 and dimensional floral accents are EVERYWHERE! I’ve re-imagined it attached to this pretty painted pink bangle design using fabric paints, fabric markers and Aleene’s Liquid Fusion glue. I think this is one of those perfect ‘Back-to-School’ accessories for the teen fashionista. It’s flirty and fun and girly and right in step with what’s happening in the fashion mags.

PLUS the flower spins around like a pinwheel, so it’s a kinetic design too! When those crystals get spinning, it’s really quite mesmerizing!

This requires using an electric drill, so a little assistance from mom or dad may be required. You could opt to do smaller flowers and have them circle the wrist, but I’m a big and bold kinda gal and so is Miss Avalon, my resident teen. Take this idea where you like, express your individuality! That’s what crafting and fashion is all about.

Materials
Grungeboard sheet swirls pattern
Tulip Soft Fabric Paint in azalea
Tulip Metallic Dimensional Fabric Paint in white
Tulip Metallic Dimensional Fabric Paint in metallic silver

DIY Bangles small wooden bangle
Inkadinkado lourish stamp
Aleene’s Liquid Fusion glue
Tulip Glam-It-Up™ crystals
Crystal bead for center
Pink or silver-plated head pin
Sizzix Bigz Flower Die

Tools
Tulip Glam-It-up™ tool
Sizzix Big Shot machine
Electric drill with 1/16” bit
Paintbrush
Foam brush or foam applicator
Flush cutters
Round nose pliers


1. Paint several layers of azalea paint on inside and outside of bangle. Allow to dry between layers.

2. Stamp flat oval areas with flourish stamp and white paint. Apply paint with a foam applicator or brush to surface of stamp. Allow to dry.

3. Mark center of one flat oval segment on bangle and drill.

4. Die cut flower out of Grungeboard using the Big Shot and the Bigz flower die.

5. Paint both sides of each layer of flower with azalea paint. Allow to dry.


6. Use foam applicator and flourish stamp to apply metallic silver paint to surface of flower layers. Allow to dry.

7. Use a thin paintbrush or your foam applicator to edge the flowers with the metallic paint. Allow to dry.

8. Glue flower layers together with Liquid Fusion. Allow glue to dry.

9. Use Tulip Glam-it-Up crystals and wand to apply crystals to edges of flower petals.

10. Thread head pin with flat side facing inside of bracelet through drilled hole, hole in center of flower and a crystal bead. Use round nose pliers to turn a loop and secure. (If the head pin head is too small, use a small button to secure it to the back of the bracelet.)