Showing posts with label jewelry making. Show all posts

Pretty Poppies Pin

Wednesday, June 13, 2012


iLoveToCreate Teen Crafts
Pretty Poppies Pin
Avalon Potter
"Teen crafted, mom approved."

I scored these yummy retrofabulous fabric fat quarters at JoAnn Fabrics a while ago and had them hoarded away in a secret drawer until yesterday.  Avalon ferreted them out and turned them into this fabulous pin/necklace!  How cool is this?  The chain is vintage celluloid and had been sitting in a box for several years until she dug it out and added the pin.  Simply fabulous and so fun to make using Aleene's Stiffen Quick and Fabric Fusion sheets.  Teens will love turning fabric, jeans and t-shirts into these stylish pins they can pop on purses, jackets, chains...whatever they like!  I'm thinking of making a smaller version to festoon my flip flops! 

Materials
Coordinating fabric swatches
Black craft felt
Flat pin back
Aleene's Fabric Fusion Peel and Stick Sheets
Aleene's Stiffen Quick Spray

Tools
Die cutting machine (Avalon used a Sizzix Big Shot)
Floral layered die (Avalon used a Sizzix Big Shot poppy die)
Sponge brush
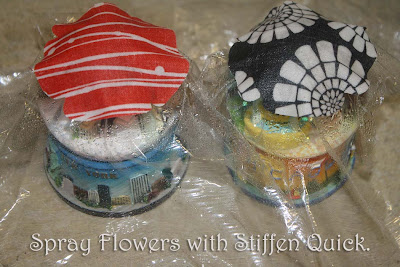
Round surfaces that fit flowers (Avalon used her snow globe collection)
Plastic wrap to protect round surfaces
Scissors to cut felt

Die cut your flowers making one size of each layer in each flower, this gives each flower a different configuration of layers.  Spray flowers with Stiffen Quick and allow to dry over your plastic wrap covered round surfaces.  Keep adding layers of spray until the flowers are the stiffness you'd like them to be.

Stack flowers together adhering layers with Peel and Stick sheets.

Adhere flowers to a felt base with Peel and Stick sheets, cut felt to fit bottom of flowers and prevent any felt from peeking out of the sides of flowers.

Adhere a pin back with Peel and Stick sheet.  Attach your flower pin to anything you like!
Visit us on Facebook!
Craft on!

ILoveToCreate Pink Splash 3-D Flower Bracelet

Wednesday, August 11, 2010


ILovetoCreate Teen Crafts Pink Splash 3-D Flower Bangle
Copyright Margot Potter
“Mom crafted, kid approved.”

I designed a chain and bead necklace a couple of years ago featuring a similar hot pink die cut flower on it for a class proposal. At the time, this kind of look hadn’t hit mainstream fashion hard and I think it was just a skootch ahead of the curve. Flash forward to 2010 and dimensional floral accents are EVERYWHERE! I’ve re-imagined it attached to this pretty painted pink bangle design using fabric paints, fabric markers and Aleene’s Liquid Fusion glue. I think this is one of those perfect ‘Back-to-School’ accessories for the teen fashionista. It’s flirty and fun and girly and right in step with what’s happening in the fashion mags.

PLUS the flower spins around like a pinwheel, so it’s a kinetic design too! When those crystals get spinning, it’s really quite mesmerizing!

This requires using an electric drill, so a little assistance from mom or dad may be required. You could opt to do smaller flowers and have them circle the wrist, but I’m a big and bold kinda gal and so is Miss Avalon, my resident teen. Take this idea where you like, express your individuality! That’s what crafting and fashion is all about.

Materials
Grungeboard sheet swirls pattern
Tulip Soft Fabric Paint in azalea
Tulip Metallic Dimensional Fabric Paint in white
Tulip Metallic Dimensional Fabric Paint in metallic silver

DIY Bangles small wooden bangle
Inkadinkado lourish stamp
Aleene’s Liquid Fusion glue
Tulip Glam-It-Up™ crystals
Crystal bead for center
Pink or silver-plated head pin
Sizzix Bigz Flower Die

Tools
Tulip Glam-It-up™ tool
Sizzix Big Shot machine
Electric drill with 1/16” bit
Paintbrush
Foam brush or foam applicator
Flush cutters
Round nose pliers


1. Paint several layers of azalea paint on inside and outside of bangle. Allow to dry between layers.

2. Stamp flat oval areas with flourish stamp and white paint. Apply paint with a foam applicator or brush to surface of stamp. Allow to dry.

3. Mark center of one flat oval segment on bangle and drill.

4. Die cut flower out of Grungeboard using the Big Shot and the Bigz flower die.

5. Paint both sides of each layer of flower with azalea paint. Allow to dry.


6. Use foam applicator and flourish stamp to apply metallic silver paint to surface of flower layers. Allow to dry.

7. Use a thin paintbrush or your foam applicator to edge the flowers with the metallic paint. Allow to dry.

8. Glue flower layers together with Liquid Fusion. Allow glue to dry.

9. Use Tulip Glam-it-Up crystals and wand to apply crystals to edges of flower petals.

10. Thread head pin with flat side facing inside of bracelet through drilled hole, hole in center of flower and a crystal bead. Use round nose pliers to turn a loop and secure. (If the head pin head is too small, use a small button to secure it to the back of the bracelet.)

Customized Ribbon Flower Jewelry

Thursday, May 6, 2010


This past week I took a ribbon flower class taught by the amazingly rad Becky Joiner with mom as her mother's day present. Like every class at Stitch Lab it was oodles of fun and muy informative. My only complaint is that I am not a fan of the wired ribbon color options. As beautiful as it is, I'm just not a satin or velvet ribon kind of gal. I'm more of hot pink, lime green and zebra skin kind of girl. That being the case I had to take matters into my own hands and create my own color options of wired ribbon. Today for I Love to Create we are taking plain white wedding ribbon to an all new tack-a-liscious level.


SUPPLIES
Wired Ribbon
Needle and Thread
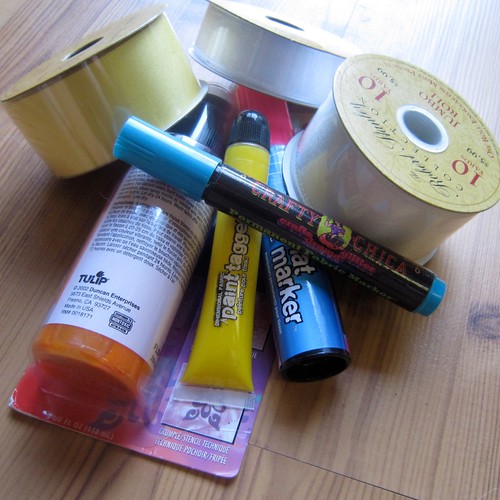
Various fabric paint and dyes such as Tulip Soft Fabric Paint, Crafty Chica Paint Markers, Fabric Spray Paint and Tulip Fashion Graffiti Big Phat Fabric Marker.
Jewelry Findings
Liquid Fusion Glue


COLOR YOUR RIBBON
In the floral department you can find spools of wired ribbon. However, as mentioned none of it really did much for me. I opted for white ribbon which I promptly took home and revamped. Using various paints and markers I polka dotted, splattered and smeared my ribbon. Let your ribbon dry completely.


RIBBON FLOWERS
Using the techniques I learned in class I whipped up a whole batch of ribbon flowers. You can tug on the wire and use a needle and thread to create your own flowers.


WEARABLE RIBBON FLOWERS
Using Liquid Fusion Glue I converted two of my ribbon flowers into wrist corsages. I wired the third to a hair comb.


If you are in Austin I highly recommend taking the ribbon flower class. I also recommend making your own custom ribbon. It was easy, fun and more importantly completely unique. Do you have any ribbon flower making adventures? I'd love to hear.

ILoveToCreate Teen Crafts: Sparkle and Shimmy Earrings

Tuesday, April 27, 2010

ILoveToCreate Teen Crafts: Sparkle and Shimmy Earrings
Margot Potter for ILoveToCreate
“Mom crafted, kid approved.”


Avalon just got her ears pierced this year, so it will be a while before she can wear anything that swings and dangles.  Still she’s been observing my jewelry box with a glint in her eye. Teens love bold jewelry and these earrings fit the bill.

These feature the new Katiedids™ components my friend Katie Hacker created for Beadalon. They have empty chambers that can be filled with a variety of items. I don’t know why I thought wired tinsel when I saw these, but Aleene’s Platinum Bond Glass and Bead adhesive made quick work of this project. You can whip these puppies up in twenty minutes or less, which is the perfect project if you’re an impatient crafter like me! Try filling the chamber with fibers, crystal chain, regular chain, gemstone chips...just be sure you thread the head pin through so you can turn them into fun jewelry components.


Materials
Aleene’s Platinum Bond Glass and Bead Adhesive
4 Katiedids™ 1” open center circles
2 10mm black faux pearls
2 10mm acid green moonglow Lucite rounds
Wire sparkly tinsel
2 silver plated or sterling ear wires
4 thin gauge silver plated or sterling head pins

Tools
Wire cutters
Round nose pliers
Chain nose pliers


1.
Cut tinsel to fit half of chamber. Repeat four times.


2. Thread the wire through the holes in the edge of the components and the center bead and back through.
For the green beads, you need to leave equal amounts of wire exposed on both sides, for the black beads bring the head pin flush to the bottom of the component.


3. Place a thread of glue into one of the components. Gently place tinsel into glue, compressing into chamber on either side of center head pin, repeat with second piece of tinsel. Repeat for all four components. Allow glue to dry.

4. Use round nose pliers to create loops at the top and bottom of both green bead components. Bend wire flush to component at a 90 degree angle, grasp wire end with round nose pliers and form a loop. Cut off excess wire with wire cutters.

5. Use round nose pliers to create wrapped loops at the top of the two pearl components. See my YouTube Channel for a video on how to do this.

6. Attach pearl components to the bottom of each green component. Attach the ear wires. Adjust loops so earrings hang properly.