Showing posts with label ribbon crafts. Show all posts

Customized Ribbon Flower Jewelry

Thursday, May 6, 2010


This past week I took a ribbon flower class taught by the amazingly rad Becky Joiner with mom as her mother's day present. Like every class at Stitch Lab it was oodles of fun and muy informative. My only complaint is that I am not a fan of the wired ribbon color options. As beautiful as it is, I'm just not a satin or velvet ribon kind of gal. I'm more of hot pink, lime green and zebra skin kind of girl. That being the case I had to take matters into my own hands and create my own color options of wired ribbon. Today for I Love to Create we are taking plain white wedding ribbon to an all new tack-a-liscious level.
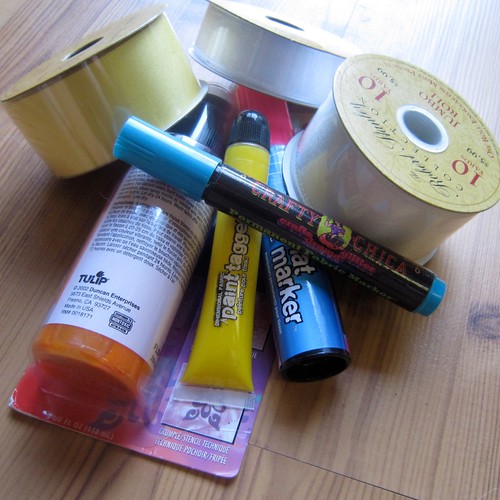

SUPPLIES
Wired Ribbon
Needle and Thread
Various fabric paint and dyes such as Tulip Soft Fabric Paint, Crafty Chica Paint Markers, Fabric Spray Paint and Tulip Fashion Graffiti Big Phat Fabric Marker.
Jewelry Findings
Liquid Fusion Glue


COLOR YOUR RIBBON
In the floral department you can find spools of wired ribbon. However, as mentioned none of it really did much for me. I opted for white ribbon which I promptly took home and revamped. Using various paints and markers I polka dotted, splattered and smeared my ribbon. Let your ribbon dry completely.


RIBBON FLOWERS
Using the techniques I learned in class I whipped up a whole batch of ribbon flowers. You can tug on the wire and use a needle and thread to create your own flowers.


WEARABLE RIBBON FLOWERS
Using Liquid Fusion Glue I converted two of my ribbon flowers into wrist corsages. I wired the third to a hair comb.


If you are in Austin I highly recommend taking the ribbon flower class. I also recommend making your own custom ribbon. It was easy, fun and more importantly completely unique. Do you have any ribbon flower making adventures? I'd love to hear.

iLoveToCreate Teen Romantic Wristlet Ribbon Corsage

Tuesday, February 2, 2010

Romantic Wristlet Copyright 2010 Margot Potter for iLoveToCreate
(Click on images to view details)

iLoveToCreate Romantic Wristlet
Mixed Media Ribbon Corsage
Margot Potter
Teen Crafts
"Mom crafted, kid approved."

I have a deep and abiding love of all things vintage and romantic. When I saw this lovely wired damask ribbon I simply had to have it because I knew it would make the most charming ribbon flowers that would be delightful for Valentine's Day. A little sewing, a little Liquid Fusion, a little Aleene’s Fast Grab Tacky glue and you’ve got a lovely ribbon corsage or hair clip, pin, card embellishment... Make a whole bouquet of these on hard wire stems and give them to a sweetheart or glue a variety of these around the edges of a frame. The thinner the ribbon, the flatter your flowers will be. I doubled up two flowers to make a ribbon rose and added some vintage button accents and attached it to a ribbon wristlet for a simply stunning corsage. This would be perfect for a Valentine’s Day dance.

If your teen is a girlie girl, she’ll adore these flowers and they’re so fun and easy to make I guarantee you’ll be searching for ribbon to make more! These aren’t just for teens, they’d be perfect for bridesmaids too!  Heck I'd sport this wristlet myself.  I can't wait to surprise Avalon with this on her birthday this Thursday! 


Materials
Ribbon (I used 2.5” thick damask print ribbon with wired edges)
Vintage buttons
Thread
Magnetic purse snap
Liquid Fusion Glue
Aleene's Fast Grab Tacky Glue

Tools
Chain nose pliers
Sewing needle
Scissors

1. Cut an 11” length of red damask ribbon. Fold the edge on one end.

2. Use a simple basting stitch to sew the bottom edge of the ribbon.

3. Gently remove wire from top of ribbon.

4. When you get almost to the end of the ribbon, fold the end and sew the two ends together.

5. Gently pull the thread to create a flower.

6. Sew the edges together and finish. Cut off excess thread. Fold top edge over to create the first layer your rose.

7. Repeat making a 9” flower.

8. Sew the two flowers together, nesting the smaller flower in the center of the larger flower. Fold edge over as before.

9. Glue a smaller white button into the center of a larger red button. While still wet, glue these to the center of the smaller flower. Use thread to tack the buttons down. Cut off excess thread. Allow glue to dry.

10. Fold a 5.5” section of black and white damask ribbon over itself to create one half of a bow shape. You should have a 2.75” bow end. Repeat on the other side, leaving the ribbon end attached to the spool.

11. Wrap the ribbon around itself and gently tug to create a bow. The bow should be 5.5” wide. Cut off excess ribbon.

12. Use the thread to secure your ribbon together and sew it to the bottom of your ribbon rose.

13. Measure and cut a length of ribbon to fit your wrist, leaving a 1” overlap on each end. Remove wire from both sides of ribbon.  Fold end over 1/2" thick, mark center placement of magnetic snap.

14. Cut slits for snap to thread into, thread snap into ribbon and bracket and fold over ends with chain nose pliers.

15. Tack a button over the exposed snap end on one side with thread, secure with Liquid Fusion glue and allow to dry.

16. Tack flower to center of wristlet with thread and secure with Aleene’s Fast Grab Tacky Glue. Allow to dry. You can remove your ribbon flower and attach to a hair clip when the wristlet gets dirty.