Wood Collage Jewelry
Friday, November 29, 2013 at 6:09 PMEasy Beaded Moccasins Tutorial
Thursday, November 7, 2013 at 4:30 AMConvert Your Kids Art Into Party Decorations
Thursday, February 14, 2013 at 1:32 PM
I'm spicing things up today for I Love to Create and making a video with my daughter Tallulah. In the video we are making custom party hats using art work (and some of mom's vintage wrapping paper stash) created by she and her brother. They have a birthday party on the horizon and I wanted them to feel involved and included in the planning.

SUPPLIES
Children's art work
Scissors
Aleene's Fast Grab Tacky Glue
Party horns
Party hats
Decorative trim, stickers, gem stones and more!
I recently read a blog post about how we are letting Pinterest dictate our kids crafts and involvement with crafting projects. I too am guilty of wanting to make things like custom party decorations myself for the pretty finished picture that I can post all over various social networking sites. However, this does not do much for my kids. I wanted my kids to feel involved in their party planning. I wanted them to be proud of the decorations and favors. I wanted them to feel like their crafts were worthy of being pinned.
Eco Fun - Cardboard Tubes - Cool2Craft TV
Friday, July 27, 2012 at 9:00 AMIt's super cool! Cool2Craft TV July 30, 2012: Cardboard Tubes! The Cool2Craft design team is sharing a fun collection of eco-cool cardboard tube craft ideas this week! EcoHeidi Borchers is crafting a Bumble Bee Noisemaker Wand featuring Aleene's Tacky Glue and Tiffany Windsor is transforming paper towel rolls into Floral Stamped Earrings featuring Aleene's Fast Grab Tacky Glue, plus much more!
Craft on!
Crafting with Food. That's Yummy! Cool2Craft TV
Friday, February 24, 2012 at 8:00 AMIt's super cool! Cool2Craft TV February 27, 2012: That's Yummy - We're heading to the kitchen for this week's creative inspiration! EcoHeidi Borchers is making fruit themed stickers with Aleene's Tacky Sticker Sheets and Aleene's Magnetic Tacky Dots, Tiffany Windsor is creating a Pasta Art Box with Aleene's Fast Grab Tacky Glue, Savannah Starr adds a splash of glitter to a Make-Up Brush Holder featuring Aleene's Fabric Fusion Peel & Stick Tape and Candace crafts a yummy look of chocolate Candy Ring. It's a terrifically tacky and creatively cool show!
Visit us on Facebook! Craft on!
Glitter Makes Everything Better
Thursday, December 29, 2011 at 7:13 PM

Every January most of us make the same resolution - to lose a little weight. For me, losing the baby weight is on the top of my list. I thought if my scale and I are going to be spending a lot more time together in the near future I might as well make it a little easier on the eyes.

SUPPLIES
Scale
Scrapbook Paper
Collage Pauge
Fast Grab Tacky Glue
Crafty Chica Glitter
Paper Glaze
Scissors
After you choose a decorative paper that tickles your fancy cut it out to the size of your scale. Using Collage Pauge adhere your paper to your scale.

Next trim the paper in Fast Grab Tacky Glue. While the glue was still wet sprinkle red glitter. You might want to try and get your lines a little straighter than I did. Allow the whole thing to dry completely.
When everything is dry give the scale a top coat or two of paper glaze.

Every week when I weigh in to try and reach my goal I'll get to look at bright colors and glitter. Sparkles make everything better, even my weight.
Visit us on Facebook!
Craft on!
MAYA IN THE MOMENT CRAFT: Holiday Tinsel Bracelet
Wednesday, December 7, 2011 at 12:45 PMThis is what you need:
- bracelet blank. I used one from DIY Bangles, but you can make your own from cardboard or anything.TIP: Get a bracelet that is one size LARGER than your wrist because after you apply the tinsel, it will be smaller.
- Aleene's Tacky Glue (my favorite is called Fast Grab because it is super thick an
- Metallic tinsel, about 12"
- Assorted little holiday charms and toys. You can find these in the miniature objects section of the craft store. My mom got these from Silver Crow Creations
Apply the glue inside the bracelet and spread it around with your finger. Next, wrap the bracelet with the tinsel. Let dry.
Use scissors to give the tinsel a massive haircut! Cut away from the inside and the outside of the bracelet as much as you can.
Choose your items and glue them in place. You can use clothespins to keep them in place while the glue dries. Also add little crystals and anything to liven up your bracelet.
Visit us on Facebook!
Craft on!
Christmas Cutie Pattern Stand Up Doll
Friday, November 25, 2011 at 8:56 AM

Ya, ya, ya I know I did a project using my vintage pattern girls just a few weeks ago. So sue me. She was fall themed, had a fabric dress and was in a frame. This new and improved Christmas cutie has a fresh spin on the same illustrations and it is the perfect project to kick off all the Christmas crafting you have planned.
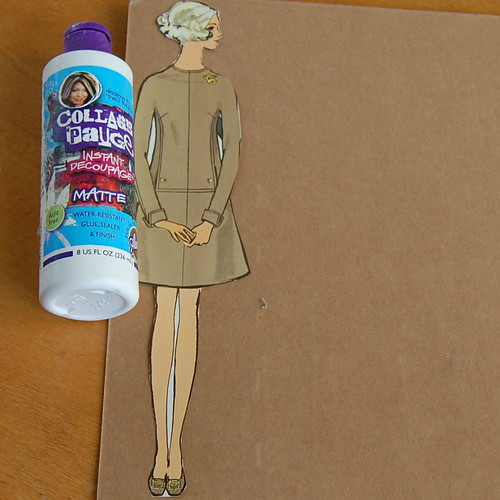
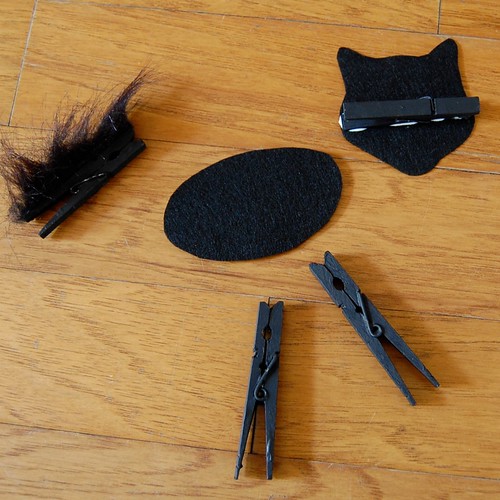
SUPPLIES
Vintage Sewing Pattern Image
Scissors
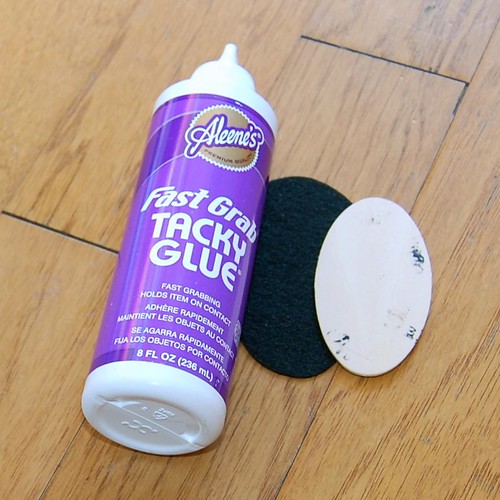
Aleene's Quick Dry Glue
Rick Rack
Scrapbooking Paper
Foam Board
Chip Board
Collage Pauge
Tracing Paper
Pencil
Red Pen
Jolee's Scrapbooking Elements
Crafty Chica Paint White
Craft Knife
Paint Brush
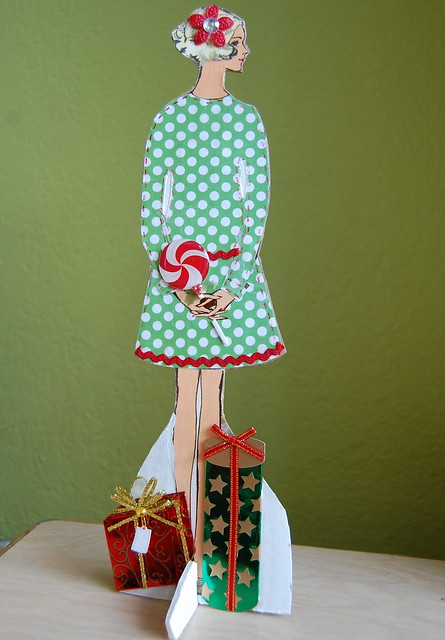
Let me start by saying just because you don't have a vintage pattern book does not mean you can not play along. Pick up a vintage sewing pattern at the thrift store to use for the graphic. Choose a full length picture of a model from a magazine. Better yet have a friend take a picture of you to print out and use!
Once you have your desired image to make into a wee little stand up cut her out. Place your image on a piece of foam board, cardboard or chipboard and decoupage. I used a combination.

At some point either before or after you cut out your image trace the dress. This will give you a pattern to work with. I suggest using a fairly simple design. Also, a lesson I learned the hard way is you should cut out the hands to glue on separate. I'll explain in a minute.

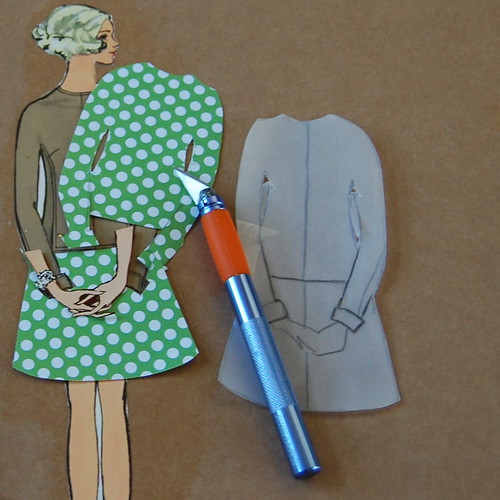
After you have your pattern made from tracing paper you can place it on scrapbook paper or thin fabric to make a new and improved dress. Use a craft knife to cut out the detailed spots like between the arms and body. This is where I should have cut out her hands completely before I decoupaged her to chipboard. No worries, I just stole hands from another image. This way you don't have to do all the tedious knife work around the hands you can just stick them on top of the new outfit.

The next step after getting your dress decoupaged in place is cutting out your stand up. Leave a wide base at the bottom. This picture lies a little bit. I did cut a slit in the center, but I used a small piece of foam board instead of chipboard as the second part of the base. The foam board is thicker and helps her stand better.


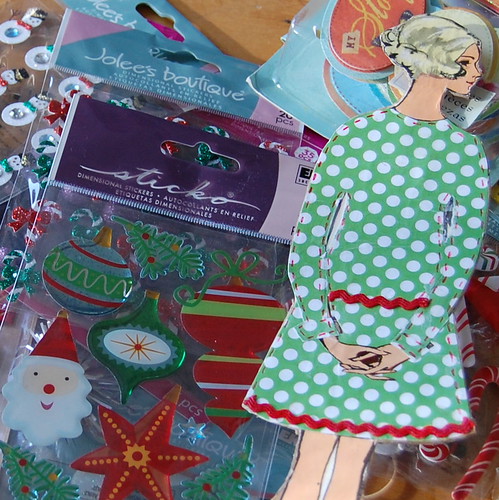
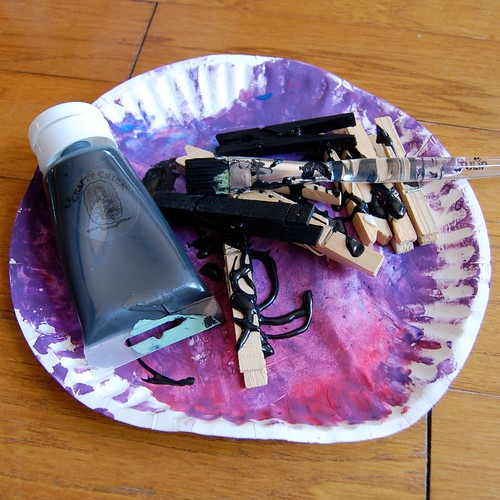
Now for the fun part! Using various vintage bits and pieces, scrapbooking elements, pens and sewing notions you can gussy up your stand up. I used Aleene's Fast Dry Tacky Glue to hold everything in place.

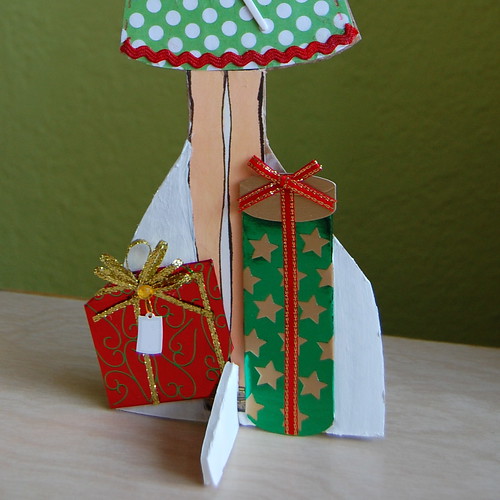
I finished things up by painting the backside and base white with Crafty Chica paint. I used a few wrapped gifts around the base to make things extra festive.

Set your Christmas Cutie anywhere to add an extra touch of kitschy cheer. I can't wait to make a whole slew of these lovely ladies. I also see a shelf sitter version in my future! Love to know if you make your own version.
Visit us on Facebook!
Craft on!
iLoveToCreate Teen Crafts: Hallowe'en Jack-o-lantern Earrings
Wednesday, October 26, 2011 at 12:01 AMCraft on!

Hallowe’en Jack-o-lantern Earrings
Margot Potter for Avalon Potter for iLoveToCreate
Avalon was busy with school this past week and I had some free time, so I agreed to make her project for her. We love Halloween around Casa de Potter, but Avalon isn’t into scary stuff. These little vintage jack-o-lanterns were so cute; they seemed like the perfect fit for a flirty seasonally apropos pair of earrings. Permission free images are easy to find and decoupage on Grungeboard allows you to create water resistant and lightweight jewelry. A little touch of Collage Pauge sparkly and some Glam it Up Crystal accents add the perfect dash of sparkle!

Materials
Grungeboard plain sheets
Permission free jack o lantern (image can be downloaded from here)
2 Small Glam it Up crystals
2 10mm silver tone jump rings
2 silver tone ear wires
Traci Bautista’s Collage Pauge sparkly
Traci Bautista’s Collage Pauge glossy
Aleene’s Fast Grab Tacky Glue
Tools
Hole punch (I used a Crop-a-dile)
Sharp craft scissors
Foam paint applicator tool
Computer with publishing software
Printer

1. The image should be sized correctly, but if you want to print multiples you can size it and put it into publishing software before printing. Print a sheet with at least two jack o lanterns on it. Cut out two.
2. Use glossy decoupage medium to attach images to Grungeboard. Smooth any wrinkles gently with finger tip and allow to dry.

3. Use crop-a-dile to punch a hole in the top center of each jack o lantern.
4. Use sharp scissors to cut out dried jack o lanterns.

5. Paint two thin layers of sparkly decoupage medium on each earring. Allow to dry.
6. Adhere crystals to eyes using glue. Allow to dry.
7. Attach ear wires to earrings using the jump rings.
8. You can decorate the backs of your earrings as you wish, I painted some sparkly dimensional fabric paint on the back of mine.


Creepy Creature Canisters
Thursday, September 29, 2011 at 2:10 PM

Excuse last week's neon bachlorette interruption, it is back to all Halloween all the time around here. This week for I Love to Create I present you with some creepy creature canisters.

SUPPLIES
Set of Canisters
Sheep (ish) yarn
Felt
Scissors
Aleene's Tacky Glue
I love recovering old canisters and making them into something new. Remember my wallpaper covered canisters from last year? This time I went the yarn route. I had a set of 3 canisters from Ikea just waiting to celebrate Halloween properly.
This project is so super duper easy. All you need are some canisters which I see regularly at the thrift store. Round or square will work. Next you will need some Tacky Glue, my preference is some sort of fast grab. I am in love with the colors in my friend Vickie Howell's new yarn line Sheep(ish) so I grabbed a ball of blue, green, orange and got to wrapping.

Starting at the top or the bottom wrap your entire canister in yarn. You will need a dab of glue when you finish to keep your yarn from unravelling. I wrapped the starting piece of yarn to hold it in place.

Once your canister is totally wrapped it is time to adorn with felt and more yarn. You could use white yarn for ghosts or mummies, brown yarn for werewolves, green yarn for witches - the options are endless. Now what kind of sweet treats shall I put in my canisters?

Check out more Halloween fun here and more I Love to Create posts here.
Visit us on Facebook!
Craft on! Click here for today's daily giveaway!
Black Clothespin Cat Party Favor
Thursday, September 15, 2011 at 1:32 PM

I tried really hard to wait until October to start the Halloween crafts, I really did. I figured if my Halloween decorations are already up, the pumpkins are all out at the grocery store and Target's Halloween department is brimming with orange and black goodness I could go ahead and start the creepy crafts. Today's craft is a double whammy, creepy and educational.

I am gearing up for my annual kids Halloween party. I already bought the goodie bags all I have to do is fill them. In years past I have made soap and crayons, this year I thought the kids were old enough for a little game. Clothespins are a great way for toddlers to practice their fine motor skills - all that squeezing to open and close the pin.

SUPLIES
Pre-stiffened Black Craft Felt
4 Wooden Clothespins
Black Crafty Chica Paint
Black Fun Fur
Martha Stewart Black Cat Face Template
Scissors
Aleene's Tacky Glue
June Tailor Fabric for Printers
Printer
Steam a Seam 2
Oval Shaped Wooden Disc

The first thing I did was paint all 4 of my clothespins black. Two pins will act as legs for the cat, one will be the tail and the other will hold the cats head.

Next I cut my stiffened craft felt into the shape of a cat body. You could also use black foam or card stock for the body. The point is you want it stiff enough to hold it's shape. I found that I needed to glue a piece of wood to the back. I used Tacky Glue and a thin wooden oval from the craft department.

After your body is cut it is time to make the tail. Trace the shape of the clothespin onto the un-furry side of the fun fur. Next cut out out the small rectangle trying not to get fun fur all over the place. Using tacky glue attach the strip of fur to one of the clothespins.

For the head I used a template from Martha Stewart's most recent Halloween magazine. Print out your head onto June Tailor fabric for printers. I enlarged the heads a bit. Peel the protective top coat from one side of your Steam a Seam and attach to the back of your cat head. Next cut a piece of stiffened felt about the size of the head. Peel the second backing from your steam-a-seam and attach to your felt. Cut out the shape of the cat head. Use a hot dry iron to fuse everything together.

Once your head is ready using Tacky Glue attach it to one of the clothespins.

All that is left to do is assemble all the pieces or help your toddler do it. Now I just have to make like 30 more of these and I'll be ready!

*I would also like to mention if you kids are under 3 or still prone to putting things in their mouth this is not a great project. It does not take much for the metal clothespin center to pop out and become a choking hazard*
Visit us on Facebook!
Craft on! Click here for today's daily giveaway!