
Last week for
I Love to Create I made a
toddler themed Easter basket for Tallulah and this week I am showing you a few options for the extra wee ones. This is technically Baxter's second Easter, but he was only about a month old last year. This year he is old enough to get a basket full of goodies and maybe even hunt for an egg or two. I was inspired by a post I saw on
Modern Parents Messy Kids where they made activity oriented Easter baskets. Now that Baxter has been diagnosed with a fairly severe peanut allergy it is not like I can load the kids baskets up with candy. They don't need candy anyway, but now that we are living in a nut free world it seems like every chocolate Easter bunny is no longer a friend but a foe with hidden nuts. The suggestions I have for my baskets will entertain your kids for a lot longer than a piece of candy and there is no risk of a sugar buzz.
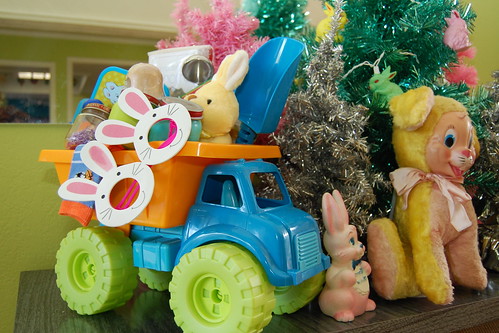
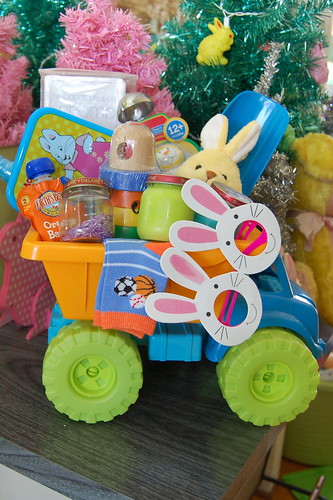
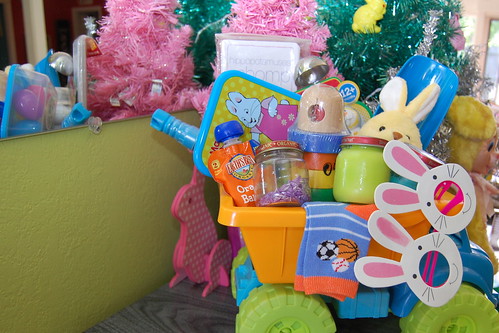
Even your Easter basket should be something fun to play with. Tallulah got the sand pail and Baxter gets a dump truck. Make your basket functional and not something cheap that will get thrown out. Heck,
make your own out of recycled paper if you want. Anyway, both kids will get to use their baskets soon enough in the new green turtle sandbox their grandmother got them that I have filled with...wait for it....pink sand.

Like Tallulah not everything in Baxter's Easter Basket is handmade. Here are a few suggestions for baby baskets...
Bubbles (he is a little young for them, but his sister will help)
Socks (Can you really ever have too many?)
Stuffed Bunny (his sister was getting one so I thought he might like something to cuddle)
Bunny Glasses (futures so bright, I gotta wear bunny shades)
Ikea stacking rings (I have a plush version that is getting a little flacid)
My First Crayolas (he always watches Tallulah color longingly)
Board Book (nothing says Easter like pictures of cute puppies)
Flash Cards (who does not like to learn about animal sounds)
Ok, onto the stuff I did make!

Tallulah probably paints every single day. Poor Baxter just gets to sit on the sidelines and watch most of the time. Occasionally I will give him some pudding and put him on a piece of posterboard or in the tub and he has such a good time. Usually he just paints with chocolate pudding, but for Easter I decided to expand his color options.

Using empty baby food jars I used my trusty cheap pudding, but this time I chose vanilla and added food coloring. Nothing fancy, but I know he will love playing with this. I'll set him up outside one hot day soon and just hose him off when he is done. If he does not lick himself clean first.

Have you ever noticed most plastic Easter eggs have 2 small holes on both ends? I'm not sure why, but they do. These holes inspired me to try a version of a project I have seen on Pinterest where you engage a child's sense of smell.
SUPPLIESPlastic Easter Eggs
Glue Gun
Aleene's Tacky Dots
Spices

I applied 2 Tacky Dots to both sides of the inside of my Easter Egg. Next I shook a separate spice into each egg. Use strong easy to smell spices like curry and cinnamon. I closed my egg and shook the spice around then opened up and dumped out the excess. Plenty of spice stuck to my glue dots. Next use a glue gun to seal your egg closed. I just did a blind smell test with husband and they totally work. A half dozen fit perfectly inside a small Max and Ruby tupperware.

Baxter is a little old for rattles, but I couldn't resist making one of these jars of rice. I have seen them all over Pinterest and Modern Parents Messy Kids made some for their baby basket. You can use the food coloring and alcohol method like I did with the pasta I dyed for Tallulah or you can just spray fabric dye from Tulip.
 SUPPLIES
Rice
Tulip Spray Dye
Baby Food Jar
Aleene's Tacky Glue
I spread my rice out on a paper plate and sprayed with fabric dye. I let the rice dry and then tossed and sprayed again. All that was left to do was fill an empty baby food jar and glue the lid on.
Hopefully Baxter and Tallulah will spend hours upon hours quietly entertaining themselves with their baskets and the contents. Then again, maybe not. I should also mention that you should supervise all these activities with your wee ones. Things like glass rattles should be investigated on grass or carpet not cement or hardwood. You get the drift. Have fun and happy Easter!
Here are a few other suggestions of fun goodies to make for your babies Easter basket:
stenciled onesies,
customized bibs,
sensory bottles,
grandparent's puzzle,
pull toy,
booties.
Visit us on Facebook!Craft on!