Liter Bottle Terrarium

Friday, March 19, 2010


Make a terrarium from a liter bottle and watch plants grow! Liquid Fusion™ is perfect for this project – it keeps all your treasures in place that decorate the terrarium..

Supplies
– Liquid Fusion™ Clear Urethane Glue
– Marker
– Pebbles
– Tumbled glass pieces
– Scissors
– Liter bottle
– Dessert plate
– Wax paper
– Terra Cotta pot
– Low tack masking tape
– Craft stick

Instructions
1. Wash and dry liter bottle. Have a parent use scissors to cut bottom fourth from liter bottle.

2. Line up tumbled glass pieces, small pebbles or driftwood along edge of dessert plate. Pick up a piece and add a drop of Liquid Fusion to back. Press back in place. A small piece of tape can be used to hold in place till dry if needed. Continue with remainder around plate. Let dry.

3. Place liter bottle, cut edge down, on a piece of waxed paper. Apply a dot of glue to back of smooth pebble then press at cut edge, letting stone rest on waxed paper. Hold in place with tape till dry. Continue around entire bottom of bottle.

4. Place terra cotta pot upside down on waxed paper. Glue pebbles around edge of pot letting them rest on surface. Hold in place with tape till dry.

5. To create plant marker, glue a stone at end of craft stick, let dry, then use pen to write what kind of plant it is.

6. Glue a slightly larger pebble on top of liter bottle to create handle.

El Tigre T-Shirt Applique

Thursday, March 18, 2010

Two of my favorite things are tigers and hoodies, so today's I Love to Create project is about combining forces with the two of them. What was once an old T-shirt headed for Goodwill is now a fancy applique on my brand new hoodie.


SUPPLIES
T-shirt with a design
Hoodie
Tulip Fashion Graffiti Stencil
Tulip Soft Fabric Paint
Sponge Brush
Embroidery Supplies
Tulip Fashion Graffiti Dimensional Paint Taggers
Steam a Seam
Scissors
Iron
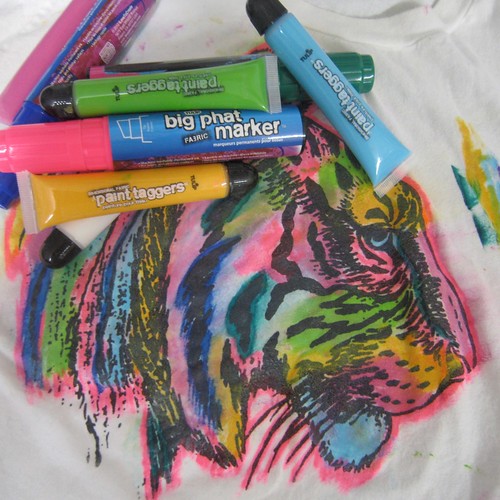
Tulip Fashion Graffiti Big Phat Markers


OLD T-SHIRTS ARE NEW AGAIN
I have so many T-shirts in my closet that either no longer fit me, have been stained or somehow managed to get holes in them. The graphics on these shirts are still as cute as when i bought them, they just need to be transfered onto something else. Like a hoodie for example, but there is nothing that says I could use these T-shirt appliques on another T-shirt, tote bag, you name it!


RAINBOW TIGER
I used a combination of Tulip Big Phat Markers and Tulip Paint Taggers to color my tiger. I was inspired by the screen printing of 1Aeon.


APPLIQUE
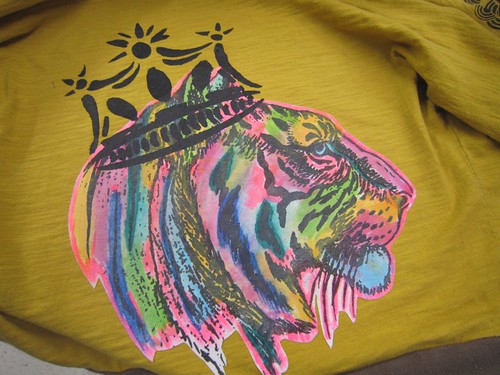
Once the tiger's paint had dried I cut him out using scissors. I used Steam a Seam and an iron to adhere him to the back of my hoodie. I decided the El Tigre needed a little something extra, like a crown.


STENCIL
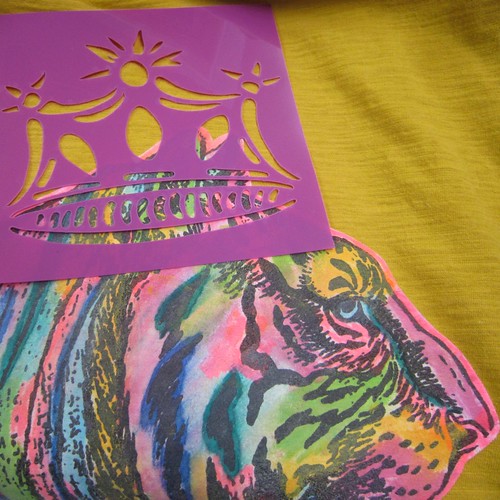
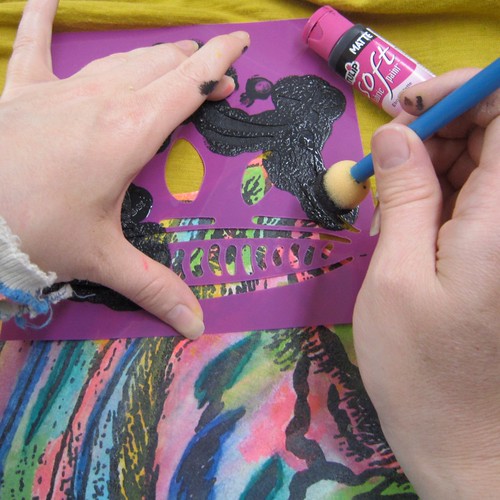
Using a Tulip Fashion Graffiti stencil I placed the crown on my tiger. I used a sponge brush and Tulip Soft Fabric paint in black to add the crown. I allowed the stencil to dry completely.


EL TIGRE IS CROWNED
My hoodie was looking better with every step. My old T-shirt has already gone on to a better place. I could have stopped here, but I thought it might be nice to augment my crown a bit.


EMBROIDERY TIME
To give my hoodie a little something extra, not to mention hold my applique in place I decided to embroider the whole thing. I went around the edge of my tiger and accented the crown.


FROM T-SHIRT TO APPLIQUE
I heart my new hoodie and am so glad I did not have to part with my beloved Tiger T-shirt. I have several of Tallulah's onesies that she has either stained or outgrown that I plan on converting into appliques to adorn a whole new summer wardrobe with. You get way more bang for your clothes buying buck this way, not to mention it was pretty dang fun!

Recycled Silver Bangle bracelet


Can you believe it started as a plastic water bottle? No one will believe this custom bracelet is reclaimed and reworked plastic.
Materials:
– Tulip® 3D Fashion Paint™ in Silver Metallics
– Pencil
– Masking tape
– Paper towel
– Scissors
– Plastic drink bottle, 20 oz.
– Tracing paper
– Craft knife
– Aluminum metal tape (plumbing dept – home improvement stores)
– pattern (click here for pattern)

1. Wash and dry bottle. Carefully cut off top and bottom of bottle using craft knife, leaving smooth center.
2. To create bracelet, cut lengthwise down center section. Use scissors to cut a 2” wide strip.
3. Apply metal tape to bracelet, smoothing out any wrinkles. Use scissors to trim edges straight if needed.
4. Wrap bracelet around a jar or bottle and tape ends in place to secure.
5. Trace pattern onto tracing paper. Position pattern in place on bracelet and add a piece of tape to secure. Use pencil to trace over lines leaving an impression on bracelet.
6. Start flow of dimensional paint on paper towels, using an even pressure on bottle for a smooth line. Referring to photo, squeeze thick lines of Silver Metallic over pattern. Set aside to dry.