I've been seeing these skull scarves pop up everywhere and when I finally received one, I didn't want it to look like everyone else's. And that's when my crafty skills came into play.
Here at la casa Murillo, Dia de los Muertos is in high season! While I have a face paint kit out on the market, some people would rather wear a mask - totally understandable! I was at the dollar store recently and came across some scary felt masks shaped as skulls. My first thought was to paint over them, but then I thought - why not flip them around and decorate the back sides of them? It worked! If you can't find these at the dollar store, just pick up some stuff felt at the craft store, draw a template and use it to cut out your masks.
If you are near a Michaels store these days, make sure to look in the apparel section for my new Crafty Chica Dia de los Muertos endcap! I have a lot of fun, new items to embellish your projects, all celebrating Dia de los Muertos.
Today is Dia de los Muertos and while the mainstream world thinks that only involves adorable sugar skulls and clever skull designs, I'm here to share the true foundation of what it's all about - the ofrenda!
November 1st and 2nd are the days when the spirits who have crossed over are able to rejoin their loved ones for one night. November 1st is for the children, and November 2nd is for the adults. In Mexico, many families visit the gravesites and decorate the area with marigold flowers, copal candles, and a hot plate of food (the scents help the spirits find their way here).
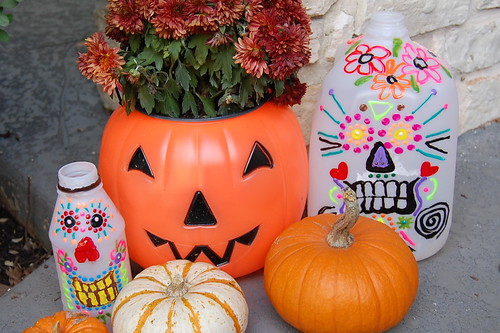
Some don't go to the cemetery at all and instead build an ofrenda big or small in their own home. Some use a whole bedroom, while others are content with the top of a dresser, or even their front porch, like Yoli!
Ofrendas aren't always dedicated to specific people. Arizona artist Emily Costello made this installation in honor of abducted children. She has toys, candies and candles of the guardian angels to protect and help guide the children in the afterlife.
Collective ofrenda - This is an altar my craft group made for Frida Kahlo. We added strands of mini lights to make it all glow! We each contributed components that were special to us.
My husband made this one! The theme is Eternal Love and celebrates his grandparents wedding.The dresser is is Grandma Minnies, it's 75 years old. The dress and veil is also hers. He created the body from papier mache. She is looking into the mirror reflecting on her wedding day.
I was at Dollar Tree recently and came across these giant felt skulls in the Halloween section. Hello, can you say "reverse stencil?" All you need is the felt skull (if you can't find one, cut your own on a large piece of watercolor paper), a white shirt, Tulip Fabric Spray in black and a piece of cardboard to go inside the shirt while you spray.
Pre-wash the shirt. Insert the cardboard inside. Set down the stencil. Spray on top. Scrunch the arms and spray them too. Remove stencil, let set for a few hours. Wash in cold water. Hang dry.
Other ideas! - Use on a patterned shirt, or spray different colors before you spray the black. Decorate the skull with other colors of paints! Heck, throw on some glitter spray too!
Dia de los Muertos is November 1st and 2nd and party planning is already in heavy action! If you're looking for a super cool party favor to hand out to your guests, I have the perfect idea!
Mini-silkscreens!
Think about it, everyone can take home a mini-DIY kit and can celebrate Dia de los Muertos in their own artful way with their own cutemini-screen. To make it even easier for you, I'm including printable graphics that you can download to use (for personal use only).
Cut up the images, make sure to leave a border around the edges for them to add paint.
Print and cut your labels, get the bags and paint ready.
If you want, you can print a sample on a fabric swatch OR you can insert a blank swatch so they can do it themselves later.
Put all the goodies in the bag, you can also add a little paper with directions if you want. Let them know to rinse their screen after each use so they can use it over and over on fabric, paper, lots of other surfaces too!
Put them all together in a bowl! You can have a silkscreen activity at your party, or they can take them to go. IDEA: You can do this same concept for all kinds of events and parties. Maybe burn a silhouette of your party guest, or a name, etc. The screen is big enough that you can cut out multiple designs.
The Crafty Chica endcap program at Michaels is going strong, thank you to all of you out there who have been shopping and proving that there is a market for crafty Dia de los Muertos items! Here is the latest round of craft blogger designs using everything from the totes to the flocked iron-ons to the juicy fabric inks!
Dia de los Muertos (Nov 1 and 2) is a celebration of life. It's 3,000 year-old Mexican holiday where you honor your loved ones and ancestors who have passed away. You remember their lives and celebrate all they brought to the world. It's not meant to be scary, but fun, meaningful and colorful. :-)
Place tape in vertical strips, I narrowed mine in the center to emphasis a smaller waist. Press the tape so it if firmly on the fabric with no bumps. Spray the black on the fabric.
A lot of paint will collect on the tape, so use a brush and pick it up and use it to paint over the opene spaces to make the black even more opaque. If it's easier, you can even pour some of the paint int a cup and touch up smaller areas that need it.
While the paint dries, go ahead and iron on your Crafty Chica transfer to a piece of fabric. Let it cool and then peel off the plastic.Use pinking shears and cut around the edges of the design to make your applique.
Remove tape then let it dry for at least ten minutes or until paint is completely dry.
Spray on the hot pink paint, let dry then if you want more design/texture add dashes with the fabric marker.
Turn over the applique and apply the Fabric Fusion Peel and Stick Sheets. Press the applique in place. The adhesive is meant to be washed and even dry cleaned, so no sewing is needed!
And here it is!! Thanks for checking our my project! Come visit me on Facebook, http:www.facebook.com/mayainthemoment
ALSO...check out my new love song video! Let me know what you think!
For those who attend - we're going to have a special gift if you purchase Crafty Chica products, plus freebies: commemorative Crafty Chica temporary tattoos, buttons and more! I'll also have a display of finished craft projects showing what you can do with the products. Oh, and I'll have books too! There is limited supplies of the goodies, so get there early!
Now wait, what if you don't live near one of the stores that sells the products? You can buy the items online at iLoveToCreate.com (should be posted soon). Now, I'm going to have fun on this road trip. I'm making special pieces of art and will be leaving them along the way throughout the tour in random places. I'll be posting the locations on my Instagram and my Facebook page - so if you live in Phoenix or California, stay tuned, you might score one of them! If you do, share a photo on my Facebook page!
Lastly, I have to give special thanks toLa Quinta Inn & Suitesfor sponsoring this tour. They are providing us rooms each night, we couldn't have done it without them! And also, gracias to iLovetoCreate and Michaels for making it all happen!
APPEARANCE DATES AND LOCATIONS
Phoenix Kick-off party! Thursday, September 13th, 6-8 pm 1925 E Camelback Rd, Phoenix, AZ
This week I'm kicking off my Dia de los Muertos project inspiration series!
Dia de los Muertos is a 3,000 year-old holiday from Mexico that celebrates the lives of those who have passed on. Sometimes it is at the gravesite, other times it is at home in front of an altar or ofrenda that we build for them.
CHECK BACK HERE EVERY DAY THIS WEEK FOR MORE PROJECT IDEAS!
Day of the Dead Timeline
Dia de los Muertos takes place over three days. Each day of the celebration has specific activities associated with it. Artwork by my husband, Patrick Murillo.
October 31
Infants and children who have died are angelitos, or "little angels." They follow the path of marigolds home, where their families have altars with pan de muertos, sweet tamales and sugar calaveras.
November 1
The angelitos must be gone. The offerings at the altars are appointed for the "faithful dead" or adult souls with pan de muertos, tamales, mole, cigarettes and tequila.
November 2
Mummers run around town wearing masks to chase the stubborn souls back to the land of the dead.
Within the next two weeks, I'll share ideas for making your own ofrenda to making crafts to display. You will rarely see a scary skeleton. Dia de los Muertos skeletons are most often jovial and happy. Their spirit is still alive, even though their bodies are not here.
Not all ofrendas have to have skeletons, they can be any way you like. Building a memory shrine to a loved one is whatever you want it to be. Set out their favorite foods, drinks, hobbies, photos and more.
You'll see a lot of sugar skulls - my favorite! The colorful icing represents the sweetness of life.
My mom, The Crafty Chica, has a new product line out at Michaels Stores through November 11! I thought I'd use some of her supplies to make some Day of the Dead hair accessories. The first one I made is this headband!
You'll need a headband and a piece of felt. Plus the design stuff. Here is a link to all the Crafty Chica products! I used the Flocked Iron On and ironed it to a piece of glittered canvas. I then added feathers and gems.
Once you finish the design, glue it to the headband and glue the piece of felt to hold it in place.
Here is my other project, a hair clip! I had a headband with a big zipper thingy that I didn't like, so I revamped it into a hair clip! I added Beads in a Bottle and glued the Crafty Chica applique in the center and added a dangling feather!
This is a JUMBO hair clip - but if you want you could make it a pin or wristlet...The main objective is to have fun and be bold and colorful!