Showing posts with label skulls. Show all posts

CRAFTY CHICA: Reverse Stencil Skull Shirt

Friday, October 12, 2012

I was at Dollar Tree recently and came across these giant felt skulls in the Halloween section. Hello, can you say "reverse stencil?"
All you need is the felt skull (if you can't find one, cut your own on a large piece of watercolor paper),  a white shirt, Tulip Fabric Spray in black and a piece of cardboard to go inside the shirt while you spray.
Pre-wash the shirt.
Insert the cardboard inside.
Set down the stencil.
Spray on top. Scrunch the arms and spray them too.
Remove stencil, let set for a few hours.
Wash in cold water. Hang dry.

Other ideas!
- Use on a patterned shirt, or spray different colors before you spray the black. Decorate the skull with other colors of paints! Heck, throw on some glitter spray too!

Halloween Goody Bags with Crayon Cucpakes

Thursday, October 14, 2010


Finding cute, not goofy, goody bags can really be the bane of a party throwing mother's existence. Trust me, I know from experience. As usual it was left to me to take crafty matters into my own hands.


SUPPLIES
Decorative Paper
Decorative Edge Scissors
Aleene's Acid Free Tacky Glue Stick
Goodie Bag Fillers - including Crafty Chica Skull Iron-On


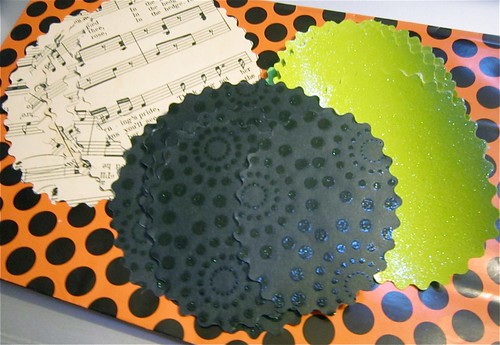
Luckily I found some cute polka dotted bags at Hobby Lobby to work with. From here I cut ovals out in 3 different sizes with scalloped edge scissors.


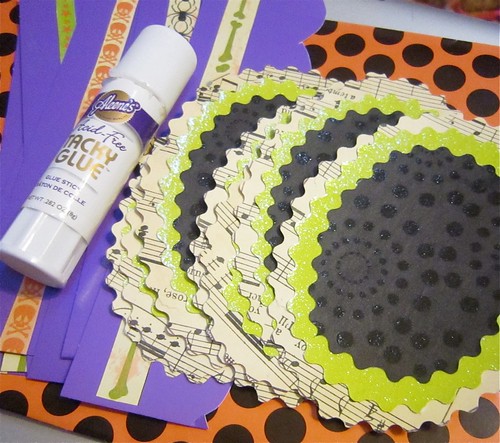
Using my Aleene's Acid Free Tacky Glue Stick I layered all my pieces together. I also made a purple border that I glued a strip of Halloween paper to.


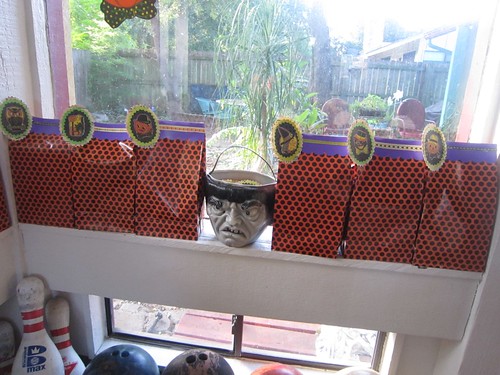
I attached my toppers to the bags using a stapler. Wanna see what's inside?


Here is all the loot for the wee little ghosts and goblins - bubbles, Crafty Chica Iron On's for their creative moms, books and crayon cupcakes. Don't know how to make crayon cupcakes? They are super easy let me show you how!


All you will need are crayons and a muffin tin. I used the same Halloween themed tin I used last year to make soap.


Peel the wrappers off of your crayons, break them into small pieces and fill your muffin tins.


I placed the tin in the oven at 250 and waited for the crayons to melt. All that was left to do was wait for them to harden and they slid right out of the tin. Much easier for toddlers to hold and color with than traditional crayons.


Now all the goody bags are waiting on my windowsills for this weekend's Pint Sized Halloween Party. I hope they are a big hit.


Craft on!Click here for today's daily giveaway!

Baby Blocks that go Boo!

Thursday, October 7, 2010


Shopping for not so cheesy Halloween decorations can be a daunting task. Maybe there are people out there that don't want dismembered limbs laying about. That being the case we crafty types have to take matters into our own hands and create our own.


SUPPLIES
Decorative Ribbon
Clothes Pins
Crafty Chica Little Chica Paint Pack
Paint Brush (medium & tiny)
Decorative Chipboard
Tulip Fashion Glitter Orange
Small Glittered Skulls
Wooden Blocks
Aleene's Fast Grab Tacky Glue
Scrap Book Paper
Stapler
Liquid Fusion Glue
2 Small Pom Poms


I have gotten a lot of bang for my buck on the bag of wooden baby blocks I bought at the thrift store. You might remember I also used them to decorate for Tallulah's 1st Birthday Party. This time around I painted the blocks black with Crafty Chica Paint. I coated the front of the blocks lightly making sure to just get certain parts of the block painted so that there would still be white showing.


Once the paint dried I went back with a tiny paint brush and covered each letter with Fast Grab Tacky Glue. While the glue was still wet I sprinkled Tulip Fashion Glitter in orange.


While my glue was drying I made party hats for my skulls. I used Halloween themed scrapbook paper, this template and Aleene's Fast Grab Tacky Glue to make the actual hat.


Next I cut 8 2"(ish) strips of decorative ribbon. Fold each ribbon in half and staple. Once you have all 8 done use Aleene's Fast Grab Tacky Glue to attach them all together to create a ribbon flower. I glued a small piece Halloween chipboard in the center. Use a clothespin to hold the whole thing together while it dries.


While my party hats were drying I used Liquid Fusion Glue to attach all my blocks together. I also glued my glittery skulls to either side of the block sculpture.


All that was left to do was attach my decorations to the paper hats and then attach the hats to the skulls. I used Aleene's Fast Grab Tacky Glue for both.


I displayed my new Halloween blocks alongside my black cat collection and a few of last year's I Love to Create projects like my Hiss Banner and Black Cat Bobble Head.

Have you been whipping up anything fun for Halloween this year? I'd love to hear about it.

Craft on!Click here for today's daily giveaway!

Skull Bookmarks

Thursday, September 30, 2010


Flashy Fabric Bookmarks

Designed by Kathy Cano-Murillo
We all know reading is more fun with fancy bookmarks, right? Here is a sparkly way to liven up the whole page turning experience!


Craft on! Click here for today's daily giveaway!