A cute floral design mixed with stripes make these DIY Floral Sneakers not only fun and fashionable but keep your tootsies comfy too!

I’m in love with all the fun patterned sneakers you see everywhere for spring. But even better than going out and buying the same ones you see in the stores, create your own unique and colorful ones. These fabric markers from Tulip make it sooo easy do too! And they dry really quickly with minimal smell, bonus!


TOOLS & MATERIALS:
- Sneakers
- Tulip Fabric Markers
- Pencil
- Ruler
- Flexible curve (optional)
 step 1
Decide what pattern you want to use for your sneakers.
I recommend drawing it out on paper to help you decide on size and placement.
Using your pencil draw lightly on your sneakers to mark your flower outlines.

step 2
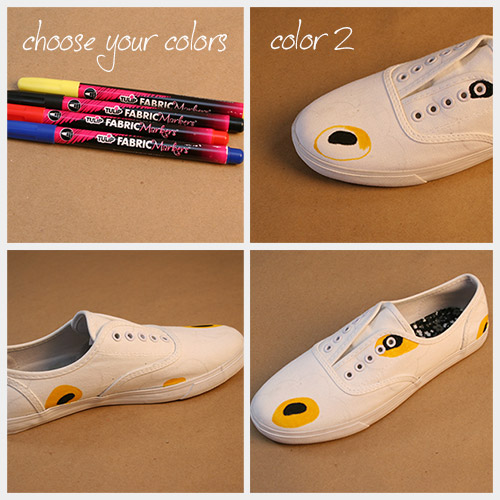
Start coloring in your flowers.
TIP: I recommend working on one color at a time, for example color all the black centers, then all of the yellow, etc. This will help you to keep the look and color placement on your shoes more balanced.
I started in the centers of the flowers and worked out.
First black centers.

step 3
Then the yellow around the black.
step 4
Then the red flowers.

step 5
Once you’ve colored in all your flowers you’re ready to make your stripes.
Decide how wide you want your stripes to be. (I made mine 3/8 of an inch wide.)
Draw them on your shoes using your ruler.
TIP: If you have a flexible curve this will help with drawing straight lines around your not so flat shoes. You can also use a heavy paper or bristol board anything flexible and straight to help make straight lines.

step 6
Once you have all your stripes drawn in you’re ready to color them in.


This is my first post for iLoveToCreate. I’m so happy to be a part of such an amazing group of talented, crafty people and I can’t wait to get started on my next DIY project to share with you!
To see more of my projects and DIY tutorials check out trinketsinbloom.com.
To see more of my projects and DIY tutorials check out trinketsinbloom.com.


