Showing posts with label Tulip Body Art. Show all posts

Messenger Bag DIY

Monday, September 9, 2013


Add a personal touch to a plain canvas bag, using stencils, fabric markers and fabric spray paints to create a cool personalized Messenger Bag DIY. I used the Tulip Body Art Stencils to create tattoo inspired designs on this bag, by filling them in with fabric markers. This is a really cool and simple way to create designs and patterns quickly and easily. 

Read more »

DIY Glittered Body Art

Wednesday, June 26, 2013
Whenever I am at the boardwalk I see booths set up where you can get temporary glitter tattoos or other kinds of body art. As a little kid the thought of having glitter and butterflies all over my arms and face sounded rather delightful. Tulip’s body art is great because instead of paying someone for a one time tattoo you can get multiple stencils and colors that can be used time and time again. It is great for going to the beach, the pool, a party, or a sleepover with your friends. I have wanted to showcase Tulip Body Art in a tutorial for a long time now, so I hope you enjoy it and make some awesome designs of your own! 
What you need:
Blue Glitter
Silver Glitter
Adhesive
Small brush
Large brush
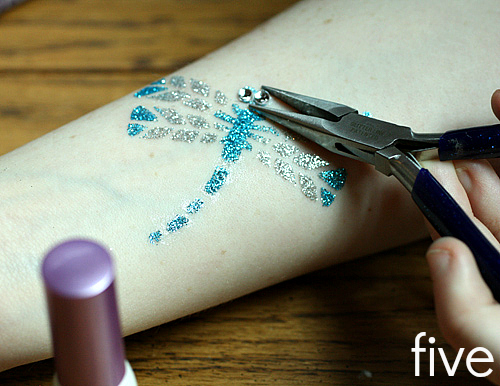
Dragonfly Stencil
Body Crystals
Remove stencil from backing and adhere to skin.  Rub gently to make sure there are no air pockets.
Brush glue on open areas of stencil.  We left stencil on for the next step, you can opt to remove it according to instructions.
Dip brush into glitter and pounce/pat into stencil. A generous helping is good!  We used blue for the body, head and wing tips and silver for the inside of the wings.  You have to work quickly or the glue will dry. It is similar to eyelash adhesive.
Remove stencil.  Use larger brush to gently brush off any excess glitter.
Use tweezers, pliers or a crayon to pick up crystals.  Dip them into glue and gently adhere to eyes of dragonfly.  Add more if you like!
That's it!  These are so easy and fun!  I'm going to bring them to my next sleepover and share them with my BFF!  I really love them and best of all, I love that they last several days, but not forever.  
We'd love to see what you do with Tulip Body Art!  Visit us on Facebook and share your photos.  And visit my mom at DIY Doyenne for more fashion and style!

Tulip Body Art Markers: Temporary Tattoo

Wednesday, June 19, 2013
Hey everyone! I have been itching to get another tattoo just like this. But I'm very indecisive. So, using, Tulip Body Art Markers, and help from my dad, I asked my dad if he could draw me a rose to see if I could really handle another!

 SUPPLIES:  

 First, outline your design with your with the shimmer stick. If you mess up, you can take it off easy with a wipe!
  
 Next, Color in the design with the marker. To make it look like the rose had a bit of a shine, he didn't fill it in all the way. After this filling this, fill in the leaves. These markers dry right away, so don't worry about smearing it!  To take it off, use soap and water.
 
There you have it! Your own painless tattoo! I had this on for about a day and realized I didn't really want another one THIS big. Thank goodness for these body art markers!

Follow me!
mayainthemoment.com
Check out my Dad's Art!


Body Art Birthday & House Warming Party

Monday, April 22, 2013

We had the most fun at my Girlfriends combination 50th Birthday and Home Warming party this past weekend. I thought it would be oodles of creative fun if we painted each others faces and one belly with Tulip's Body Art kit. 
But first we did a little doodling with Tulip's Fabric Markers. I so love these markers! 
Arielle & Tess got really quite and serious while creating their Inspirational statements on this bandana that I purchased from Michaels Craft stores. 
I love the intense look on Tess's face! These girls are super talented! 
We continued to add more artwork through out the night. A really fun and inexpensive way to create and give a gift all at the same time. 
Smile...Your Beautiful! 
Next it was off to Tulips Body Art. I must say that everyone was super eager to paint someone's face, belly or arm. It was so much fun to watch. 
The Birthday Girl and her Lovely daughter Tess picking out a design to paint on momma's face. 
It was so sweet watching these two. 
She did a GREAT job, it was so easy and quick! 
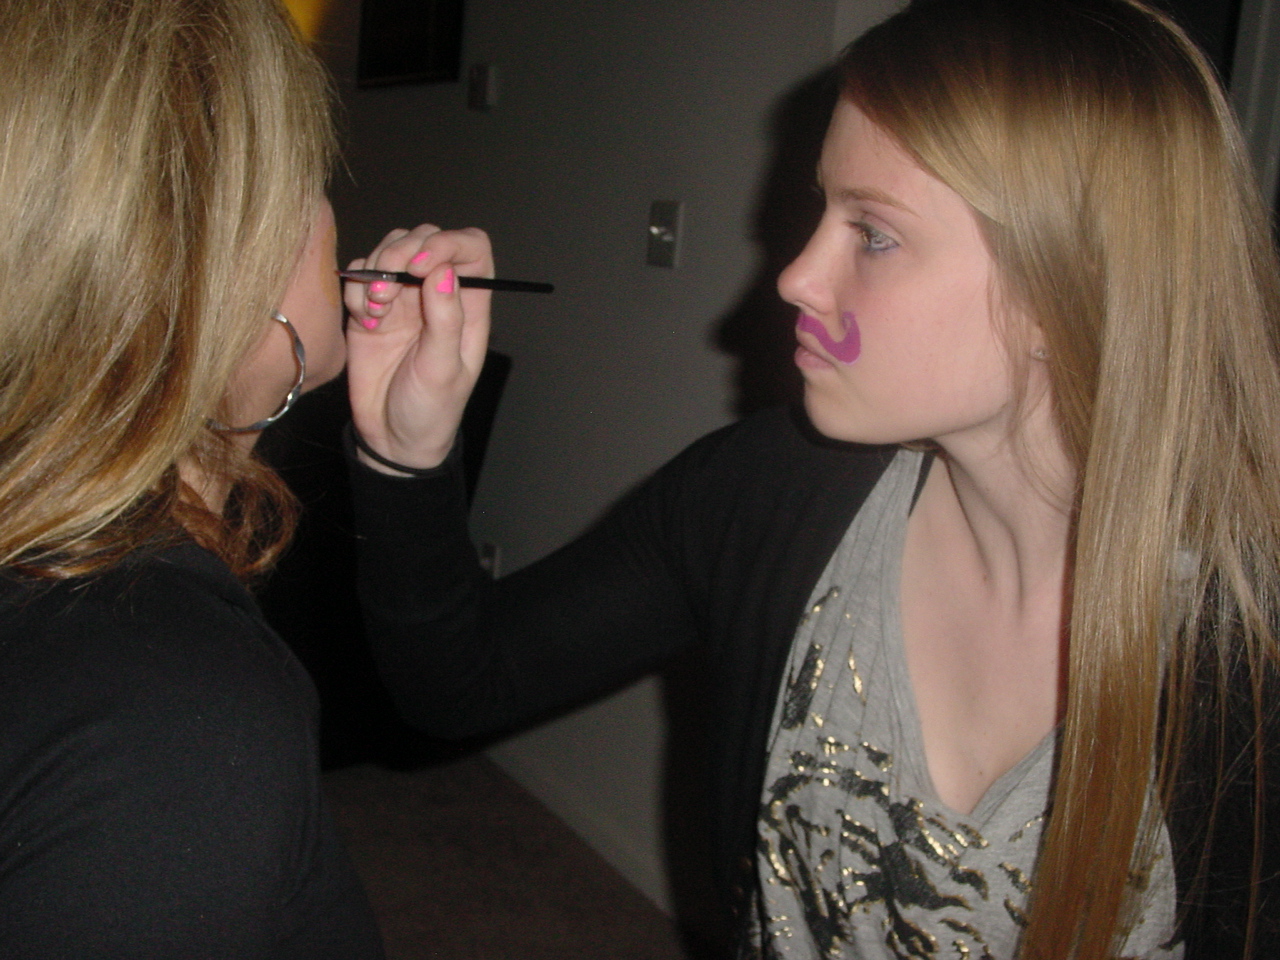
We all picked Kaileen as the perfect candidate for a silly Mustache.
She ROCKED it big time! 
Watching these two almost Newlyweds paint each others faces was beyond Hysterical! 
Not bad......its a Tulip, Tracy's favorite flower.
This girl has "Mad Skills" and she did it so quick! 
Santos, you are such a "Doll Baby", hehe! So cool! 
Hey its called Tulip Body Art, Do my Belly! 
Love how Arielle incorporated Natalie's belly button ring as the nose and mouth for her smiley face!
Hey...Whats that crawling on your forehead? Tess's friend Sam pull out her own free hand painting skills with this Pinterest inspired image of a snail.
and then it was my turn! 
Great job Kaileen! Love my sunshine. 
Needless to say a great time was had by all! We are definitely taking our Tulip Fabric Markers and Body Art to the Jersey Shore this summer. In fact we are already brainstorming on quick and easy images that we can paint for each day. Don't worry I am sure there will be a Blog entry featuring that crazy trip! Enjoy! Jewels 

iLoveToCreate Craft Haul Video with The Impatient Crafter

Wednesday, February 27, 2013

Craft Haul Video for iLoveToCreate  

(from The Impatient Crafter!)


One of my favorite freelance gigs is working as a blogger for the fine folks at iLoveToCreate. They make some of the coolest products in the craft industry and they're some of the nicest people you'll ever meet. Their team is unparalleled, creative, visionary and smart. So when I get a box filled with new goodies to use in my blog posts and designs, it's always a party at Casa de Potter. This time, we decided to film the most auspicious opening of the latest box of awesome. 

Yup, it's an iLoveToCreate Craft Haul Video!  Huzzah!

Be forewarned, I try to keep my tongue firmly planted in my generously rouged cheek at all times.  So if you're looking for a straight forward haul video, this isn't it.  If you're looking for a little chuckle, a lot of chutzpah and a bevy of bodacious products including Tulip Body Art, Tulip Tie Dye, Tulip Glam-it-Up and more...well you've come to the right video!

Enjoy!

xoxo
Madge a.k.a. Margot Potter

Crafty Cinema: 'The Hunger Games' Face Painting & Body Art

Tuesday, February 28, 2012
The Hunger Games-inspired facepainting. My 'tribute' to Katniss Everdeen: Half my face is painted with foliage for hiding in the woods; and the other has flames to go with her initial on-screen debut where she shows off the amazing dress that Cinna makes for her! My husband painted the Mockingjay on my chest because we ran out of room on my face!
I'm a book geek. 
Last year I became addicted to The Hunger Games trilogy. Think of a teenage version of Survivor – with the twist being that only one person will be left breathing at the end of the series. The story is vivid, emotional, multi-layered and features flamboyant people from “The Capitol” who tattoo, paint their faces and bodies in elaborate designs. They even sport huge, crazy wigs, implant whiskers and permanently embed gems into their skin. Anything goes for the sake of fashion! The author leaves the ultimate vision up to the reader’s imagination, and that was enough for me to get creative. 

And with the movie coming out later this month, I put my vision into action using Tulip Body Art!
Click here to see the actors on their mall tour this week.

Body art inspired by people who live at The Captiol. Jewel-toned mosaic blocks with an embedded crystal. This is my friend, Dania from http://LaBeautyPie.com.

I recently gathered some fellow Hunger Games friends and we painted our faces inspired by the characters. The first three are what we think some of the Capitol designs could look like, bold and bright, contrasted by shimmery gold and jewel-tone accents.

The final image is my tribute to Katniss Everdeen, our heroine. Half my face is painted with a forest/jungle theme to help her blend in with her surroundings while the game is being played. The other half is decked out in flickering flames – in honor of her title as “the girl on fire.”
My Katniss-inspired camouflage. See? I told you I was a geek!


More Capitol-inspired designs. Lots of gold accents, like the character of Venia!

Basic painting with glittery designs!

Supplies:


Lotion
Makeup wipes
Cup of water
Paper towels

Directions:

Version 1:
1.     Wash your face and apply a thin layer of lotion.
2.     Choose a stencil and apply to skin, press down with fingers so there are no gaps.
3.     Dip the sponge in water and then rub in Body Art paint until you get a smooth and creamy consistency.
4.     Dab the paint over the open areas of the stencil.
5.     Continue until stencil is covered. Peel away stencil.
TIP: If you want to add glitter, before removing stencil, add Tulip body Art Adhesive and use brush to add glitter.

Version 2:

1.     Wash your face and cover it with a thin layer of lotion.
2.     Choose a foundation color.
3.     Dip a sponge in water and rub it in the make up until you get a smooth and creamy consistency. Smooth it on around your face, avoiding the eyes and mouth areas. Let dry.
4.     Use one of the brushes and begin to draw out your design shapes using a base color – for example, if you are painting leaves, use green.
5.     Use the darker colors for shading and contour.
Visit us on Facebook!
Craft on!

Easy Costume IDEA: Faux Tattoos!

Saturday, October 29, 2011

LINK

Visit your local craft store and pick up some Tulip Body Art and paint faux tattoos all over your body! Well, actually, have someone do it for you!

I recently painted my daughter, Maya, for the Tucson Home and Garden Show and it was funny to see all the looks that came her way. She felt like a transformed person in a new body and personality. Perfect for Halloween - and you can wash it off when the night is over!


Visit us on Facebook!
Craft on!

Fun With Tulip Body Art

Tuesday, October 4, 2011
In preparation for Halloween, I told my nieces and nephews I would bring all my face painting stuff to a family dinner so we could practice.  I found out I'm definitely not a face painting pro, but we all had some serious fun.  

Each child took a turn, requesting any random thing he or she could think of for me to paint.  I was really excited to try out my Tulip Body Art supplies.


Here's our work:

Naturally, my son wanted a superhero mask.  I know some schools don't let kids wear masks for Halloween, so this would be a great alternative.  The paint went on quite opaque.  That's great because little kids don't hold still enough for second coats.


One niece wanted big eye make up with glitter and then swirls all over.  Like I said, I'm not an expert.  Let's call this one the exotic mermaid princess?


Another niece wanted pink and glitter.  The body art kit has this glue you spread on and then blot with glitter.  It's cool stuff.


On nephew wanted the Cars logo.  That was a bit tricky, but we made it work.


Of course there had to be some Batman action.  (I think I might have made the mask look more like Cat Woman.  Whoops :)


And one nephew let me practice my beard that I'll paint on my youngest son for his viking costume for Halloween.  (Don't worry folks.  It's root beer.)


I just might bring out the face paints a little more often.  It was like having our own little carnival.  The kids loved it and the Tulip face and body paint we used isn't hard to wash off.  (I was a little nervous that my sisters were going to kill me if it was hard to wash off.  No worries.  It was a breeze.  Whew!)