Woot Woot for Summer Undies! Because I love Tie Dye I figured I would push things a little further by adding some color to my plain undies. I realize I am now a true "tie dye addict" but this was the most fun I had with dye in a long time. Why wear boring undies when you can add some flare to them. Don't get me wrong there are ton's of cute undies out there but being able to transform a boring white pair into a fashionable statement piece is priceless. Plus, did I mention how much fun this is? I wonder if I could wear these as a bathing suit bottom. Let's get started!
We are so excited about our brand new Tie Dye Your Summer web site! The site is packed with tons of cool inspiration, step by step instructions, videos, and giveaways each month. It's the one-stop place for all things TIE DYE and we hope you'll join us for the fun!
Here's just a few of the many things you will see when you visit the site...
We're running two awesome Tie Dye Giveaways! For both giveaways, you can win an Apple® - iPad® mini Wi-Fi - 16GB with Tie-Dye Skin and supplies to throw your own Tulip® One-Step Tie-Dye party. You can enter in the form below -or- enter using Instagram. All the contest rules and details can be found on our giveaway page!
Click here for Tons of how-to's and inspiration. Learn the basics of tie dye (prepping, rinsing, and washing) as well as all these fabulous techniques. The instructions are shown in clear, easy-to-follow photos along with lots of projects using that technique. And we've also compiled an informative list of frequently asked questions tie dye questions that will make your project the best it can be.
You might just want to try out the spiral technique! So much of the fun of tie dye is the "MAGIC" reveal when you see the how your dyed item turned out!
Learn all about the history of our Tulip One-Step Tie-Dye Van. You'll also find info on our Tie Dye Tour down the California Coast this summer along with dates and photos of our appearances. Learn more on our Follow the Van page. Planning a tie dye party? We have a great video and detailed steps to plan a fun afternoon with you and your friends! Click here to find all the Tie Dye Party Planning details!
And finally, on our product page, you can see our brand new Tulip® One-Step Tie-Dye packaging! It's so eye-catching and fun.
We hope you'll take a look at the site and that it will inspire you to TIE DYE ALL THE THINGS!
Do you love color as much as we do? Then you'll want to make a pair of your very own Tulip One-Step Tie Dye socks (or leggings as some may call them). We are so ecstatic how these tie dye socks turned out. They were created by superstar designer Lauri Eaton. So fun and truly statement making for your wardrobe! Lauri shows you how to make them below...
What you need:
– Tulip One-Step Tie Dye (Neon kit for rainbow socks; Vibrant kit for green, blue, and purple pair)
Before you begin:Prepare your work area and wet your socks and squeeze out any excess water.
Lauri started off making the blue, green, and purple socks. For these socks, you will fold them in half, then fold them again to make four layers.
Section the socks into three sections using the zip ties. Pull the zip ties as tight as you possibly can for best tie dye results.
Fill your tie dye bottles with water and shake well. Now place the socks on a drying rack and squeeze the 3 tie dye colors on each section. Make sure to not squeeze all around the zip ties. The colors will seep toward the zip tie as it sets, so there's no need to stress about getting every teeny tiny white area!
This is what the dyed socks looked like before Lauri covered them to set. She let them set for 10 hours! That's why the colors turned out so intense.
For the rainbow tie dye socks, Lauri folded them in half, then dyed them in rainbow color order. Notice there's a paper towel underneath the rack to catch the dripping dye. Sometimes the paper towels turn out so pretty!
We love how the socks turned out and now want to make more! Do you think you'd like to rock some tie dye socks? They'd even be fun for just around the house!
Love tie dye? Check out these other fun, vibrant project ideas!!
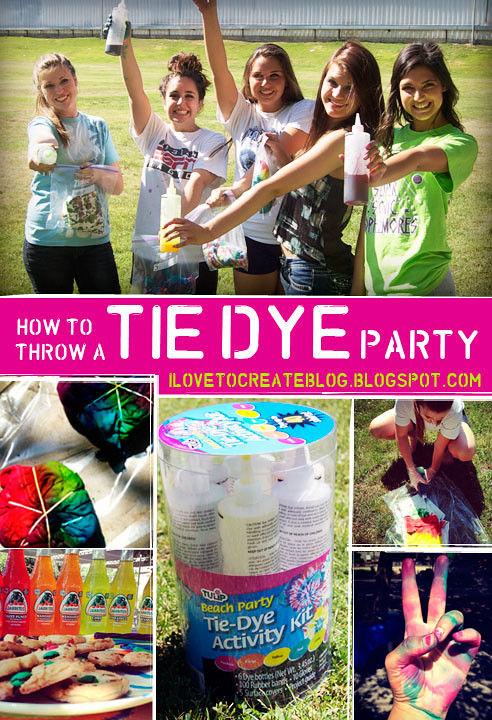
Last month, we hosted a fun tie dye party in our backyard for some super creative local high school girls. They had a blast making everything from shirts to shorts to socks. They tie dyed everything, including their hands! Here's a fun guide on how to throw a tie dye party of your own. Tie dye is a great team-building activity to do at slumber parties, birthday parties, and church and club events. Here's how you can plan to tie dye at your next event! How to throw a TIE DYE party What you need (based on 6-8 guests): – Tulip Tie Dye Activity Kit (the one shown available at Walmart; other Tulip One-Step dye kits are available at your local craft store) – 100% natural tshirts, socks, jeans, shorts, etc. (you can supply or have your guests bring their own) – Extra items to dye if guests forget (optional) – Plastic bin filled with water for wetting your clothes before dyeing – Large plastic tablecloths – 1 or 2 plastic or metal buckets – filled water pitchers – Snacks and drinks (the more colorful, the better) – Folding tables – Weights for weighing down surface covers – Gallon-sized plastic bags – Paper towels – Wet wipes
Are you looking for a totally different way to tie dye? If you are ready for a new tie dye challenge, then here are 4 techniques to try to get the lastest fashion-forward looks! And they are just as fun and easy as the classic styles. They are ombre, shibori, urbanesque, and marble. Here’s how you do ’em!
All of these instructions are for the surface shown in the above photo; however, you can get the same look using different kinds of surfaces, just follow the instructions! Shibori Tie Dye Materials – Tulip® One-Step Dye™ – Loose-fitting shirt – white – 100% cotton – PVC pipe – Plastic tablecloth
Instructions 1. Prewash shirt to remove sizing. Do not use fabric softener. 2. Cover work surface with plastic tablecloth. Lay damp shirt on prepared surface. 3. Wearing plastic gloves, add water to Fuchsia dye bottle to line indicated on bottle. Replace cap tightly and shake until dye is dissolved. 4. Place the PVC pipe at the top of the damp tee then roll tee around pipe, rolling down to the bottom of shirt. Scrunch fabric tightly around pipe. 5. Squeeze Fuchsia dye onto scrunched shirt, making sure to rotate pipe if necessary to cover shirt from top to bottom. 6. Unwrap shirt from pipe then cover with plastic tablecloth and let sit 4 to 6 hours. Wash in a large load of water with a small amount of laundry soap and dry in dryer.
Here's a video also showing this technique!
Tie dye using Marbles Materials – Tulip® Dye Techniques Kit™ – Tulip® Surface Cover™ – Extra rubber bands – Large flat glass marbles – Scissors – Paper towels – White T-shirt
Instructions 1. Wet shirt and wring dry or place in washer on spin cycle. 2. Cover work surface with Surface Cover™ then place shirt on surface and smooth with hands. 3. Place a marble inside front of shirt then tightly rubber band. Continue to add marbles where desired. 4. Wearing gloves from kit, fill Turquoise and Fuchsia dye bottles with water to line indicated on bottles. Shake until thoroughly mixed. 5. Squeeze Turquoise onto shirt, avoiding marble sections and carefully lifting shirt to dye back if needed. 6. Replace lid of Fuchsia dye bottle with sprayer from kit. Test on a paper towel, then spray top of each section of fabric with marble, letting overspray blend with Turquoise dye to create Purple color. 7. Let set for 4-6 hours. Carefully cut off rubber bands and remove marbles then wash in washer with small amount of laundry soap. Dry in dryer.
Urbanesque Tie Dye Materials – Tulip® Dye Techniques Kit™ – Trash bags or plastic tablecloth – 100% cotton ¾ sleeve tee – white Instructions 1. Prewash fabric to remove sizing. Do not use fabric softener. 2. Cover work surface with trash bags or plastic tablecloth. Lay damp fabric on prepared surface. 3. Wearing rubber gloves, add water to the Turquoise, Lime and Fuchsia dye bottles. Replace caps tightly. Shake until dye is dissolved. 4. With the shirt lying flat on tabletop, squeeze Lime dye in an abstract flower petal design. Refer to photo. 5. Squeeze the Turquoise dye onto shirt, bordering the Lime flower petal design. Repeat step with Fuchsia dye bordering the Turquoise portion. 6. Cover fabric with trash bag or plastic tablecloth. Let sit 4-6 hours. Wash in a large load of water with a small amount of laundry soap. Line dry.
Ombre Skirt Materials – Tulip® One-Step Dye™ in brown, fuchsia, and orange – Plastic tablecloth – Skirt – 100% cotton
Instructions 1. Prewash skirt to remove sizing. Do not use fabric softener. 2. Cover work surface with plastic tablecloth. Lay damp skirt on prepared surface. 3. Wearing plastic gloves, add water to dye bottles to lines indicated on bottle. Replace caps tightly and shake until dye is dissolved. 4. Squeeze Brown dye on the top portion of skirt, Fuchsia in the center section and Orange on the bottom section. Refer to photo. 5. Cover fabric with plastic tablecloth and let sit 4 to 6 hours. Wash in a large load of water with a small amount of laundry soap and dry in dryer.
Here's a video showing the Ombre technique!
Are there any tie dye techniques you've done that are different from the norm? Tell us about them!