
Christmas in an Ice Cream Cone

Thursday, December 17, 2009

As a little girl my very favorite Christmas ornament was one that my babysitter Janet Maxwell gave to me. Janet was cool and would tell me about the U2 and Go-Go's concerts she would go to, she drove a blue car with yellow polka dots and she was a cheerleader. To me Janet hung the moon so when she made my sister and I Ice Cream Cone Christmas ornaments you know I thought they were they best thing to happen to December 25th since Rudolph.


I had long since forgotten about Janet and her crafty cones until I was recently flipping through a copy of Better Homes and Gardens Christmas Ideas for 1961. The kitschy holiday pictures and crafts had me turning the pages like this baby was straight off the New York Times Best Sellers List. Then there it was... the Ice Cream Cone Tree on page 27 and the memories of Janet and her ornament came rushing back. As you might recall from my customized cartons, loquat and pumpkin flavors and even painted tights - I kind of have a thing for ice cream cones. Maybe it all started with Janet and her ornament. Today for I Love to Create I am going to show you how to make your very own!
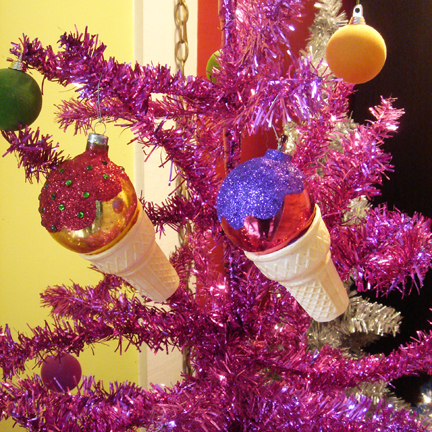

SUPPLIES
Ice Cream Cone
Liquid Fusion Glue
Crafty Chica Little Chica Paint Packs
Tulip Fashion Glitter
Tulip Glam It Up Iron On Crystals
Christmas Ball Ornament
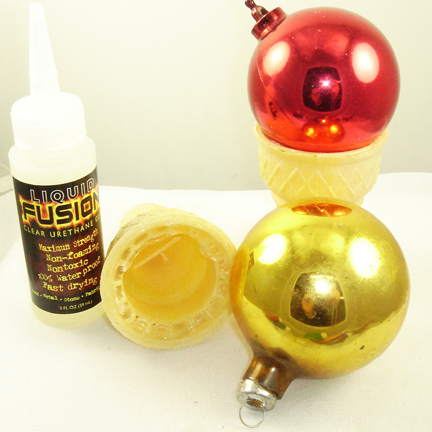

BALLS + CONE + GLUE = ORNAMENT
The first thing you need to do is glue your ornament into your ice cream cone. Remember you can use a plastic or glass ornament, solid or printed - you name it. You just want to be sure to leave the part with the hanger out of the cone. Speaking of cones if you are more of a sugar cone guy or gal go for it! I used Liquid Fusion Glue along the rim of my cone to anchor my ball in place.
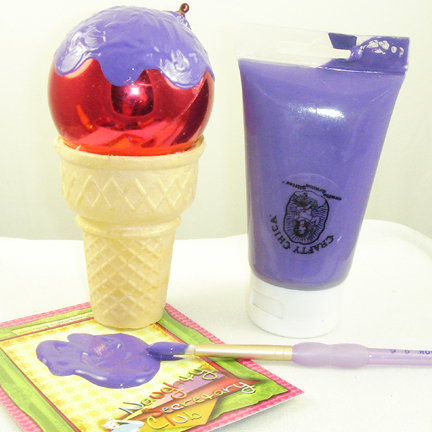

WITH SPRINKLES ON TOP
You could stop there, but why? I like to think if you are reading the Naughty Secretary Club blog you too are a firm believer in the more is always better philosophy. That being the case let's put some topping on that cone. I used Crafty Chica paint and free handed a yummy topping onto my Christmas ball. While the paint was still wet (and fairly thick) I sprinkled on Tulip Fashion Glitter. Allow to dry.


YUMMY TO MY CRAFTY TUMMY
If you are going to take the step of adding an ooey gooey glittery faux candy dipping sauce, what's a few rhinestones? Using your Liquid Fusion Glue add small dots randomly around your cone and stick in your rhinestones. Allow to dry.
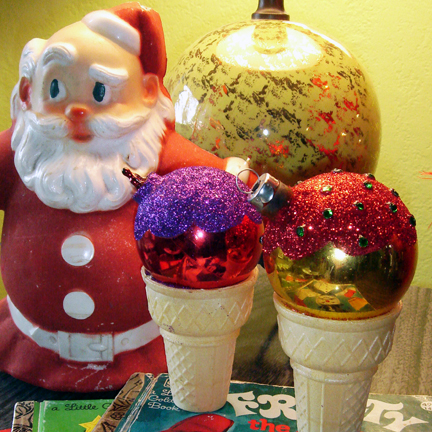

DECK THE HALLS
These ornaments look good enough to eat, though I would not recommend it. Speaking of, just because you would not eat these ice cream cones does not mean someone (or something) else wouldn't. When storing your cones I recommend a zip lock bag so hungry little attic vermin don't decide to snack on your cone during the other 11 months of the year.

Buy yourself a pack of cones, some crafting supplies a cheap box of ornaments and get crazy! You can use all kinds of color combinations, leave off the glitter if you want, glue a fake cherry on top, what about a double dip cone? The possibilities are endless.

Crocheted Poinsettia Brooch

Wednesday, December 16, 2009
DSC04383

Materials
Worsted Weight Sparkly Yarn
Size US G Hook
Tapestry Needle
Glittered Holly Berries (cut from decorative floral bouquet)
Pearl Pin (optional)

Abbreviations
ch=chain
sc=single crochet
dc=double crochet
tr=triple crochet
hdc=half-double crochet

Directions
Large Petals (Make 5):
Ch 8. Sc in 2nd ch from hook, hdc, dc, tr, dc, hdc, sc. Tie off.

Small Petals (Make 5):
Ch 8. Sc in 2nd ch from hook, sc, hdc, dc, hdc, 2sc. Tie off.

Finishing:
Sew large petals together in a star formation. Do the same with the small petals. Center small petal bunch on to of large one; tack in place to create flower.

Using your finger, spread a liberal amount of Fabric Stiffener over flower. Shape and let dry.

Use Fabric Fusion to glue glittered holly berries to center of flower. Let dry.

Pin to your favorite bag, coat or beanie!

Crocheted Poinsettia

Never crocheted before? No problem! Check out my How-To section for tutorials.

(Holiday) Craft.Rock.Love,
Vickie

P.S. Make a Candy Striper felted purse to go with your sparkly Ponsettia Brooch--get the pattern here!

Free Holiday Teen Craft Project by Margot Potter: Have Yourself a Twilight Little Christmas

Tuesday, December 15, 2009

(Click on images to view close up)

Have Yourself a Twilight Little Christmas

Twilight Themed Ornament/Pendant
Margot Potter The Impatient Crafter for iLoveToCreate Teen
“Mom crafted, kid approved.”

I thought we’d escaped the phenomenon of
Twilight. Avalon showed no interest in the books at all...until last month. Then suddenly she wanted to read the first one. So we bought it. She read it in one day. Then we got the second book. Alas, she’s hooked. I thought in light of this and the incredible popularity of this series and the films, I’d be remiss as a teen craft designer if I didn’t come up with something Twilight themed.

I have always loved silhouettes. I don’t know what it is about them that I find so intriguing, but I do. I’ve been meaning to work on a silhouette craft project for a few years now, so this seemed like the perfect match. I figured fans of the film would recognize the silhouettes of the actors who play Edward and Bella...and just in case they didn't I added a “Bella & Edward 4-ever” to the other side of the framed images. You are welcome to use the template I’ve made. It’s sized to fit inside a 2”x2” frame and you’ll need to clean up any rough edges when you cut it out. I made the ornament and thought it would be a cute pendant, so I did a variation. It’s the same thing, slightly different.


(Twilight and my designs are under copyright and you absolutely can not take this project and resell it. This is intended for personal use only.)

Ornament Materials
2”x2” gun metal Ranger Memory Glass frame
2 2”x2”Ranger Memory Glass squares
19mm Lucite leaf bead from The Beadin' Path
2mm freshwater pearls
K & Company Brenda Walton Evergreen Designer Mat Pad
Tulip Dimensional Glitter multi
Aleene’s Glass and Bead Slick Surfaces Adhesive
Aleene’s Archival Glue Stick
Liquid Fusion glue
Printed image sized to 2”x2”
The King & Queen Font 9 pt. black “Bella & Edward 4-ever” centered and cut to fit frame
(Similar free fonts available at DaFont.com)
Thin black satin ribbon

Tools
Scissors
Computer
Printer


1. Right click and save image. Print silhouette. Cut out carefully with scissors.

2. Cut out tiny heart from red area of plaid holly paper. Dab a small amount of dimensional glitter on heart and allow to dry.

3. Trace with 2” glass square and cut out plaid holly paper to fit frame.

4. Cut out holly shapes to edge image on both sides of frame. Add a thin layer of dimensional glitter. Allow to dry.

5. Assemble the collage using your glue stick to adhere layers.

6. Print text. Trace with 2” glass square and cut out to fit frame.


7. Place front and back of collage together between layers of glass.

8. Slide into frame.

9. Glue three pearls into a small Lucite leaf with Liquid Fusion glue. Allow to dry.

10. Glue leaf to front left corner of frame with Glass and Bead Glue. Allow to dry.

11. Spread a thin layer of dimensional glitter on frame edge. Allow to dry.

12. Attach a thin satin ribbon to loop at top of frame.

(For the pendant, spread a thin layer of dimensional glitter on cut out image. Shake on a generous amount of Crafty Chica glitter in Be Bop Black. Allow to dry. Insert with text on back as before into frame. Glue a small satin bow to a red button with Liquid Fusion. Allow to dry. Glue button to frame edge with Glass and Bead glue. Spread a thin layer of dimensional glitter around frame edge. Attach to a chain with a 10mm jump ring. All materials used in these designs were given to me to use in my work except for the satin ribbon.)