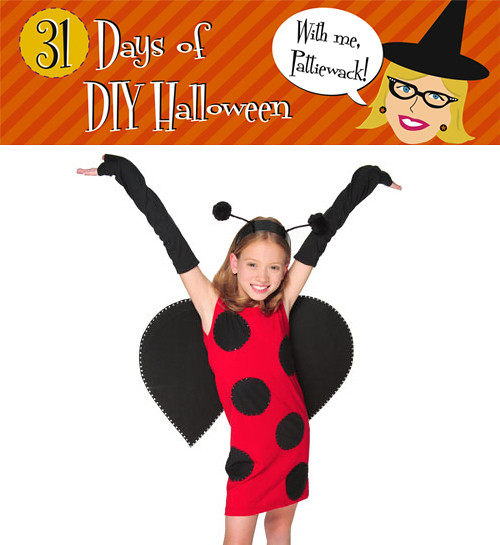
This is absolutely darling, and believe it or not, it’s just t-shirts!! A couple snips, a few quick stitches and you can make your little lady the cutest little bug on Halloween night!
Little Ladybug Costume
Materials:
– Tulip® Glam-It-Up!™ Fashion Art Tweezers™
– Tulip® Cordless Heat Setting Tool™
– Tulip® Glam-It-Up!™ Iron-On Crystals™
23123 300 Clear Pack
25621 Red
– 1 T-shirt, black
– 2 Pom Poms, 2” black
– 2 sheets Felt, stiff black
– Scissors
– 1 Headband, black
– Straight pins
– Tailor’s chalk
– Sewing machine /matching thread
– 1 T-shirt, red
– 2 Pipe cleaners, black
– pattern (click here for pattern)
Instructions:
1. Cut sleeves off red shirt, using scissors.
2. Place plate on black T-shirt. Trace six circles with tailor’s chalk. Cut out and pin circles on red shirt.
3. Thread sewing machine with black thread. Sew on all circles.
4. Place wing pattern on stiff felt. Trace around with chalk. Cut out two.
5. Flip red shirt to back. Place wings in center top of shirt. Refer to photo. Pin in place.
6. Sew only center edge of wings on shirt. Refer to photo.
7. Place red Crystals around inner edge of each circle, using Tweezers.
8. Heat Heat-Setting Tool following package instructions. Gently place tip of Tool on top of Crystal. Hold for about 5 to 6 seconds. Repeat for all Crystals.
9. Outline wings with clear Crystals. Refer to photo.
10. Tip: If you have some black t-shirt leftover, make long armbands.
11. Twist one end of a pipe cleaner around a pom pom. Repeat with other pom pom and pipe cleaner. Wrap other end of pipe cleaner around headband.
Craft on! Click here for today's daily giveaway!


