
Showing posts with label tacky glue. Show all posts
Showing posts with label tacky glue. Show all posts
23 Tacky Glue DIYs that are so not TACKY!
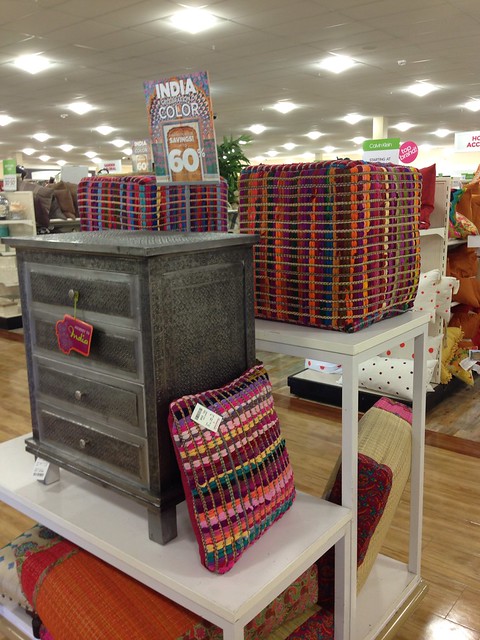
Monday, October 28, 2013Home Goods Fabric Covered Ottoman Hack
Thursday, July 18, 2013

I spend way too much time in Home Goods. Like the cashiers know me by name. Recently they have had a lot of fabulous items from India that have been catching my eye. Case in point, this ottoman. Problem was the ottoman is $70. The rugs are $7. I kept thinking their had to be a way to make my own version and I was right.
Cupcake Wrapper Flowers
Monday, February 11, 2013
Making these pretty flowers for gift wrap and décor can be done in no time at all! And they are created using your stash of pretty cupcake wrappers. I don't know about you, but I have tons that I snatch up throughout the year. I show you how to make these pretty gift toppers in the video below!

What you need:
– cupcake liners
– clothespins
– scissors

Also shown in the video are how to make these fun flowers that can adorn simple spray-painted sticks from your yard. These are perfect for accessorizing a space in your home or for displaying in a big glass vase for your next party, shower, or function.
It's always nice to have a simple craft like this on hand when you want to do something special for a gift or a quick decoration. Hope you like trying it!
How to Make Paper Snowflakes Embellished Gift Bags
Wednesday, November 28, 2012
How to Make Paper Snowflake Embellished Gift Bags
Our favorite holiday movie here at Casa de Potter is Elf. (We watch it all year round!) In fact, we just watched it this past weekend. One of my favorite scenes is when Buddy decorates the department store and makes a flurry of fabulous paper snowflakes. It's been so long, I had to give myself a refresher course in how to make paper snowflakes. Once I had it down, I decided to make some using upcycled magazine pages, we have a lot of magazines piling up around here and I hate to throw them away.
Fair warning, this is very addictive. Why stop at hanging them from the tree, when you can layer them on plain kraft paper gift bags and tags? I am seriously smitten with these and plan to wrap all of our holiday gifts in snowflake embellished kraft paper wrappings this year.
(I guess I'm not the only one with snowflakes on my mind, Megan Nicholay made some seriously cute snowflake stencil t-shirts yesterday!)
Materials
Text printed magazine pages
Kraft gift bags
Kraft gift tags
Plastic rhinestones
White and Off White Buttons
Jute or hemp twine
Aleene’s Tacky Glue
Tools
Small paper friendly scissors
Hole punch
Paper plate
Tulip Sponge Pouncer

Cut standard size magazine pages into various sized snowflakes. Paper can be full size sheet or halves or quarters.

Fold paper in half.

Fold paper in half again, don’t score, just pinch edge to mark center point.

Fold right edge with bottom edge at center point on an angle that lines up with the top left corner.

Fold left side overlapping center as before with folded edge flush to edge of first fold, as in photo.

Fold this in half one final time. (The folds should be on the inside.)


Cut excess paper from above top of smaller interior fold.

Use a marker to trace a series of cuts or just roll freestyle, don’t cut too much off of folded edge, or your design may become too fragile. Simple, bold cuts work best.

Mark placement of snowflake on bag, cut off excess edge. Depending on size of snowflake, you can use the excess edge to make a second or third snowflake on bag. Cut them in different sizes for multiple snowflake bags!

Use spray adhesive or gently dab thinned Tacky glue from a paper plate using a sponge pouncer across back of snowflake, make sure to get entire snowflake covered with a thin coat of glue. Starting from the edge, press snowflake flush to bag using your fingers to remove any air bubbles. Take your time to prevent tearing paper. (You can also opt to use a brayer here.)

To embellish: Use Beads in a Bottle or a thin line of glue and loose glitter to add sparkling accents around the edges of all cut outs. Glue rhinestones and buttons to snowflakes with Tacky Glue. Allow bags to dry.
To create matching tags: Repeat process but use a smaller starting size of paper. Punch a hole in the top edge of tag and tie to handles of bags with jute twine.

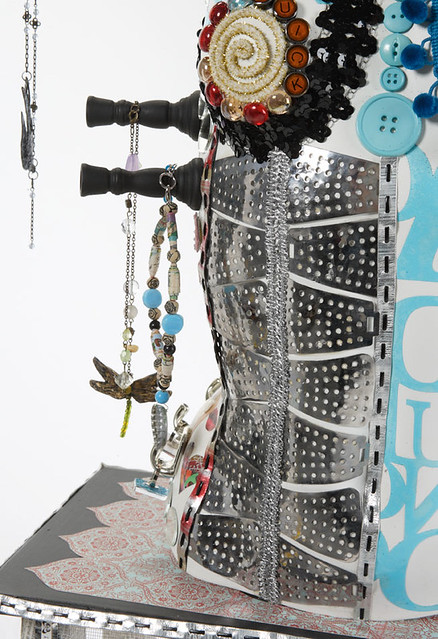
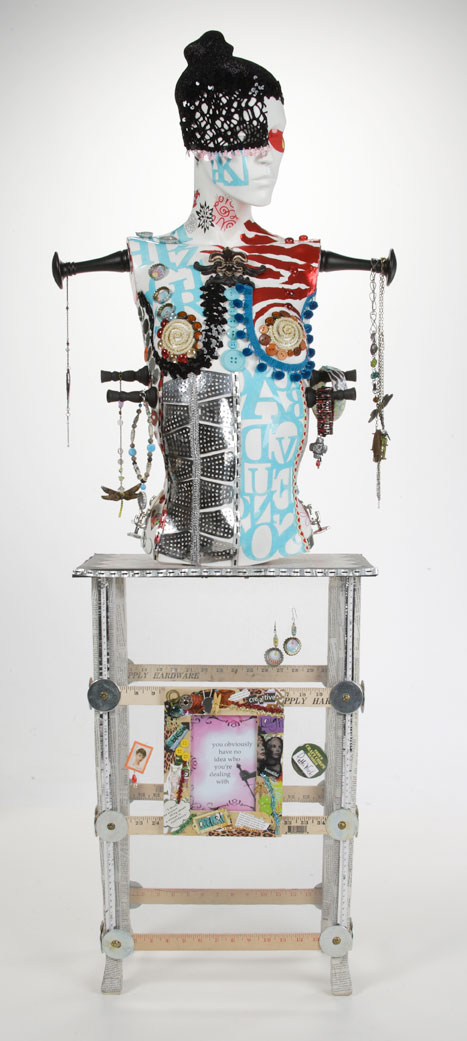
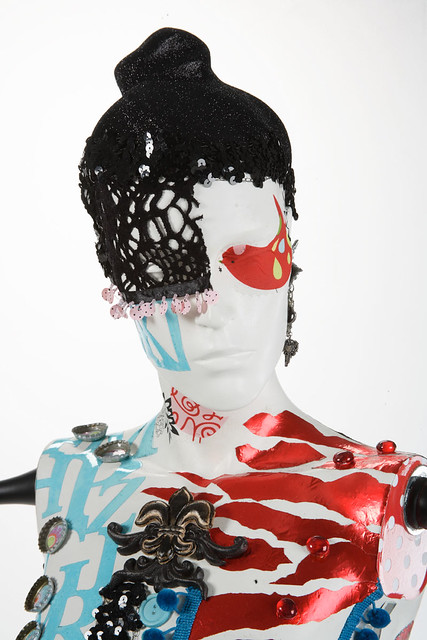
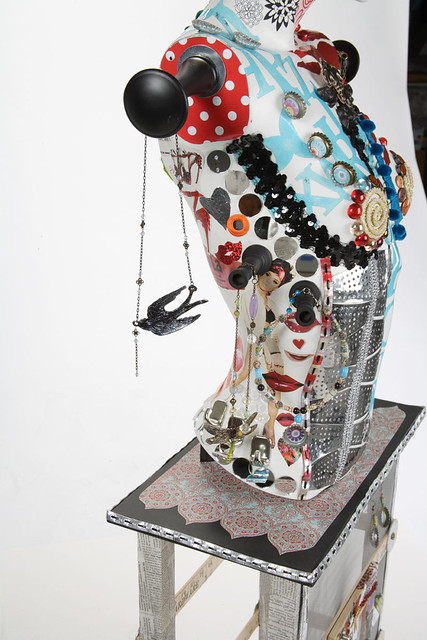
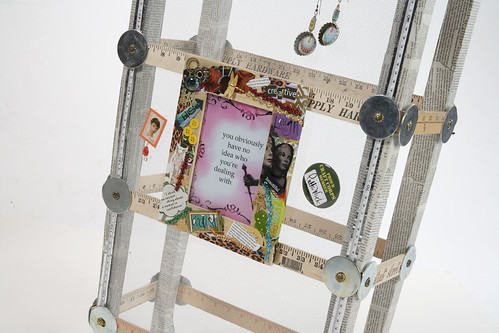
Pattiewack's Mixed Media Jewelry Stand
Friday, June 10, 2011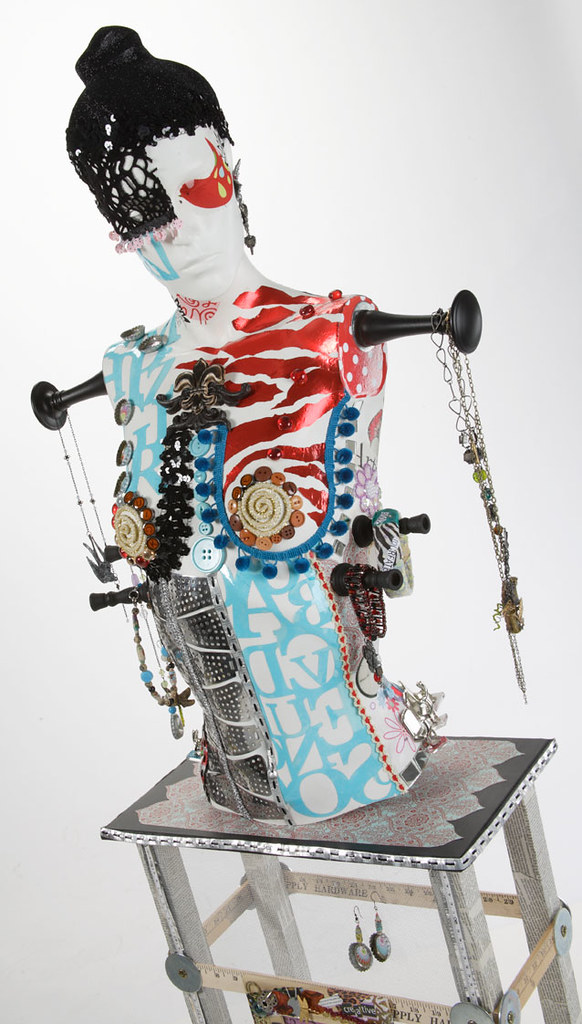
Looking today through our project image library, I came upon this amazing piece of art by Pattie Wilkinson! She created it last year for the 2010 Craft and Hobby Association Summer Tradeshow. We've posted a pic of it here or there, but none this good. It is too cool of a piece not to reshare! Isn't all the detail just amazing?? Awesome job Pattie! You really made that mannequin come to life!
This entire mannequin was put together using various Aleene's® Adhesives! Even the jewelry pieces were created using techniques using good ol' Aleene's® Original Tacky Glue®.
Visit us on Facebook!
Craft on!Click here for today's daily giveaway!
I Love to Create Live Plastic Bag Craft Smock for Kiddlets
Thursday, April 28, 2011
I hope you were able to tune in to I Love to Create Live today. Don't worry if you missed it, you can catch the whole thing on Ustream. In case you are just now hearing about this whole shindig, let me fill you in. I Love to Create sent several crafters, myself included, a swag bag full of their crafty goodies. The challenge was to make something unique and different. Leave it to me to be drawn to not only the supplies, but also the hot pink bag it came in.

Feast your eyes on the selection of goodies that arrived on my doorstep. Where has that owl stencil and the Beads in a Bottle been my whole life? I was inspired and so was my daughter Tallulah. She loves to paint and craft with mommy so she immediately started helping me sort through the box. The first thing that came to my mind was to recycle the pink plastic bag and make her a craft smock.

The problem is as you know I am not much of a seamstress. That being the case my mother, AKA my hero, offered to help me out. I mailed my bag of goodies and my smock plan to North Texas and hoped for the best. What she sent back was amazing! I just asked her to sew me a smock, but my mother that crafty devil went a step above and beyond. For the bias trim she created a polka dot using Tacky Glue as a resist. She squirted various dots of glue on the trim and once it had dried to point of skimming over she sprayed the bias tape with Tulip Spray Dye. She then dried the dye with a hair dryer and washed the glue dots off in the sink. It's like Tacky Glue batik!
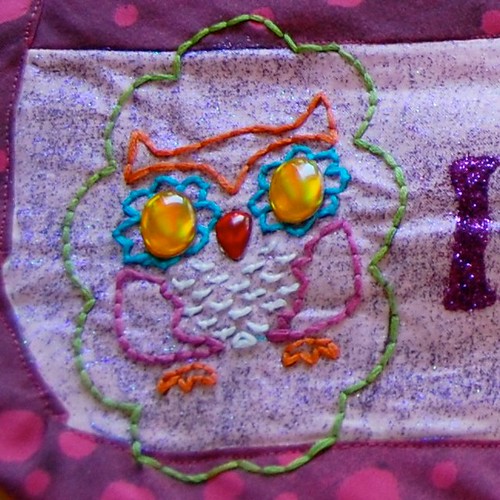
When the smock returned to Austin there was a giant white pocket for me to adorn. I painted the pocket with the lavender Tulip Soft Fabric Paint first. Next I added a top coat of Tulip Fashion Glitter Shimmer Fabric Paint. Once the paint had dried I applied the letter and owl stencil to the smock and this is when disaster struck, sort of.
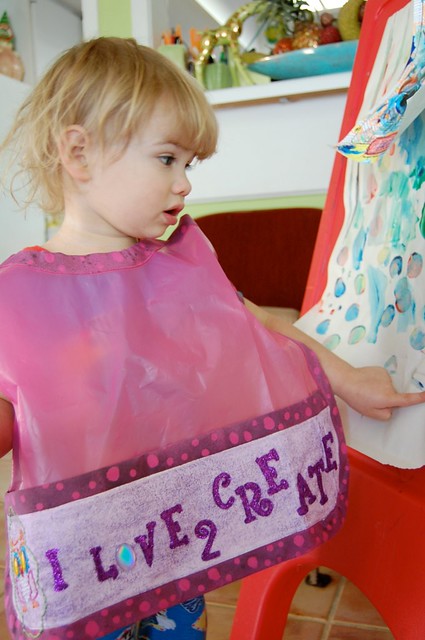
I had visions of embroidering everything on Tallulah's new craft smock, but that didn't happen. Please note Tallulah's unbrushed hair and Thomas the Train PJ's. I made the poor kid model while she was sick. when you have a sick toddler and a newborn, embroidering is a little tricky. I had already finished the owl, but since I was under a deadline for the live cast the letters were not going to make it. No worries I just painted them with Tulip Fabric Paint and covered the wet paint with tulip Fashion Glitter.
Tallulah is on the mend and seems to like her new smock. Hopefully we will be giving it a test run this weekend!
Check out more I Love to Create projects right here.
Visit us on Facebook!
Craft on! Click here for today's daily giveaway!
Every Day's a Holiday - An I Love to Create Interview with Heidi Kenney
Thursday, December 9, 2010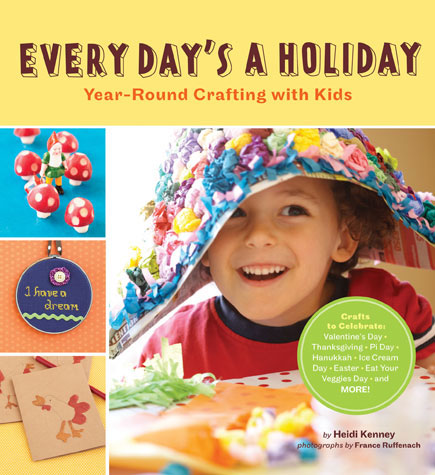
Brace yourself for some exciting news! Not only is today a book review and interview, but we are giving away A GALLON OF TACKY GLUE! The crafty possibilities are endless! It seemed an appropriate prize since throughout Heidi Kenney's adorable new book Every Day's a Holiday Year-Round Crafting with Kids she mentions using Tacky Glue for projects like Gingerbread House Tissue-Box Covers and Felted Love Bugs.
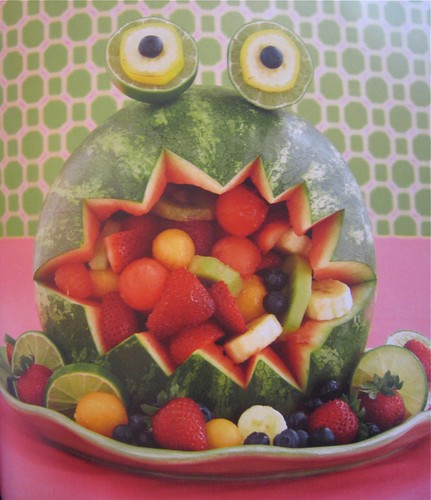
If these projects have you intrigued then you are going to want to run right out and snag yourself a copy of Every Day's a Holiday. Even if you don't have kids to craft with heck I'd wear the adorable Erin Go Bragh Leprechaun Pin and happily serve the Watermelon Monster at any party for adults or kids.
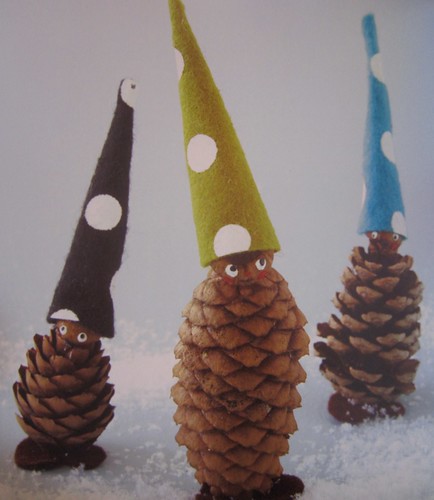
Every Day's a Holiday has oodles of projects I can't wait to make with Tallulah (read the interview for her suggestions on toddler crafts). There are several projects that strike a cord with me creatively. If Heidi's Cool Ice Cream Cone and Punxsutawney Phil Shadow Puppet had a baby it would be my Groundhog Day Pop Up Puppet. The Prize Winning "Pi" Pie celebrating Pi Day in May satisfies my love of prize ribbons perfectly! The Recycled Mini Robots seem like a much more kid friendly version of the tin can robots I made with my mom that perhaps I could conquer with Tallulah some day. The Woodland Gnomes and their pointy polka dotted hats makes me want to revamp my Parisian Pine Cone People stat.
I am drawn to so many of the cute projects I could go on for days, but I won't. Let's get on with our interview. Heidi Kenny is an old school crafter who has been 'making' long before Etsy was a glimmer in a Brooklynites eye. Her website My Paper Crane made doughnut shaped plushies a household name. Her fantastic art and crafts can be seen in galleries, craft fairs and books across the country. Read on for more inside scoop!
I know for me since the birth of my daughter my interest in crafting and decorating for holidays has gone way up. Was that the case for you or have you been decorating for Arbor Day since you were a teen?
I would say I have always loved celebrating, and crafting so for me those always went hand in hand. I remember one time as a pre-teen I made the whole family New Year's Eve hats, noisemakers (that didn't work so well), and confetti. I remember just really wanting everyone to be into it, and they really weren't haha. I will say that having kids has been great for my love of crafting for the holidays because they are always game.
What is your favorite holiday to decorate and craft for? I’m a fan of Halloween myself.
My most favorite holiday is Christmas, and Halloween is a close second. We go a little nuts around our house with decorations for both.

When writing Every Day’s a Holiday did you experience any craftnical difficulties? I know for my book The Naughty Secretary Club there were a few projects that I wanted to make, had the plan in mind and then when it came to executing that idea I could not make it work and had to scrap it.
Yeah, I had this great idea for a pillow for Halloween. I felt like I was being really clever too in thinking up a technique I had never seen before (although that doesn't mean someone else hasn't already done it) I had the idea to embroider a jack o lantern using black wool yarn onto a square cut from an all wool orange sweater. Then I figured you could felt the whole thing! It worked okay, but the design wasn't exactly as I was expecting. I still hope to try again some day.
For those of us with young kids, toddler range, what are some of the best projects in Every Day’s a Holiday to do with the kiddlets?
For toddlers I think projects like the recycled card board flowers for Spring Equinox could be a good project. If mom or dad cuts out all the flower shapes, your little one can arrange the actual flowers, and then you can help with gluing them down.
Also the seed keeper pouch for Johnny Appleseed is fun for young ones because they can stamp down the apple, and it's pretty fool proof.
The ribbon bows in the back are another way you can work together with your toddler. They scribble and color the paper, which the adult can then cut up and glue into the bow.
Thanks so much, the fabric designing has been such a fun new thing for me. I'd really say I go through moods. Some times I really feel like sewing plush, and some times I like working better with paper. Most of my fabric designs are used by cutting and layering color paper into the actual characters and then scanning them into my computer.
When writing your book were there any months that were harder to come up with projects for than others? When I am writing my own weekly how-to projects it seems some months are busting at the seams with holidays while others are pretty holiday light.
Yes, I found that August and September were tricky ones for me, and we actually had to even combine them in the book.
I remember at Christmas time we used to make reindeer pins out of clothespins and felt, and at Easter we made pom pom chicks with googly eyes. Both my parents were crafty, so we made a lot of stuff growing up.
I noticed lots of the projects from Every Day’s a Holiday are edible: Marzipan Doughnuts, Mini Radish Mushrooms, Pinecone Cheese Balls and more. This is a two fold question – if you were going to chef school would you specialize on the savory or sweet side of things? Second do you mind sharing a go-to recipe you use with your family.
If I were to go to chef school I would have to go with the sweet. I love the way sweet foods lends itself to cuteness and colors.
A go-to recipe for me in my Mom's mac and cheese, it is easy to remember because it is all "2"s
2 T butter or margarine
2 T flour
2 cups of milk
2 cups of shredded cheddar cheese
1 box of elbow noodles
Preheat your oven to 350F, and put your elbow noodles on to boil
Meanwhile in a saucepan over medium heat melt the butter and then add flour. Stir until fully combined.
Next add the milk and let it heat up until the butter/flour has all combined.
Then add the cheese and lower heat to low.
Stir the mixture now and again until cheese is al melted and the cheese sauce looks nubbly.
Drain noodles, and add to cheese sauce.
Pour the mixture into a casserole dish and bake for 30 mins.
I am a firm believer in the family that crafts together stays together. My mother, sister and I still craft together and always have great creative synergy. I’m trying to instill those same ideas with my daughter. Why do you think it is important to introduce kids to crafting?
I agree, I grew up making things and I think it kept our whole family close. My sisters and I have such great memories of crafting. I think it also is just a special time to sit down with your kids and make something. With the world changing and technology everywhere, there is just something so great about working together to make something with your own hands.
What does the future hold for Heidi Kenney? Any new fabric designs on the horizon? Have you inked a deal with Chronicle for a slew of new books? I adored the plush jewelry on your website – any more wearable plans?
While I don't have anymore book plans just yet, I would love to do something with theme parties. I have a possible line of goods coming out with a company I have not worked with before. I am also continuing to work with Kidrobot and have a bunch of new goodies with them releasing in March of next year.
The jewelry I made was for a wearable art show, and so much fun. I'd love to try making some more.

Cozy & Cute Yarn Headband
Thursday, November 11, 2010
Yesterday I got inspired to make a yarn wreath. Looking at all the pictures of the adorable wreaths out there really got my creative juices flowing. However, in true form I looked at the wreaths and thought to myself: how can I make these wreaths wearable? I don't mean literally - I mean using the same techniques on something besides a wreath. Join me on my weekly I Love to Create journey as I bust out the yarn and Tacky Glue!
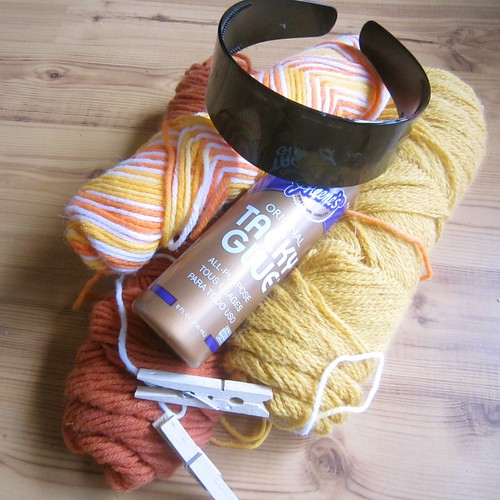
SUPPLIES
Yarn
Tacky Glue
Plastic Headband
Clothes Pins
Felt
Scissors
Acorns
Is there such a thing as sentimental yarn? This yarn belonged to my grandmother and I can remember her having it when I was a little girl knitting on an empty spool of thread will nails stuck in the top. I have always wanted to do something with the funky retro variegated yarn and a fall themed headband seemed perfect.
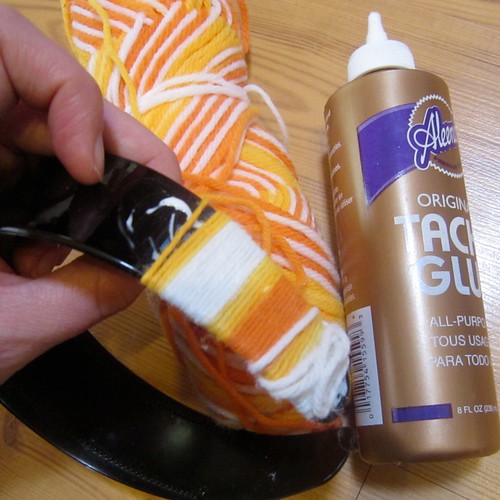
This project was super duper easy. I coated a section of my headband at a time with Tacky Glue and wrapped the yarn tightly around. The ends were a little tricky but that is where the clothes pins come in to hold all your handy work in place while the glue dries.
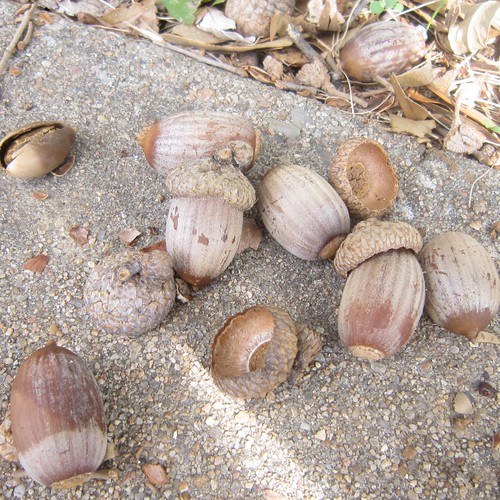
I wanted to incorporate some fall elements into my headband so I stole a few acorns from my neighbors yard. Shhhh don't tell. I used Tacky Glue to make sure their little toppers stayed on.

Nuts were not near enough pizazz for my special headband. I cut up felt, stapled ribbons and used Tacky Glue to make a cute little fall-ish arrangement.
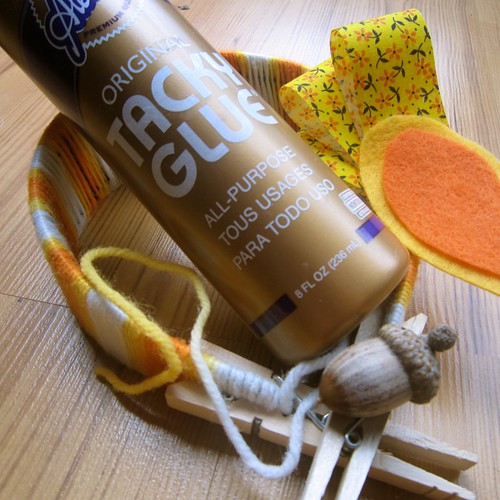
Once the glue had dried on my arrangement all that was left to do was add it to my headband. I also trimmed up my yarn edges.

I know what I'm wearing to Thanksgiving dinner, at least in my hair.
Craft on!Click here for today's daily giveaway!
Tacky Tuesdays: Give the Gift of Aleene's® Tacky Glue!
Tuesday, August 10, 2010
I absolutely love this idea of decorating mini bottles of Aleene's Tacky Glue and giving them away as little party favors or gifts! These were created by the talented jek in the box {is home}.
Wouldn't this be a great idea for a bridal shower or a crafty birthday party? Gifts don't have to be expensive and good things really do come in small packages!
You can get these bottles in the Aleene's® Tacky Packs or they are sometimes sold next to the register at your favorite craft store!
I love having my own Mini Mes!
Tacky Tuesdays: Tacky goes Back to School
Tuesday, August 3, 2010 Yeah, it's once again another year! Time to put away my surf board in exchange for my pencil, paper, and books. I have a class clown reputation to maintain so I have to aid in a little mischief here and there. I have been spread countless times inside the desk while the teacher didn't notice. It really wasn't me doing it, I swear! I can't help that kids like to squeeze me! I'm NOT going to detention when I was simply minding my own beeswax!
And on that note, I leave you with the opening to the cinematic gem "Grease 2". This little number is so bad it's good. Michelle Pfeiffer in her best work. By the way, I totally want to learn these dance moves! I would totally be able to rock them at the first school dance of the year!
Aleene's Glue wall at Winter CHA
Friday, January 29, 2010
Watch the below video featuring Pattiewack and Traci Bautista and see everything our cool glues can do. This video features several wonderful projects that you will want to make! Check it out!
Top 10 Must Recycle (and Repurpose) Items for Crafters!
Wednesday, August 26, 2009
Top 10 Must Recycle (and Repurpose) Items for Crafters
Us crafters love to make somethin' out of nuthin' but even during these eco-conscious times, there's a fine line between waste not and pack rat. Here's my list of favorite household items to reuse and repurpose using a few staple craft supplies and a bit of creativity!
1. Shipping Boxes: Cut-up boxes are great for use inside of t-shirts when decorating with fabric paints or markers. They also make great canvases for kids' artwork!
2. Consumable Containers: Glue vintage wallpaper over food and body product containers to create decorative holders for your craft bits. Knitters, try drilling a hole in the lid, feed yarn through and close to keep a yarn ball from tangling!
3. Magazines: Cut out your favorite images for endless decoupage, inspiration board and greeting card projects.
4. Ribbons: Save those gift ribbons to tie around plushie creature's necks, glue onto decorative vases or bind dried flowers with.
5. Curtains: Recycled curtains are a great resource for plentiful yardage of neutral or patterned fabrics. Turn that fabric into journal covers, table runners or little girls' dresses.
6. Window Screen: Staple onto over-sized frames to make an earring display, cut-up and adhere to a collage to add texture, or paint over to add a pattern to fabric or paper.
7. Broken Dishes: File edges of a pretty piece of glass or ceramic and drill a hole for a unique pendant, glue pieces onto a plain frame for decoration, or use multiple broken dishes to create a mosaic design for a tea-table top.
8. Wrappers & Packages: Colorful food wrappers make great base materials! Fold and weave them into a wallet, stick onto contact paper and sew into a tote bag, or glue onto cardstock for unique gift cards.
9. Plastic Grocery Bags: Make "plarn" and knit or crochet a recycled tote, fold and sew into "quilted" place mats, or tie onto a wire circle to create an eco-smart wreath.
10. Old Wool Sweaters: Unravel sweaters and custom dye yarn; repurpose yarn into new, knitted or crocheted treats; or felt, cut and sew sweaters into throw pillows, pet beds and more!
Craft.Rock.Love,
Vickie
Vickie Howell is a mother, designer, author and crafty spokesperson. For more info on projects and how-to goodness, go to: www.vickiehowell.com.
Designer of the Month - Gabriela Delworth
Friday, August 7, 2009

Each month, here on the iLoveToCreate blog, we will putting the spotlight on fabulous artists and crafters who love to create! This month, we got in touch with crafty queen Gabriela Delworth and asked her a few questions to get to know her style, sensibilities, and crafty expertise! Here's what she had to say!
So Gabriela, what do you love to create?
I love creating a variety of things but my favorite medium is paper.
Do you have a favorite iLoveToCreate product that you can’t live without? How do you use it in your projects?
There are many ilovetocreate products on my list of favorites. Let’s start with the products I use to design my altered Marie Antoinette T-Shirts: I use Tulip® Photo Transfer Paper™ to transfer images onto T-Shirts. I use Tulip® Mini Fashion Iron™ to iron paper transfer images on T-Shirts. I use Tulip® 3D Fashion Paints, Tulip® Fashion Glitter™ and Aleene's® Fabric Fusion™ to embellish them. And I use Aleene’s® Original Tacky Glue® on my paper crowns, tiaras and all my paper projects.
 Marie Antoinette T-Shirt with embellishments!
What’s your favorite project that you’ve created?
I am really happy with the way my altered Marie Antoinette T-Shirts turned out.
 A pretty detail of her shirt.
Tell us about a time when you found inspiration in a very unlikely place.
I have to say that inspiration comes to me from many different sources, but the most unlikely would he the supermarket! There are enough colours and shapes to “dream” multiple craft projects at this place.
As we’ve seen on www.craftfail.com, not all projects go our way.
Tell us about a Project that you created that went terribly wrong.
I guess not allowing glue to dry completely on paper has been my “terrible wrong” experience.
What’s the best crafty tip you have up your sleeve?
My best crafty tip would be to be open and try different materials and products.
There is always a new technique or trend to be discovered.
 Lots of crafty tips can be found on Gabriela's web site. Check out her great tutorials!
You have some mad crafty skills, but whose crafty skills do you admire?
I admire people that can sew and knit.
Based on your blog, it is evident that you are a very busy lady! How do you juggle the TV appearances, classes, cooking, and crafts that you do? What’s your secret?
My secret is to be organized and plan activities ahead of time. (Check out Gabriela on Youtube here)
You have great photos on your blog. What advice do you have for photographing your work for other bloggers?
My advice would be to invest in a good digital camera to start. And then practice or take photography lessons if possible.
Your gift wrap designs are impressive. What are some everyday supplies that you can recycle that are simple gift wrap solutions (like the cupcake wrapper rosettes)? We as well as many of our blog readers love recycled crafts!
I believe that “presentation is everything” and always try to transfer that on my gift wrap designs. Recycling and re-purposing is very important to me. I love to collect and save a variety of disposable materials. Some of them are cardboard, fabric trims, paper of all kinds, plastic, etc.
 A beautiful gift wrap design by Gabriela. See more of Gabriela's gift wrapping samples here.
Thanks Gabriela for sharing with us! If you would like to be the iLoveToCreate Blog Designer of the Month, send us an e-mail at ilovetocreateblog@yahoo.com and share with us links or attachments of your work using iLoveToCreate products! We are looking for artists of all kinds from ceramicists to Chicano art lovers crafters who create in steampunk style!
Thanks for stopping by!
Subscribe to:
Posts (Atom)


