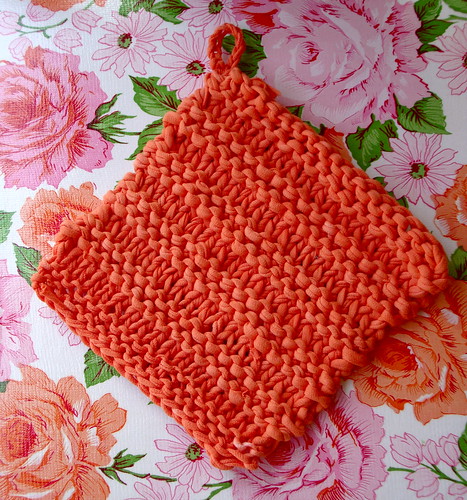
Hottee: T-shirt Yarn Hot Pad

Wednesday, March 31, 2010
Hot-T

In my house if it's not nailed down (and can be cut into strips), then I'm probably going to try and knit with it. Fortunately this fact lends itself well to recycling, especially all of the old t-shirts that tend to pile up in a household of 5.

You know what else those t-shirts are great for? Dye experiments. Mix the two together to create a handy-dandy hot pad in the perfect shade to match your kitchen (or your mood)!

DSC00681

Materials
T-Shirt Yarn (from an XL-XXL Men's Shirt)
Stainless Steel Pot

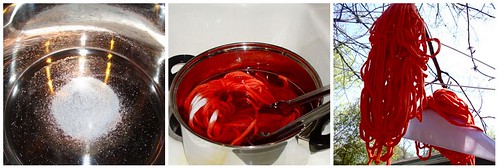
How to Dye T-Shirt Yarn
  • Choose color from the Custom Dye Color Kit Chart (I went with "Mango" for Spring). Following the chart's recipe, add dye mixture and 1 gallon of HOT water to pot.
  • Immerse t-shirt yarn into dye bath and stir continuously for 15 minutes. Let soak for at least 45 minutes more, stirring occasionally.
  • Thoroughly rinse t-shirt yarn in cool water and mild soap until water runs clear. Wring excess water out. Hang dry.
  • Wind into ball before using.
mosaicad79a3b968d09d18fee4d5c2320ed715b9964927

T-Shirt Yarn in Color: Mango
DSC00694

Make the Hotpad
Materials:
T-Shirt Yarn
Size US 13 Needles
Size US J Crochet Hook
Yarn Needle

CO 18 stitches.
Rows 1-5: Knit
Row 6: Purl

Repeat Rows 1-6 four times more.

Repeat Rows 1-4.

BO.

Finishing
Join t-shirt yarn at corner of hot pad. With crochet hook chain 10; join chain at corner to create a loop. Tie off.

Weave in ends.

Craft.Rock.Love,
Vickie

T-shirt yarn is made by cutting t-shirts into strips and rolling them into a ball. For a tutorial, check out my book AwareKnits: Knit & Crochet Projects for the Eco-Conscious Stitchers.

In Austin? Take my Eco-Yarns class!
DSC00645

ILoveToCreate Teen Crafts: Pretty in Peeps Pendant

Tuesday, March 30, 2010


ILoveToCreate Teen Crafts: Pretty in Peeps Pendant
Mixed Media Jewelry Project
Margot Potter
“Mom crafted, kid approved.”
Copyright 2010 All Rights Reserved

I loves me some Marshmallow Peeps candies! How about you? Last year I bought a huge pile of them just to stack them up and stare at the fabulous colors. They’re so happy and fun filled. My daughter Avalon loves Peeps too. She loves them so much I can’t buy too many or she’ll turn into a Peep.

No, seriously.

I spent the better part of Easter season last year contemplating how to turn a Peeps candy into a bead. I thought about leaving one to sit for a few months and get nice and hard and then spraying it with a sealant...and heck that might work if you didn’t live in a 130 year old school house with a small mold problem. Methinks a moldy Peep bead would lack some appeal.

I finally settled on Sculpey Ultra Light polymer clay embellished with Crafty Chica paints and glitter and Tulip Glam It Up Studs. This could become a pin or a pendant or you could make a whole bunch of these on dowels and do a fun Peeps flower pot centerpiece like my edible bouquet from last year. I decided to make mine into a necklace and just added a bunch of springy Vintage and new Lucite and wood beads for a super cute necklace. If you really want to go to town, try making some Sculpey egg beads to coordinate...or add some polka dots and squiggles to large wooden beads...or do a collar of several Peeps that circle the neckline. I am not exaggerating in the least when I tell you that making these is so much fun, you’re going to look for reasons to make more!


Materials
Sculpey Ultra Light
Crafty Chica Little Chica Paints Red and White
3 Tulip Glam-It-Up Iron-On Studs Black
Crafty Chica Glitter Sunset Pink
Aleene’s Jewel-It Glue
Aleene’s Fast Grab Tacky Spray
Aleene’s Matte Finish Spray Sealant

Tools
Paint Brush
Polymer Clay Dedicated Toaster Oven
Sheet of Brown Kraft Paper

(To Make the Necklace:
Various Coordinated Beads in a Pattern That Makes a 16” or Longer Finished Length (I got the clear Lucite with green filament beads in NYC but here’s a source online and Beadin’ Path has a plethora of great vintage and new Lucite beads), 49 Strand .018 (or thicker) Beadalon Wire (always fill the holes of your beads with the wire), Beadalon EZ-Crimp Fancy Sterling Toggle Clasp, Mighty Crimp Tool and Wire Cutters)


1. Soften clay in your hands or by running it through a clay dedicated pasta machine until it is malleable. Use a real Peep as your guide to create a clay version. I bought some for research so I could get the size right...that’s my story and I’m sticking to it.


2. Use a sharp pointed object to create a hole in the middle of your rabbit’s head. This hole is threaded side to side so you can string the pendant on a necklace. Skip this step if you’re not making a bead.


3. Place rabbit on a sheet of Kraft paper on the baking tray and into a pre-heated 275 degree Toaster Oven. Watch the clay to be sure it doesn’t burn...it shouldn’t take very long to set. Mine took about 7 minutes...after I burned the first one. Oops.


4. Allow rabbit to cool. Mix red and white Crafty Chica paints to get a nice shade of pink. Paint rabbit. Allow to dry.


5. Place rabbit on a sheet of kraft or scrap paper. Spray with Aleene’s Tacky Spray. Pour a generous helping of pink glitter all over rabbit front and sides. Tap off excess and pour back into jar. Allow to dry.

6. Spray rabbit with Aleene’s Matte Finish Spray Sealant. Allow to dry.


7. Adhere the three Glam It Up studs to the face of your rabbit with the Jewel-It Glue. You’ll need to have a good dollop of glue so it fits into the recess on the stud. Use the handle of your paintbrush or a toothpick to remove any excess glue. Allow to dry.

Design Note: Do not eat this Peep.  It won't taste very good.  Trust me.

Sock it to me Owls

Sunday, March 28, 2010


Sock it to me Owls
by Cheryl Ball

Materials:
Aleene's® Fabric Fusion® Permanent Dry Cleanable Fabric Adhesive
Tulip® 3D Fashion Paint™ in Pink
– Stick
– Rice
– Kids socks: assorted sizes
– Paper towels
–Needle and thread to match
– Buttons: ½” (2) per owl in desired color
– Clothespins
– Raffia
– Sewing pins
– Jute for hanger, 2 yards
– Masking tape, low tack
– Scissors

Instructions:
1. For body, cut across sock, just under heel, using scissors.
2. Pin forehead, beak and wing patterns onto ribbing of socks. Cut out.
3. To create ears, glue two scrap sections of socks together. Let dry. Cut out ear shapes.
4. Fill body section with rice to within 1-1/2” from top. Pinch in sides and apply a dot of glue in pinch to hold in place. Hold with clothespins until dry. Fold excess to back, applying glue on back of flap and press in place creating head of owl. Hold with clothespins until dry.
5. Thread needle with contrasting thread to buttons. Sew a few times in holes of buttons. Tie knots at back of button then trim ends.
6. Apply glue to back of forehead triangle, smooth with finger to edges then press in place slightly above fold of body. Apply a thin bead of glue along bottom of edge of ear then press in place on back of forehead holding in place with tape if needed until dry.
7. Glue buttons, beak and wings in place. Let dry.
8. Start flow of Pink Slick Paint on paper towel using an even pressure on bottle for a smooth line. Lay owls on back and flatten. Paint semi-circles on sock to create look of feathers. Let dry.
9. Cut a stiff branch with several branches. If needed, several smaller branches can be tied together with raffia to create a wider area for owls to sit on.
10. Position owls on branch then remove and apply a thick bead of glue in place. Replace owl and press into glue. Repeat with other owl. Let dry.
11. Tie a knot with raffia on one side of branch; determine length of hanger then tie knot on other side. Hold up to see if it hangs straight, if not add another length of raffia and knot at top.

Faux Porcelain Roses Jewelry

Saturday, March 27, 2010


Knead white bread and Aleene's Original Tacky Glue together with a drop of paint. that's all you need to create this simple clay. The delicate roses in the jewelry set will inspire you to try all kinds of shapes with this easy recipe.

Materials
Aleene's® Original Tacky Glue®
– Needle nose pliers
– Slice of white bread
– Jump rings, clasps
– Decorative paper clips in spirals, flowers, hearts
– Acrylic paint (for colored clay)
– Plastic bags
– Craft stick

Instructions:
1. Remove crust from the bread slice, and discard crust.
2. Tear bread into small pieces and put into a disposable cup or bowl.
3. Add 1 tablespoon of tacky glue. Mix with craft stick until well blended.
4. Divide into thirds to make three different colors.
5. Add a few drops of acrylic paint to each batch. Mix with craft stick, and then knead in your hands until it becomes the consistency of fine clay. Keep bread dough in plastic bags to keep it from drying out while you make the project.
6. Take a pinch of dough and roll it into a ball. Flatten the ball into a flat circle. Roll the circle to form the center of the rose.
7. Take another pinch of dough and roll it into a ball. Flatten the ball into a flat circle. Shape the circle into a petal. Press the petal to the center of the rose.
8. Continue to make petals and add to the rose until it is the size you desire.
9. Pinch any excess clay from the bottom of the rose. Roll the excess clay into a ball and flatten it. Press a spiral paper clip into the clay. Place the clay rose over the paper clip and press it gently into the excess clay to encase the clip. Set aside to dry.
10.Repeat the process until you have enough roses on clips to form a bracelet or necklace. Let the clay roses dry overnight.
11.Join the rose clips together with jump rings and add clasps to complete.

For technique with step by step photos, visit our technique page on our iLoveToCreate site.
PattieWack Pointer: Clay objects made with this recipe can be glued to all types of projects, such as frames, buttons, journals, boxes, and scrapbook pages. Adhere them to any hard surface with white tacky glue, adhesive dots, or hot glue.

How to Prevent Stencil Overspray

Friday, March 26, 2010


This is a great tip to prevent getting the stencil border from showing up after you spray it with your favorite fabric spray paint! We recommend trying the Tulip® Fashion Graffiti Spray Cannon or Tulip® Fabric Spray Paint™!

Such an easy solution for an age old problem!!!

Shimmer and Shine Sequin Flower Purse


Don't let ordinary fabric glue turn your dream design into a nightmare. Use Aleene's Fabric Fusion, the ultimate glue for all fabric projects. No stringiness, no toxic fumes - just a permanent, dry-cleanable bond between your fabric and a wide range of embellishments from beads and trims to sequins and rhinestones. Aleene's Fabric Fusion. Because you deserve a glue as unique as your designs.

Materials:
Aleene's® Fabric Fusion® Permanent Dry Cleanable Fabric Adhesive
– Single sequins: assorted shapes, colors, finishes
– Ribbon, 2 yards black grosgrain
– Scissors
– Sequin trims: 5 yards each assorted colors and widths
– Sequin trim for fringe around bottom, 10 yards
– Wedge make-up sponges
– Clothespins
– Sewing pins
– Foil
– Pencil
– Low tack masking tape
– Purse with flat sides
– Wool Felt, ½ yard natural
– Ruler
– Patterns 1 & 2 (click here and scroll down to bottom of materials list for pattern)

Instructions:
1. Measure and cut felt to fit around purse and a section for bottom, adding an inch for overlap on each. Squeeze a large puddle of Fabric Fusion on foil. Tap flat end of wedge sponge in glue then swipe glue along bottom of purse. Center and press felt piece in place. Use scissors to make ½” wide snips along excess felt. Apply glue to lower edge of purse then press excess in place creating a finished edge.
2. Swipe glue on purse then press felt into place butting edges where they meet. The felt can be trimmed close top of purse or folded inside and glued in place.
3. Cut out patterns, pin to felt and cut out.
4. Leaves: Starting at tip of leaf, apply glue to back of sequin, press in place about ¼” over edge to cover edge of felt. Continue with next sequin slightly overlapping first. Continue covering remaining felt leaf. Let dry. For vein, cut a 3” strip of darker green sequin trim. Squeeze a thin wavy bead of glue down center of leaf then press trim into place. Let dry. To apply sequin trim to felt, apply a thin bead of glue in desired design – circles, stripes etc., then press trim into place. Poke a pin to hold ends in place if needed until dry. Continue with remainder of leaves using different sequins, and trims for each referring to photo for design reference.
5. Flowers: Pin and cut patterns from felt. Starting along outer edges, glue overlapping single sequins and sequin trim in place. 6. Apply a thin bead of glue following desired direction or design of sequins then press into place. Center of red flower has large single sequin glued in a circle then sequin trim coiled and glued in center. Let dry.
7.Bottom sequin loops: Apply a bead of Fabric Fusion along bottom edge of purse about ½” up from lower edge. Starting at back, poke a pin into end of sequin trim to hold in place. Loop trim down about 3” then loop up into glue poking a pin to hold loop in place. Continue around entire edge of purse gluing and pinning. Let dry. Remove pins.
8. Position dry sequined flowers where shown. Use pencil to lightly draw on different areas of design; circles, stripes and filled in areas. Glue designs to about ½” up from bottom edge. Remove flowers. Apply glue and sequins in design area: add sequins to an area then move onto the next keeping in mind to cover edges, overlapping sequins to fill in areas solid so no felt shows through.
9.Glue several strands of different sequin trims around bottom edge to cover loops of fringe.
Finish back of purse as desired.
10. Position flowers and leaves in place having edge of flower and leaf over lower edge. Glue leaves in place first. Apply glue to bottom third on back of leaf then press in place. Glue flower layers in place applying glue to bottom third of each petal then glue entire center in place.
11. Handles: Remove handles. Thread ribbon through one loop then over to other loop. The handle is double ribbon. Determine length then trim ends. Use a new wedge sponge to swipe Fabric Fusion on a small section of ribbon. Press other ribbon in place then hold with clothespin until dry. Continue with remaining handle. Repeat with other handle. Let dry then remove pins.
12. Apply a thin bead of Fabric Fusion down center of ribbon handle and press on sequins. Hold with clothespins or low tack masking tape until dry. Carefully remove tape or clothespins.

Easter Egg Mosaic Earrings

Thursday, March 25, 2010


Here comes Peter Cottontail, hopping down the bunny trail. You know what that means, time to put on your Easter craft thinking caps. In a random stroke of luck I recently discovered a vintage Easter crafts idea book from PAAS full of egg inspiration. One of my favorite projects was an eggshell mosaic lamp. A lamp seemed like a whole lot of eggs, but a pair of earrings was totally doable. Today for I Love to Create let's make Easter wearable.


SUPPLIES
Eggs
Plain Earrings
Aleene's Tacky Glue
Easter Egg Dye
Pot
Water
Stove
Mugs


DYE EASTER EGGS
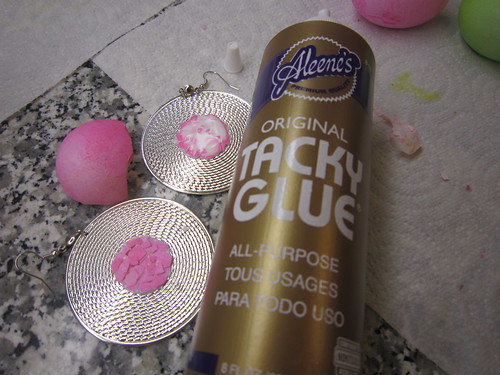
Come on you know you are going to dye eggs anyway. Make a quiche, egg salad or omelet and get crafty with the dyed shells. First I hardboiled my eggs. You can find egg dying kits at most grocery stores. Dye your eggs following the instructions on the package, I opted for hot pink and lime green.


PEEL YOUR EGGS
Once your eggs are dyed peel the shells. I broke my shells up into pieces. I started my drawing a large circle in the center of my earrings with Tacky Glue. I filled the circle in with pink eggshells. I found the best method was to start with a layer of larger egg shells and then add smaller pieces where there are blank spaces. Once the glue had started to dry a bit I went back over the circle with more Tacky Glue to act as a protective coat and anchor down all my pieces.

After I did the pink circle I went back and filled in the rest of the earring with green eggshell.


EGGSTRA-SPECIAL EARRINGS
Once you are done you have a pair of earrings so cute you could wear them any day of the year, not just Easter.

Little Red Classic Plate


Turn a classic flower into modern art with the Duncan® Oh Four™ Coupe Dinner Plate! Whether you’re looking for a vibrant table setting or standout wall décor, your piece will blossom to life with Neon Envision® Glazes.

Materials
– Dinnerware Bisque Designs
21426 Coupe Dinner Plate 11" x 11" x 1.5"
– Signature Brushes
SB 803 No. 4 Liner
SB 807 No. 6 Fan Glaze
SB 812 No. 10 Round
– Envision® Glazes
IN 1026 Very Black
IN 1075 Cobalt Blue
IN1206 Neon Red
– Foil or paint palette
– Container for water
– Graphite paper
– Potter’s sponge
– Pencil
– Paper towels
– pattern (click on this page and scroll down in materials list for pattern link)

Instructions:
1. Wipe plate with damp sponge to remove bisque dust.
2. Enlarge pattern to size of plate. Lay graphite paper between plate and pattern and trace over lines with pencil, transferring design onto plate.
3. Pour a puddle of Cobalt Blue onto foil or palette.
4. Using the No. 4 Liner, brush two coats around the outside of the petal lines to create shading, letting dry between coats. Refer to photo. Let dry.
5. Pour a puddle of Neon Red onto foil and using the No. 10 Round, apply one coat of Neon Red on each petal, gently brushing over the Cobalt Blue shading. Let dry then apply two more coats over remainder of petals (avoiding Cobalt Blue), letting dry between coats. Let dry.
6. Pour a small puddle of Black on foil and using Liner, add thin lines around petals to define. Paint in edge of plate where outer petals meet with Black. Apply three coats, letting dry between each. Let dry.
7. Apply three coats of Neon Red to back of plate, letting dry between coats.
8. Stilt in kiln and fire to witness cone 06.

Aleene's Exclusive Store and Online Event with A.C. Moore and Tiffany Windsor!

Wednesday, March 24, 2010

We are excited to announce that Tiffany Windsor will be hosting an in-store event at the new A.C. Moore in Greenville, North Carolina on April 17th! Actually, the Grand Opening celebration lasts for a month starting this Saturday, March 27th!

We wanted to tell you about this a few weeks in advance so you can not only plan to attend, but you can get in on the celebration for this store! In anticipation of this event, we will be featuring lots of fun techniques and projects using Aleene's Crafting Adhesives and also more info on Tiffany! So even if you don't live in the Greenville area, you can still get in on the fun!

If you are in the Greenville area,mark your calendar for the grand opening of the new University Commons store! Here's the location:

A.C. Moore University Commons
3040 South Evans Street
Suite #112 Greenville, NC 27834

Tiffany will be showcasing super cool techniques that you can do using Aleene's Crafting Adhesives as well as give you an opportunity to do your own Make it Take it! Also, she'll be there to answer all your glue-related and crafting questions! Check back here on our blog, or follow us on Facebook, Twitter, or on Tacky Glue's fan page to get inspired in the weeks to come. We want to show you all the cool things you can do with your favorite bottle of gold glue!

Stay tuned!

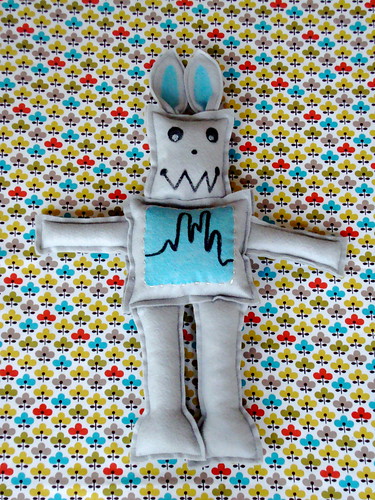
Robbit Plushies!

Robbit Plushies!

Rabbits are nice but robots are (dare I say) cooler--this year add a little techie love to a traditional bunny to make the kids a Robbit plushie for their Easter basket! Here's how.

Materials

Grey Felt
Poly or Bamboo Stuffing
Sewing Machine & Grey Thread
Fashion Graffiti Fabric Paint Tagger (in either color: Soho, Merge or Taxicab)
Fine Tip Paint Brush
Optional: Embroidery Needle & Floss (Silver & Light Blue)
Optional: Wooden Skewer

How-To
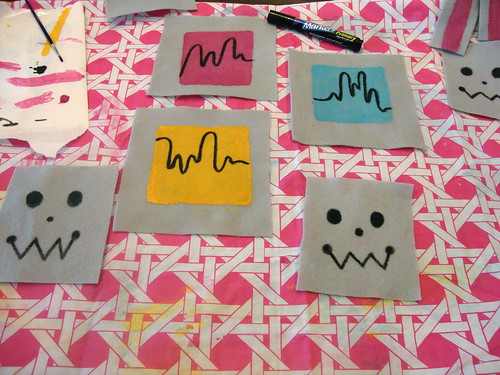
  • Cut front & back pieces for the head, body, legs, arms & ears (see photo below for examples.)
DSC00668
  • Use Fabric Paint Tagger to color in the center of the front ear pieces, and a square on the front body piece. Let dry.
DSC00669
  • Use Fabric Marker to draw a robot-y face on front head piece and the frequency modulator line on the body front.
DSC00670
  • Using needle & floss, embroider detailing on the body & eyes (optional).
  • Sew Robbit together using a top stitch & 1/4" seam allowance; stuffing all pieces (except the ears) as you go along.
Note: If you don't want your Robbit to be all flopsy-mopsy, insert a wooden skewer through the stuffing in the body & head.

Blue Robbit
Blue Robbit

Pink Robbit
Pink Robbit

Yellow Robbit
Yellow Robbit

Beep-beep, hippoty-hop--Happy Easter!

Craft.Rock.Love,

How to bleach and dye a basic black dress!


Kathy Cano-Murillo a.k.a. Crafty Chica
gives a behind the scenes look at how Chloe and Allee, two iLoveToCreate team members, made this amazing dyed/bleached dress from a basic black dress from Target.

So easy and fun and exciting experimentation! Great job ladies!

Wild Flower Frame


Aleene’s® Crafting Adhesives hold this project together for an adventurous walk on the wild side.

Materials:
Aleene's® Paper Glaze
Aleene's® Original Tacky Glue®
Tulip® Soft Fabric Paint™ in BI15790 Crimson Red
– Plastic tablecloth
– Ruler
– Coffee filter
– Wood frame, 8” square
– Scissors
– Construction paper, red
– Wavy edge scissors
– Paintbrush, large
– Glass micro beads: black, red
– Paper, 12” square, zebra print
– Newspaper
– Pencil
– Craft knife
– Aluminum foil

Instructions:
1. Cover work surface with tablecloth. Lay frame onto work surface.
2. Apply Tacky Spray onto front of frame, following manufacturer’s instructions. Center zebra paper onto frame, smoothing out any bubbles. Cut an “X” from corner to corner of frame opening, using craft knife.
3. Apply Tacky Spray onto back of frame. Fold paper to back of frame, clipping corners so they lie flat.
4. Cut a strip of construction paper to fit along inside edge of frame opening. Glue into place, using Tacky Spray.
5. For flower, pour a half dollar size puddle of Paper Glaze onto foil. Add a dime size puddle of Crimson Red to tint Paper Glaze. Mix well. Apply a generous coat of mixture to cover half a page of newspaper, using brush. Let dry completely.
6. Trace coffee filter three times onto painted newspaper, using pencil. Cut out, using wavy edge scissors. Trim second circle ½” smaller and third circle 1” smaller.
7. Grasp back of one circle. Pinch center together. Twist, to shape into flower petal. Repeat for remaining circles. Glue medium petal onto largest petal, using Paper Glaze. Glue smallest petal into medium petal. Let dry.
8. Cut a 12” x 4” strip of painted newspaper. Coil strip to form center of flower. Glue into center, using Paper Glaze. Let dry.
9. Squeeze a thin line of Paper Glaze along edges of flower. Sprinkle a random pattern of micro beads onto wet glue. Let dry.
10. Apply a generous coat of Paper Glaze onto front of frame. Set flower onto left upper corner. Let dry overnight.

ILoveToCreate Teen Crafts: Trashionista Mixed Media Purse

Tuesday, March 23, 2010

ILoveToCreate Teen Crafts
Trashionista Mixed Media Purse
Margot Potter

"Mom crafted, kid approved."
Copyright Margot Potter All Rights Reserved

I have an ever bursting at the seams pile of fashion mags that sit by my bed and on the kitchen table. I peruse them at night before I go to sleep and while I’m noshing to trend spot. The problem is that they start to take over my house if I’m not careful! What I don’t recycle, I love to use to make accessories. The words and images on this purse are all made of recycled paper. This is all about layers of paper, inks and paints and every purse will turn out differently. I love that! 

Teaching our teens about the many ways they can recraft, reuse and repurpose is crucial. Plus this project will be a lot of fun for them to personalize. You can do this with old cigar boxes and get hardware and a handle to retrofit. Avalon loved this one and I’m hoping we can whip up some more soon together.


Materials

Wooden purse blank
Aleene’s Traci Bautista Collage Pauge Matte
Crafty Chica Little Chica Paints Red
Fashion Graffiti Paint Cannon Fabric Paint White
Fashion Graffiti Big Phat Fabric Marker Black
Fashion Magazines
Vintage book pages or newspaper
Inkadinkado Animal Print Clear Stamps
Fiskars Clear Stamp Block
Sizzix Big Shot Flower Die

Tools

Sizzix Big Shot
Mini-screwdriver
Paintbrush
Foam Brush
Old toothbrush
Scissors

1. Remove hardware from purse. Sand, clean and coat purse with a layer of racy red paint inside and out. Allow to dry.


2. Use Big Shot and die to cut three vintage book page or newspaper flowers.


3. Select words and images.  Decoupage flowers and cut and torn magazine words and images to the purse front using Collage Pauge matte and a foam brush. Allow to dry. If bubbles form under the images, wet your finger with water and work them out from center. Don’t fret about bubbles, they’ll go away once the medium is dry.  (I had to remove and replace a word at the top of this purse...which you can do while everything is still wet.) 

4. Use the Big Phat marker to put a layer of ink on your stamps and randomly stamp the leopard and tiger prints around edge of purse. Allow ink to dry.

5. Use marker to make angled stripes on thinner edge of purse. Allow ink to dry.


6. Dip an old toothbrush into the white paint and flick it across purse front. Repeat using red paint. Allow to dry.

7. Reassemble purse.

Pops of Polka Dot Apron


Make your time in the kitchen extra fun with pops of colorful polka dots! Stitch this vibrant apron with little effort and add floral embellishments with Aleene’s® Fabric Fusion™.

Materials
Aleene's® Fabric Fusion™ Permanent Dry Cleanable Fabric Adhesive
– Sewing pins
– Iron
– Pinking shears
– Low-tack masking tape
– Orange Mini Dot – ¼ yard
– Scissors
– Jumbo rick-rack – bright pink
– Red Dot Tonal – ¾ yard
– Yellow Transitions – 1/3 yard
– Sewing machine
– Ruler or tape measure
– Green Fancy Floral – ¼ yard
– Lime Polka Dot – ¼ yard
– Fuchsia Polka Dot – 1/3 yard
– Craft brush – ½” flat
– Thread to match
– White Lace – ¼ yard
– Needle
– Paper towels
– Foil

1. Measure and cut a 30” x 18” rectangle from red fabric. Fold short sides over ½” then another ½”, iron flat then sew in place.
2. To create bottom hem, fold over ½” then 1” and sew in place.
3. To create apron ties, cut two 5” x 30” strips of pink fabric. Fold over lengthwise, right sides together, and sew along sides, sewing an angle at one end and leaving other end open. Trim seams, turn right side out and iron flat.
4. Measure and cut two 16½” x 3” yellow sections for waistband. Fold over ½” along one long edge and iron flat. Lay one of the yellow waistband pieces right side up on work surface and pin pink apron ties at each end of piece. Pin other yellow waistband piece right side down on top of first piece, sandwiching ties in between, then sew along one long side and two short sides. Trim seams, turn right side out and iron flat.
5. Pin top of apron inside open end of waistband, folding equally spaced pleats at the top of apron until excess fabric fits. Sew in place. Hand sew folded edge on backside of waistband in place on apron, covering sewing line.
6. Layer several pieces of red fabric then pin large scallop pattern in place. Use pinking shears to cut around pattern. Cut six red scallops then repeat step, creating two smaller sections from pink, orange and yellow. Refer to photo.
7. Squeeze a puddle of Fabric Fusion on foil. Place a pink section right side down on a paper towel. Dip flat brush into glue then brush on a thin, even coat to back of fabric piece. Carefully center on red section then press to secure. Repeat with all scallop pieces. Let dry.
8. Use pinking shears to cut a 4” circle from orange and red fabric. Pin each section onto lace then loosely cut around lace, leaving a wavy 1” border around each.
9. Flower: Cut a 4” x 30” strip from pink fabric and a 3” x 30” strip from yellow. Fold in half lengthwise, placing wrong sides together, and iron smooth. Use a needle and thread to sew a basting stitch along cut edge, gathering fabric along the way. Gather tightly then sew a few stitches to hold in place at other end. Roll strip, lining up edges along sewn side then sew through gathers to hold flower together. Repeat with other strip.
10. Leaves: Cut two 4” squares from green fabric then three 3” squares from lime and one 3” square from green fabric. Fold a square in half wrong sides together then bring top corners to center. Slightly overlap then hold with a pin to secure. Sew a gather stitch along cut edge. Tightly gather then add a few stitches to secure. Repeat with all squares.
11. Position scallops along hem of skirt, alternating colors and placing about ½” under hem. Glue in place. Brush glue to back of lace sections then press in place at bottom of apron as shown.
12. Position fabric circles in place then position leaves where desired. The cut edge of leaf will be covered by edge of fabric circles. Glue leaves in place accordingly. Brush glue to back of fabric circle then press in place, covering ends of leaves adjusting as needed. Let dry.
13. Glue flowers in place. Let dry.
14. Cut rick-rack to width of hem then add three additional inches and cut. Working in short sections at a time, apply a thin bead of glue to back on one end of rick-rack strip, fold 1” or so to back and hold with a small piece of tape. Glue rick-rack in place along bottom hem of apron, holding in place with tape as needed until dry.

Recycle, Reorganize, Recipes

Sunday, March 21, 2010


Love to cook, love to organize, and love to decoupage....
so I love this decoupaged recipe tin I made to organize my fave recipes to keep right on the counter top in my kitchen.


I'm a big coffee and hot tea lover and I just can't bear to throw away some of the cool packaging and save them in an ephemera box I keep in my studio. The maple syrup and the chocolate label were tucked away there, too. The cute alphabet caps were in my scrapbooking stash.

I started out with a humdrum recycled tin from the thrift store. It would have been fine the way that it is, but who you have to agree, it's pretty darn boring.

Then I used Aleene's® Collage Pauge Instant Decoupage to glue the labels to the tin. I laid the labels face down on a paper towel, brushed glue on the back and then applied them to the tin, pushing out any air bubbles. When I was finished with that step, I put a coat of glue over the labels to keep my tin nice & clean from flying food.


Recipe cards were a snap to make with colored card stock, clippings from magazines and the web, and glued together with Aleene’s® Acid Free Tacky Glue™ Sticks.
The whole project didn't take very long, and more recipes can be added all the time.


This project, and dozens more were designed by me and written up by Barbara Winkler in "Cookbooking, the delicious new way to scrapbook" by Sterling Publishing. You can pick yours up at Barnes & Noble or online.

Oh, and here's my recipe from the pic. I like to make this for my gal pals on the weekend.

Grapefruit Pomegranate Sunrise:
4oz. Light Rum (optional)
16 oz. Pink Grapefruit Juice
2 oz. Pomegranate Juice
2 oz. Ginger Ale
4 Wedges Ruby Red Grapefruit

Pour ingredients into a tall glass pitcher. Pop a dozen ice cubes into the pitcher. Stir briskly. Serve in champagne flutes with crushed ice and a garnish of grapefruit wedges. Enjoy!

Happy Cooking and Crafting!
PattieWack

Queen for a Day Tiara


Crafty Chica created this pretty and glittery queen headress for Mother's Day or anyday! Here's the instructions to make your own sparkly creation!

Queen for a Day Tiara
Designed and Decorated by Kathy Cano-Murillo

Materials:
Aleene's® Paper Glaze
Crafty Chica™ Uno Inspiration Cards™
Crafty Chica™ Little Chica Paint Packs™
Crafty Chica™ Chunky Glitters in Popstar Purple
– Aleene's® Original Tacky Glue®
– Hot glue gun
– Small silk roses
– Paintbrush
– Plastic beaded necklace (optional)
– Scissors
– Wood disc
– Glitter snowflake ornaments (optional)
– Scratch paper
– Plastic tiara
– Newspaper
– Silk leaves


Instructions:
1. Cover work surface with newspaper. Cut out the Queen image or image of choice from the Crafty Chica™ Inspiration Cards™ pack. Glue image to center of wood disc with Original Tacky Glue™. Let dry.
2. Using color of choice from the Crafty Chica™ Little Chica Paint Packs™, paint the area left uncovered by the image on the disc, adding an additional coat if necessary.
3. With a clean brush, paint over painted section of disc with Aleene’s® Paper Glaze™ and sprinkle Chunky Glitter™ of choice over Paper Glaze™, pressing glitter with finger to secure. Let dry, then shake off excess glitter onto scratch paper and pour back into container to be reused.
4. Use hot glue gun to glue disc to center of tiara. Let dry.
5. Use Original Tacky Glue™ to adhere silk roses and leaves around the base of tiara. Let dry.
6. Cut a portion of a beaded necklace to fit around disc on tiara. Glue on with Original Tacky Glue™, then glue glittered snowflake ornaments around the back edge of disc. Let dry.