Showing posts with label aleene's spray acrylic sealer. Show all posts

Glittered Glam Christmas Trees

Thursday, December 5, 2013
I think I love Christmas for one very distinct reason... It is totally acceptable to have everything in your home covered with glitter. In fact, it's highly encouraged! So I decided to bling out a pair of paper mache cones I had in my craft stash!

Read more »

DIY Collage Pendants

Monday, April 1, 2013
These boutique chic collage pendants are easy peasy lemon squeezy to create!  Collage Pauge, Aleene's jewelry glue and some pretty vintage inspired papers and decorative elements from Cosmo Cricket are adhered to light weight wooden tags and sealed for durability with Aleene's Spray Acrylic Sealer.  This is a great girl's night in project and a fun DIY to do with your teens.  And the best part, you can share your own unique message in a pretty pendant you can wear!
What you need:
Aleene's Jewelry and Metal Glue
Wooden jewelry tags with drill holes
Decorative papers (Cosmo Cricket)
Decorative fabric brads (Cosmo Cricket)
Tiny text stickers or print your own (Cosmo Cricket)
Jump rings
Chain
Clasp
Scissors
Bent and chain nose pliers
Flush cutters
Pencil
1.) Gather materials.  2.)  Trace and cut papers to fit tags.  3.  Attach paper to wood with decoupage medium.  Add tiny text to tags.  Make sure you line up items on front so tag hole is at the top! Paint two coats of medium on top.  Allow to dry.  4.  Cut metal shanks off of brads.  
5.) Attach brads to tags with jewelry glue.  Allow to dry. 6.) Punch hole in paper, carefully working the hole punch into the pre-existing hole in the back of your pendant.  7.)  Spray one coat of acrylic sealer on pendants.  Allow to dry.  8.) Attach jump rings. 
These turned out so cute, I can't wait to make more.  Adding that acrylic sealer means you won't have to worry about the decoupage medium being sticky on humid days.  I live in the Southeast, it gets hot around these parts!  Try making these with buttons, old jewelry pieces, cabachons, crystals...collages are little miniature artworks and each one should be a reflection of you!

How to Decoupage a Terra Cotta Pot

Wednesday, March 13, 2013

How to Decoupage a Terra Cotta Pot
Make a Mod Squad Planter
Margot Potter for iLoveToCreate

Terra cotta pots are absurdly inexpensive and perfect for patio planting.  It's easy to dress them up with things you probably already have on hand.  Tissue paper and decoupage medium are the perfect materials to take a plain terra cotta pot from drab to fab in just a few quick steps.


You'll need a pot, a foam brush, scissors, some tissue paper cut into strips, Aleene's matte decoupage medium and Aleene's glossy spray acrylic sealer.  Brush on some medium, attach a strip working from the inside of the pot edge around the bottom of the pot.  Layer the strips on top of each other so you get some color play.  Gently press the tissue strips from the top to bottom, add medium on top and smooth with your finger tips.  Let the decoupage medium dry and then spray it with two layers of the sealer so it's water proof.  Add a plant and you can dress up a windowsill or a patio table top in a flash.  The best part, with a little help from iLoveToCreate, you can make this retrofabulous project for under $10.00!  


iLoveToCreate Tori Spelling Inspired Pin This Necklace

Monday, July 16, 2012
iLoveToCreate Tori Spelling Inspired ‘Pin This’ Necklace
Margot Potter
“These are your grandmother’s crafts...ya gotta problem with that?”

My design process is a very intuitive one.  I see things, they spark ideas and off I go to figure out how to turn the ideas into reality.  Not everything works out the way it is in my mind, but that’s part of the fun of design.  These vintage wooden clothespins were part of an Estate Sale haul from several years back.  I knew there was a design in these, but what, I didn’t know.  Watching Craft Wars, I’ve been utterly charmed by Tori Spelling’s large scale whimsical necklaces.  This week I was going to make a Pop Craft Challenge inspired Dog Toy box, but honestly I was running out of time and feeling stressed until I stumbled on these clothespins, pictured Tori’s jewelry and it all came together.  My vintage craft magazines are filled with found object jewelry like this and I find it all such fun.  I am seriously smitten with this design. I can not wait to wear it to the big Craft and Hobby Association show I’m attending this week.  You could do something similar using clip style clothespins or golf tees would make a smaller scale but equally delightful design. 

Materials
11 ½”x4” vintage wooden clothespins
8 10mm crystal SWAROVSKI ELEMENTS rounds
2 sterling or silver plated dapped French ear wires
2 sterling or silver plated EZ Crimp ends
2 silver tone or black size 2 crimp tubes or beads
.018 49 Strand Beadalon wire
2 metal loop topped craft screws
10.5” segment gun metal textured cable chain
Gun metal lobster clasp
Crafty Chica Paints: red, black, white
Aleene’s Spray Acrylic Sealer matte finish
Aleene’s Turbo Tacky Glue

Tools
2 pairs chain nose pliers
Mighty crimp tool
Flush cutters
Electric drill with 1/16” bit
Marker

Mark and drill holes in clothespins.  There is a hole in the center top of each (these are drilled side to side so the pin leg opening will hang forward on the wire.)  The second side to side drill hole is at the sides just above the top of the pin leg opening.  Repeat for 9 of your clothespins.

Make a small hole in the center top of two clothespins; these will be threaded with the loop top screws to create the earrings.

Paint all clothespins.  There top drilled pins are red.  Make three more red, three black and three white.  This will take several coats drying in between.  You can also sand in between coats.  Use a foam brush to paint and a small detail brush to reach inside of the pin legs.  Paint all sides.

Once pins are completely painted and dried, seal with spray sealer and allow to dry.

Cut a 10” segment of beading wire.  Thread an EZ Crimp end on one side, secure with Mighty Crimp tool.  We have a video that shows you how to do this here.

Thread 9 clothespins on the wire alternating colors.  Thread wire into a second EZ Crimp end.  Use chain nose pliers to grasp and pull wire through end pulling the clothespins taught, but not too stiff.  Use Mighty Crimp tool to secure wire, use flush cutters to cut off excess wire tail.  Thread a second wire into the lower hole opening on the outermost clothespin.  Thread on one of your crimp tubes, use chain nose pliers to compress tightly.
Slide a bead on the wire, thread into the next pin and repeat this process until you reach the final bead.  Thread the wire into the 9thclothespin, add a crimp tube, tighten wire to remove any slack and compress tube with chain nose pliers to secure.  Cut off excess wire with flush cutters.

Attach a jump ring to one of the EZ Crimp ends.  Repeat on the other side, adding the chain.  Finish by attaching a jump ring to the open end of your chain and add the clasp before securing closed.

To make earrings, thread a loop top screw into the pre-drilled opening.  Dab a little bit of Tacky Glue on the screw before inserting.  Use chain nose pliers to push and turn loop into opening until it is completely embedded.  Use chain nose pliers to attach ear wires loop tops by opening the loop on the earrings, sliding them into the loop and securing closed.

Wednesday, July 11, 2012
Craft Wars Inspired (Junk Drawer) Ocean Dreams Birdhouse
Avalon Potter for iLoveToCreate
"Teen crafted, Mom approved."

My mom is going to be on an upcoming episode of TLCs new show Craft Wars and she's making projects every week with other contestants from the show inspired by the theme of the week before.  Last week's Pop Craft challenge was to make a junk drawer themed birdhouse.  We had two of these old birdhouses sitting in our yard, so we decided to both decorate one.  I used her paint scraping technique in colors that fit my style and added some things from our 'junk drawer', some sea shells from our last trip to the beach, old buttons and a seahorse metal charm.  Layers of mixed acrylic paint colors from Crafty Chica, Scribbles and Tulip are all sealed under Aleene's Spray Sealer so this can go outside.  I can't wait for a bird to move in!

Materials
Old wooden birdhouse
Seashells
Old buttons in colors to match
Seahorse or ocean themed metal accent
Number tape (7 gypsies)
Blue, black, copper, white and brown paints (Crafty Chica, Tulip and Scribbles brands)
Aleene's Turbo Tacky Glue
Aleene's Spray Acrylic Sealer (matte)

Tools
Scissors
Butter knife or palette knife


If you are using an old birdhouse, clean off any debris and lightly sand.  If a new birdhouse, sand lightly.

Mix up paints to make several shades of blue, grey and tan.  Use a butter knife to scrape paint on house door, roof and sides in layers, starting with the darker colors and continuing until you're happy with how it looks.  try not to smash the colors together, layer them on top of each other instead.

Use Tacky Glue to glue shells around your door frame.

 Glue buttons around opening using more Tacky Glue. 

Glue Seahorse to Door with more Tacky Glue. Yay, Tacky Glue!

Run tape along edge of roof on front and sides.  Cut to fit.

Spray with sealer, apply several coats allow them to dry in between each layer.

iLoveToCreate: Burnt Offerings Decoupage Necklace

Monday, June 18, 2012

iLoveToCreate Retrofabulous Crafts
Burnt Offerings Decoupage Necklace
Margot Potter

In 2009 I published a book called Beyond the Bead.  It is by far my favorite book.  I had a blast making beads and components out of all sorts of wonderful things I found in the aisles at the craft and hardware stores.  One of the projects in the book used old book pages, wooden craft stars and a wood burning tool to create the look of aged and burned charms.  I loved making it, I love wearing it and I thought I'd share it with you.  I've seen some similar projects making the rounds on Pinterest, but this is my version from a few years ago.  Aleene's Collage Pauge is an amazing medium with endless uses and here you can see how nicely it seals the old paper to create charms that look fragile, but are tough and durable.  Add a little Aleene's sealer spray and you've got a necklace that will last a lifetime.

Materials
Old book pages
Wooden craft stars
Traci Bautista Aleene's Collage Pauge Matte
Aleene's Spray Acrylic Sealer Matte
Tiny key charms
Crystal beads
Aged brass chain
Clasp
10mm gold tone or aged brass jump rings

Tools
Chain nose pliers
Bent nose pliers
Wood burning tool

Attach paper to star using Collage Pauge. Make all five stars at the same time, cutting the paper around them after they dry with scissors. 

Seal the top of the star with decoupage medium, after it dries repeat. Turn star over and repeat the process 
for the opposite side.  

Use a wood burning tool to CAREFULLY burn the edges of the stars and add some burned areas in the centers. Work in a ventilated area, take your time and be careful, the tool gets very hot. Did I mention it gets hot? Because it does. So be careful. After burning, spray with Aleene's Spray Sealer in matte.

If your stars are not pre-drilled, use a 1/16" drill bit to drill a hole at the top of one point on each star. Attach the stars and the charms and beads to the chain using jump rings and your bent and chain nose pliers.


Visit us on Facebook!
Craft on!

iLoveToCreate Teen Crafts: Mothers Give You Roots Mother's Day Planter and Plant Stake

Wednesday, April 11, 2012
Visit us on Facebook!
Craft on!

iLoveToCreate Teen Crafts
‘Mothers Give You Roots’ Mother's Day Planter and Plant Stake
Margot Potter for Avalon Potter
“Mom crafted, teen approved.

Mothers Day is coming fast and it’s time to start thinking of ways to tell mom just how much you love her. Avalon was super busy this past week, so I stepped in to make this project.  This is the perfect gift for a mom who loves to garden or one who aspires to having a green thumb. We are giving this to my mother-in-law, shhhh...

I started out with a more colorful plan, but this shade of green is my personal favorite and it just seemed perfect in this monochromatic scheme.

The saying is one of my favorites: “Mothers give you roots.” Which is followed by: “Fathers give you wings. You need both.”

I think that’s a truly lovely thought, don’t you?

I am so utterly smitten with this; I may have to make one for myself! A teen can easily handle all of the steps here and all of the accessories were found in the dollar bins, so it’s a very affordable project too!


Materials
Terra Cotta pot
Terra Cotta pot saucer
Dollar bin wooden heart ornament
Dollar bin gloves (green)
Dollar bin mini-shovel
Dollar bin mini-rake
Dollar store flower seeds
Green raffia ribbon
10 gauge tinned copper wire
30 mm silver tone jump ring
Tulip Fabric Marker (thick tip) neon green
Tulip Fabric Marker (thin tip) black
Aleene’s Quick Dry Tacky Glue
Traci Bautista’s Collage Pauge matte finish
Aleene’s Spray Sealer matte finish
Small vine or floral pattern rubber stamp
Crafty Chica little paints green and yellow

Tools
Tulip sponge brushes
Tulip sponge pouncer
Scissors
2 pairs chain nose pliers
Round nose pliers
Memory wire shears or other heavy duty wire cutters
Dowel

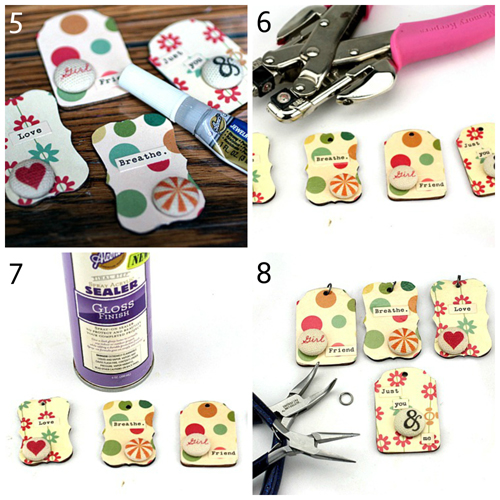
1. Make sure pot and saucer are clean and dry. Mix your paints to make a darker and lighter green. Add a small amount of yellow for the dark green and a larger amount for the lighter. You will need to mix up a fair amount of paint here so the colors remain the same, small plastic drink cups and popsicle sticks work well for this task!

2. Use a foam brush to paint the body and inside of the pot and inside and bottom half of the saucer lighter green. This will probably take 2-3 coats, allow to dry in between. Use another foam brush to paint the edge of the pot and saucer darker green, also using 2-3 coats and allowing to dry.

3. Paint heart ornament on both sides and edges in the light green, 2 coats, and allow to dry.


4. Use a paint pouncer to gently apply a layer of light green paint to top of rubber stamp. Rock the stamp from left to right around edge of pot and saucer, taking your time to avoid overlapping. This is meant to be organic, so no worries if it isn’t perfectly perfect. Allow this to dry.  Use pouncer, rubber stamp and darker paint to stamp the surface of the heart ornament on front and back. Allow to dry.

6. Print out: ‘Mothers give you roots.’ Use a green ink and an easy to read font, mine is 18pt. and the font is Abyss.


7. Use green marker to write love around edge of pot working your way around, go over that with the black marker.

8. Working outside and allowing to dry between coats, spray 2 layers of Aleene’s matter sealer on pot and saucer.


9. Use decoupage medium to apply the cut out sentence to one side of your heart. Allow to dry. You can seal this with 1-2 coats of the spray sealer if it’s going to be outside.

10. Use raffia ribbon to tie a multi-loop bow around top of heart ornament. Wrap your gloves and garden tools in raffia making another multi-loop bow.

11. Use round nose pliers to bend a loop on one end of a 2” segment of 10 gauge craft wire. Create a hook by bending wire over a round dowel (I used a metal dowel; you can use a thread spool or whatever you have at hand.) If you want to 'work harden' the wire to make it more stiff, hammer on a bench block with the flat side of a ball peen hammer. Follow by adding texture with the round end. Use jump ring and two pairs of chain nose pliers to attach heart ornament to end of plant stake.

12. To assemble for gifting cut some Styrofoam to fit inside center of pot, cutting out a segment for the gloves and tools. Poke a small hole for plant stake. Add some coordinating tissue paper and insert tools, plant stake and add your seed packet.


(This blogger was compensated for this project and given materials for construction.)

Avalon Potter for ILovetoCreate Teen Crafts: Mythical Leaf Creature

Wednesday, May 11, 2011
Visit us on Facebook!
Craft on!Click here for today's daily giveaway!
Leaf Man Sculpture Copyright Avalon Potter for ILovetoCreate

ILovetoCreate Teen Crafts
Mythical Leaf Creature
An Avalon Potter Original Creation
“Teen crafted, mom approved.”

We were assigned the task of creating our own mythical creatures at school recently. I have always loved Greek mythology, so I was very excited about this project. While my friends were busy making flying evil dolphins and Medusa berries I thought I would go with something a little less sinister (yes, a dancing leaf). My magical leaf had to be 3-d for my school project so I went out in search of paper clay and a manikin. Once I had finished the leaf I still felt like it needed some thing more, so I thought what better way to give it life then to paint it with Tulip and Crafty Chica sparkles and paints! I had lots of fun making my leaf creature and I hope you do too.

Materials
Paper clay
4.5 inch human manikin
Paint brush
Aleene’s spray acrylic sealer
LinkTulip soft fabric paint (Light green)
Tulip white glitter paint
Little Chica Paint Packs (Green)

Tools
Paintbrush


Instructions

1. Take the mini manikin and position it as you desire.

2. Cover the manikin with a medium to thick layer of clay then cover the torso and head with clay hanging off of the sides to use to form your leaf. On the tips of the feet make a curve to form the elfin shoes.

3. Sculpt the clay on the sides into points in random spots to make it appear like a leaf. Then add a vein with a few smaller veins off the sides running through the middle of the body.

4. Cover the back of the head and the torso with more clay including the clay hanging of the armature. Fill in any cracks.

5. Let the clay dry for one to three days and fill in any cracks as they appear.

6. Get the light green paint and paint the limbs and the vein the light green.

7. Take the dark green paint and paint the torso and head (excluding the vein) dark green.

8. Paint the metal and platform white. Let the paint dry.

9. Take the clear sparkle paint and coat the entire leaf with it.

10. Once the entire armature is dry take the coating and spray lightly over the entire project two to three times. Let it dry and your adorable leaf friend is done.

Happy Father's Day to the Vinyl Record Lovers!

Thursday, June 10, 2010

Father's Day is right around the corner, which means I am putting my crafty thinking cap on. Last year I made a customized 6 pack of beer which was a big hit. Today I have project on Craft about how to make etched pint glasses for dad with pictures of his kids (four and two legged). All that was left in the equation was a set of coasters.


Coasters are a little fussy for our house, so I needed to make them a bit different to fit in. Remember the Musical Mustache Masks I made? I had tons of vinyl records left over. I made jewelry with some and a clock with others, but I still have several to spare. The only thing Chris loves more than a cold glass of beer is the warm crackle of a vinyl record - why not combine the two!


SUPPLIES
Vinyl Records
Hot Pad or Glove
Aleene's Spray Acrylic Sealer
Felt
Scissors
Oven
Liquid Fusion Glue
Sand Paper


HOT VINYL
Pre-heat your oven to 200 degrees. Place your records in the oven and heat until they start to warp. Wearing a glove or using a hot pad take your records out of the oven one at a time and cut with scissors. There will be lines close to the label for you to follow. How much vinyl you leave showing is totally up to you. You may have to heat cut and heat and cut again to get all the way around the center. If your coasters are not flat heat one last time and then place between two books when you take them out of the oven.


ROUGH EDGES
For the most part your scissors will make pretty smooth cuts. If there are any rough edges use sandpaper to smooth it out.


WATERPROOF
Take your coasters outside and spray with Aleene's Spray Acrylic Sealer. Apply two coats allowing to dry completely in-between. This will help protect the label on your coaster from condensation.


SMOOTH BOTTOM
Sure the top looks great, but there is still that pesky hole for water to drip through and onto your table. Trace your circle onto a piece of craft felt and cut out. Glue on un-varnished side of coster.


POUR DAD A COLD ONE
Set your ice cold beer, Big Red or water on your coaster and don't think another thought about table rings. Lord knows dads never did anyway.

What are you making dear old dad this father's day?