Showing posts with label home decor. Show all posts

DIY Cupcake Ornaments

Friday, November 8, 2013


Wahoo! I don't know about you but I am super excited about Christmas being right around the corner. Yes, I do celebrate Thanksgiving but not in the normal way. Last night I took down all of my Christmas decorations from the attic and my goodness I was overwhelmed. But once I put my cupcake tree up everything got better.  

Let's go make some Cupcake Christmas Ornaments! 

Read more »

Chevron Ombre Pillow Case

Wednesday, August 21, 2013
I've never been happier about gas than I am right now. I don't usually get excited when I hear the work chevron because all I seem to think about is the big bold red and blue shape that takes all of my moolah.  However there is one thing I get really excited about and that is fabric paint. You can do so many great things with tulip fabric paint! Shapes, patterns and designs that are in your head can finally come to life. No special orders, no waiting for someone to make it, just you and the paint. That is all you need to create fun awesome things! Today we are making a chevron ombre pillow case that you can throw on a bed, couch or outdoors like I did.
1,2,3 LET GO!
Read more »

DIY Screen Printed Canvas

Thursday, May 30, 2013
 Small canvases are very inexpensive at the craft stores.  With just a little effort, they can pack a big design punch!  This time around I've used some graphic Ikat style fabric, which we stretched and stapled around the original canvas.  Then I created a pretty permission free graphic (you'll find it below) that I burned on a screen using the Tulip Screen-It.  This was so easy to do and if you follow the video instructions on the ILTC website, you'll have a stunning screen you can use up to 75 more times! Simply fabulous!
You will need:
12"x12" blank canvas
Black Tulip Soft Fabric Paint
Painter's Tape
Staple Gun and Staples
 1.) Print your image in black ink.  Set yourself up in a light free room with the ScreenIt and a small lamp with the yellow bulb provided in the machine.  Turn off over head light and turn on yellow bulb.  You'll need to spray the platform, place the screen on the platform.  Use squeegee to remove any air bubbles.  Spray your image, place image down on screen, use squeegee to remove any air bubbles.  Place cover on top, turn machine on and burn screen for 8 minutes.  8 minutes later, turn top of machine 180 degrees, turn back on and burn screen for an additional 8 minutes.  2.)  Soak screen in a tub of cool water for 10 minutes.  Gently rub the emulsion off of the burned areas with your fingers while screen is submerged.  Remove from water and use a soft sponge to remove remaining emulsion from the burned areas, you can do this on your printing platform.  3.) Set the screen on a towel to dry.  4.) Cut fabric to fit around edges of canvas.
5.) This is a two person job, really, but you can do it alone if you work slowly and methodically.  Stretch fabric tight and staple, start with the center and work out to sides, three staples per side is good.  To get the sides done, you will need to cut a little square off of one side of the folded fabric, then tuck, fold and staple.  6.) Tape the screen flat to the front of your canvas with painter's tape. Make sure there are no bubbles, you don't want the paint to spread outside of the printed areas. 7.) Place canvas on Screen-It platform.  Squirt out a thick line of paint and squeegee it across the screen.  8.) Remove tape and screen and let your canvas dry.

 Here is the image I used, just right click and save to your computer.  Print to fit 8.5x11 in jet black ink.


It's so much fun to screen print, you may find it just a little addicting.  I'm thinking about using my screen on some t-shirts and maybe even some pillows for our outdoor porch.  Have you ever screen printed?  What would you like to create with the Tulip Screen-it?

Get more great DIY tutorials on iLovetoCreate.com and find more DIY Fashion and Style at DIYDoyenne.com!

Cheers,
Madge

Laundry Signs

Tuesday, August 16, 2011
I have a theory.  I think that if a laundry room looks a little more decorated that you'll have a strong urge to do your laundry and it will even be fun.  Okay, not really, but I'm still going to try to make a laundry room look cute today anyhow.  These are a couple of signs for my mom's laundry room.  They were fun and easy to make.

Here's a closer look at each one.


Here's how I did it.  I cut a piece of cardboard (or two layers of cardstock) the size of the opening in the frame.  Then I cut a piece of fabric a little larger than the cardboard to cover it.  I used Aleene's brush on Super gel.  (It's like super glue, but thicker.  It dries super fast, which is always helpful.  You could probably use her spray glue or decoupage as well.)


I printed off the words in a font I liked, cut them out, and antiqued the edges with a ink pad.


I attached the signs and everything else I added with Aleene's tacky dots.  I love glue dots because they stick extremely well and there's no drippy or stringy glue.

I added buttons and a mini-clothesline with socks to the other.


Throw them in the frame and you're done.


Now, it's time to actually do some laundry.


Glittered Fruit

Thursday, May 26, 2011

Nothing makes your kitchen look bright and perky like a bowl of fresh fruit. Once you eat the fruit, or your bananas start to turn brown and barfy the fruit looses it's charm quickly. What if your fruit was bright, chipper & shimmery 365 days a year? Sound too good to be true? Grab your glitter for today's edition of I Love to Create and I'll show you how it's done.


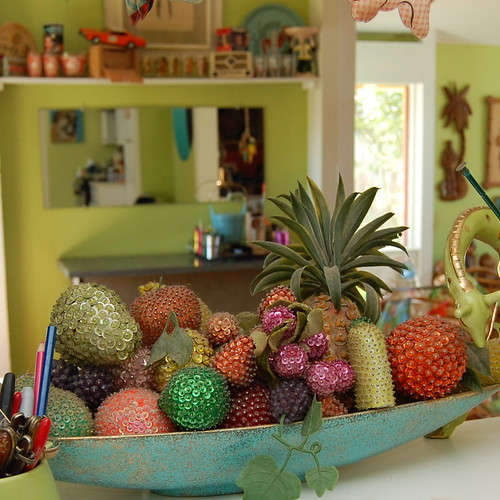
One of my 700 million collections is vintage beaded fruit. Apparently back in the day you could roll up to your local craft store and score some styrofoam shaped like fruit. From there you added sequins and beads using tiny little pins. I can feel the pain in my fingers just thinking about it, so I needed a much quicker and less painful option. Then I had a glitter epiphany.
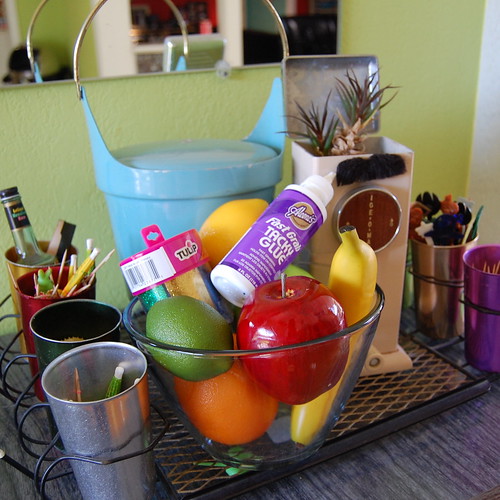

SUPPLIES
Paint Brush
Tulip Fashion Glitter
Bowl
Aleene's Fast Grab Tacky Glue
Faux Fruit


After prepping my work station a bit I was ready. This project is pretty dang easy: paint, shake & wait. First, I painted the glue on each piece of fruit.


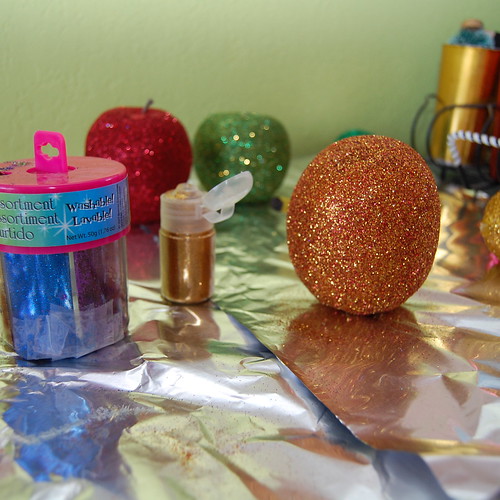
While the glue was still wet I sprinkled a thick coating of glitter on the fruit. Shake off the excess glitter and set aside to dry.


Sure glitter comes in orange and lime green, I just didn't happen to have any on hand and was too lazy to drive to the craft store to buy any. Just like you can mix paint to get any color you want, you can do the same with glitter. I glittered the red apple and shook off the excess glitter into a bowl. I then glittered the banana and the lemon and shook of the excess gold glitter into the same bowl. With a few tosses I had orange-ish glitter. I mixed gold and green to get the Granny Smith apple green.


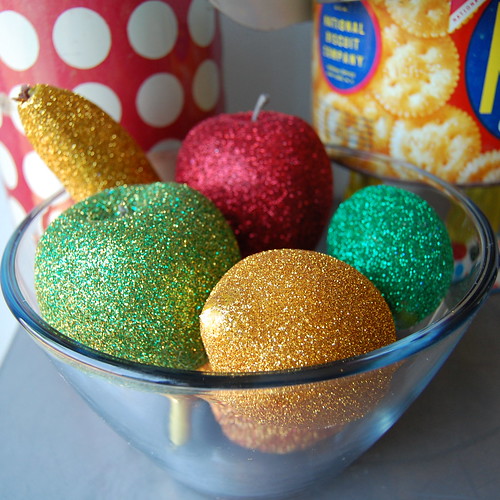
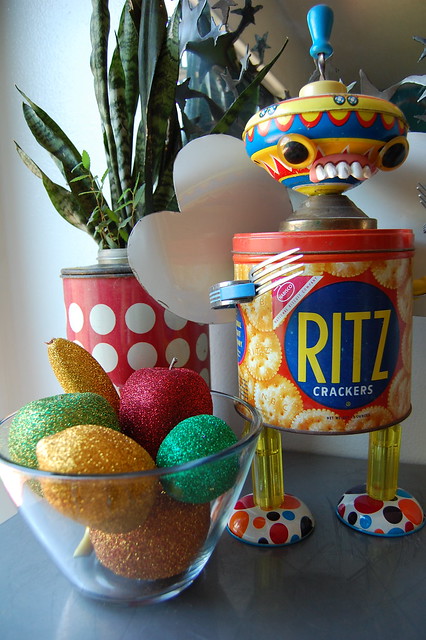
I j'dore the way the glittered fruit came out. Same kitsch and perk as the beaded fruit, but with a lot less work.


I might even let my new glitter fruit co-mingle in the bowl with my beaded fruit.


Visit us on Facebook!
Craft on! Click here for today's daily giveaway!

Green Tone Dimensional Canvas Art

Sunday, January 16, 2011
Designed by Cheryl Ball

Materials List

  • Aleene's® Original Tacky Glue®

  • Tulip® Soft Fabric Paint™

    BI15798 Olive
    BI15800 Chocolate
    BI17211 Walnut Pearl
  • Miscellaneous

    •   Pencil
    •   Masking tape
    •   Paper towels
    •   Paintbrushes, 1” wide, ½” flat
    •   Container for water
    •   Canvas squares, 8”, 4
    •   Foil
    •   Graphite paper
  • Patterns

    Instructions

    1. Position pattern onto canvas. Secure with masking tape. Slip graphite paper under pattern, making sure graphite side is next to canvas. Trace lines, using a firm pressure with pencil. Remove pattern and graphite paper. Repeat procedure for remaining designs.
    2. Start flow of Aleene's Tacky Glue on paper towel, using an even pressure on bottle for a smooth line. Fill in areas of design, using a thick, even amount of glue and following direction of leaf or tree for a realistic look. Let dry.
    3. Brush an even coat of Olive over entire surface. Let dry.
    4. Squeeze a puddle of both Walnut and Chocolate onto foil. Dip a crumpled paper towel into each color. Tap onto foil to blend paints on paper towel. Wipe over entire top of canvas, highlighting raised areas of design. Add more paint as needed. Use clean paper towel as needed to finish all four canvases. Wipe mixture along sides of canvases. Let dry.
    5. Apply a single coat of Olive onto background, using ½” wide brush. Allow some brown to show through for depth. Let dry.
    Miscellaneous Notes
    Enlarge patterns as needed to fit canvas.


Visit us on Facebook!
Craft on! Click here for today's daily giveaway!

Drama Queen Pillow

Friday, January 14, 2011
Designed by Pattie Wilkinson
This pillow definitely calls for attention, but deservedly so! The easily added shimmery accents enhance any regular throw pillow into a diva-worthy accent with the help of a little creativity and Aleene’s® Jewel-It™ adhesive!

Materials List

  • Aleene's® Jewel-It Embellishing Glue™

  • Miscellaneous

    •   Large buttons (4)
    •   Pins
    •   Paillettes
    •   Sequins
    •   Beads
    •   Ready-made pillow 

    Instructions

    1. Position buttons on pillow for placement where desired.
    2. Adhere buttons to pillow with glue. (Pin in place if needed.) Let dry.
    3. Draw squiggles of glue around buttons.
    4. Pour beads, paillettes and sequins into glue for a unique design.
    5. Keep pillow flat until dry.
    6. Shake off excess beads and sequins.

Visit us on Facebook!
Craft on! Click here for today's daily giveaway!

Cushy Love Pillow

Friday, January 7, 2011

Designed by Cheryl Ball

Fall in love with home décor that’s cute and comfortable! Turn simple T-shirts into a cushy crocheted pillow with vibrant color from your favorite Tulip® One-Step Tie-Dye Kit™.

Materials List

  • Tulip® One-Step Tie-Dye Kit™

    Good Vibrations
  • Miscellaneous

    •   Pencil
    •   Polyfil
    •   Sewing pins
    •   Crochet hook – 15.00 mm
    •   Scissors
    •   Plastic wrap
    •   Needle and white thread
    •    (4) T-shirts – white – large or extra large
    •   Plastic tablecloth
    •   Newspaper
    •   Fleece or felt yardage – white – ½ yard
    •   Sewing machine

Instructions

  1. Wash shirts without fabric softener to remove sizing. Cover work surface with plastic tablecloth then place damp shirt on surface. Following dye instruction sheet, crumple each shirt.
  2. Wearing gloves from kit, create dye according to package instructions.
  3. Squeeze ¾ bottle of Red dye on one shirt, turning and squeezing fabric and creating a mottled look. Repeat step, dyeing one shirt Fuchsia and one Purple. Squeeze remainders of three dye bottles on last shirt. Cover dyed fabric with plastic wrap to keep damp.
  4. Follow instructions on guide included with kit for dye set time and laundering shirts.
  5. To create strips for project, cut just under sleeves across shirt then cut off hem, forming a tube shape. Starting at one cut edge, cut in an a slight angle then cut about a 1” strip from tube creating one long strip of fabric. Repeat with all shirts. Roll fabric into a ball if desired.
Creating heart:
Using purple strip, chain 20. Single crochet into one side of chain stitch for next eight. Crochet next three stitches together to create dip of heart. Single crochet in one side of stitch to end of chain. Add two double crochet in last chain, creating curve of heart. Single crochet in one side of chain for nine stitches then add two double crochet in tenth chain to create point of heart. Single crochet in one side up to last stitch then add two double crochet in last, creating curve of heart. Repeat steps, crocheting with purple until it is used up, stopping or starting at tip. Tie on next color and continue around heart, adding Fuchsia strips last.
  1. Edging: Use tricolor strip to create scallop edge. Starting at tip of pillow, single crochet in first stitch then sc, dc, sc in next stitch then single crochet in next. Repeat pattern around entire pillow, ending at tip.
  2. The heart can be blocking into shape if needed by gently pressing, pulling and stretching as needed.
Finishing Pillow:
  1. Place pillow on newspaper, use pencil to trace around, then cut out.
  2. Pin pattern onto double thickness of felt or fleece and cut out.
  3. Sew around entire heart using a 1” or larger border. Trim seam to ¼”.
  4. Cut a 7” slit along lower edge on one side of pillow. Fill with Polyfil to desired size. Pin opening closed, overlapping cut edges, then use needle and thread to sew closed.
  5. Place stuffed pillow to back of heart. Use pins to attach pillow seam to crochet stitches just under trim. Use needle and thread to whipstitch together.

Visit us on Facebook!
Craft on! Click here for today's daily giveaway!

Wintry Shimmer!

Monday, January 3, 2011
Pattie Cappelluti
Here’s a snowy wreath that you can hang all winter long and it will never melt! Use Aleene’s® adhesives to attach foam snowflakes to a Styrofoam wreath, add luster with some crystal adhesives and finish with a colorful bow for a sparkling winter accent that looks great in any room in your home.

Materials List

  • Aleene's® FunCraft Foam Glue™

  • Miscellaneous

    •   Pre-cut craft foam snowflakes in various sizes
    •   Clear crystal stickers
    •   Blue felt
    •   White Styrofoam wreath 

    Instructions

    1. Glue larger snowflakes to the Styrofoam wreath.
    2. Glue smaller snowflakes on top of larger snowflakes in a random pattern leaving room for the bow at the bottom.
    3. Add crystals randomly on snowflakes.
    4. Create the felt bow and straight pin it to the bottom of the wreath.

Visit us on Facebook!
Craft on! Click here for today's daily giveaway!

DIY Thanksgiving Dinner Party

Monday, November 8, 2010
Pilgrim Hat Centerpiece, Candles and Party Favors

If you can cut & glue, this is the perfect project for your Thanksgiving dinner decorations.

The base of each one of the pilgrim hats is a simple clay pot and the hat brims are circles of foam core boards that are cut to fit perfectly on the rim of the pots when glued on.  
I popped a pot of white daisy mums in the big one for a centerpiece.
The candles are pushed into styrofoam and then tufts of tulle are poked around them.
The favors are circles of tulle filled with candy corn and tie up in a bow.
Super simple, and simple fun!


Here's what you'll need:
Clay Pots
Black Spray Paint
Black foam board
Pencil
Compass
Craft knife
Metallic Silver Scrapbook Paper
Grey Felt

Steps for the centerpiece:

  1. Spray paint the clay pot black, let dry completely.
  2. Turn the pot upside down on foam board.  Trace around the rim, then set aside.  Use a compass to draw a line 4 inches from the traced circle.
  3. Cut around the outside circle with a craft knife, being careful to cut a nice, smooth edge.
  4. Cut out the inside circle, 1/2-inch smaller than the traced line.  If you plan to use the pot as a cupcake tray instead of a flowerpot, don’t cut out the center hole.
  5. Glue the brim to the top of the pot.
  6. Cut out a buckle from silver scrapbook paper.
  7. Cut grey felt and thread through the buckle and glue around the rim of the pot.

Make the other pots the same way, only smaller.
Have fun!


Craft on! Click here for today's daily giveaway!