Bohemian Flags
Jaderbomb for iLoveToCreate
There is nothing like a set of whimsical flags flowing in your back yard catching the attention of everyone in your neighborhood or your friends and family. These flags super duper easy to make. It is also a project that relieves stress. You know, a little Art Therapy for ya! Let's get started.
You will need:
*Tulip 5 Color Tie-Dye Kit : (Red, Orange, Lime, Teal, Violet)
*Plain White Napkins (I got these from Target)
*Glue Gun & Hot Glue
*Tulip Fabric Markers
*Twine or Bias Tape
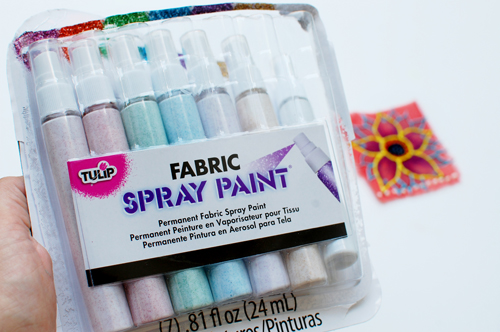
*Tulip Fabric Spray Paint (Glitter)
*Scribbles 3-D Paint
*Tulip Fabric Spray Paint (Glitter)
*Scribbles 3-D Paint
*Lot's of LOVE
I wanted to show you what comes with the Tie-Dye kit.
*Rubber Bands*Powdered Dye
*Clear Gloves
*Instructions
*Squirt Bottles
(p.s. keep these you can reuse them)
I think this is my favorite part of the project. Using all of these materials make me giddy as a "giddy little girl". What is crafting if you can't use great products like these!
Fill a bowl up with water. On the side get an old tray with an old cookie drying rack in it. If you don't have this it's ok, just use whatever you have. I like the drying rack because it allows the dye to drip below it.
Soak one white fabric napkin in the bowl of water.
Make sure to cut a "little" hole on your dye packet. We are not using a lot of this and we want to store it without getting it all over.
This is how much I actually put in my bottle. Not too much. We want a light color on our napkins.
What! No Tie-Dye? Well I figured I would do something a little different today. After you squeeze water out of your napkin place it in your tray. Pick the color you want and start applying it all over the wet napkin. We are creating solid shades of color with our Tie-Dye.
Repeat the steps until you are done with all of your napkins. I hung my napkins on a clothesline to dry. Make sure you don't hang in the middle of the day. If the sun hits the napkins more on one side it could dry that side faster and cause the color to change.
If you don't have a clothesline you can lay them flat on the ground to dry.Well looky here! Someone just had to say HI! Mr. Tacky always pops up at my house.
Your napkins should be done drying outside in 5 hours, maybe 4. Wash them all together, with nothing else. Then pop them in the dryer. I ironed them when they came out. Trust me, they will be wrinkled. Look how spiffy these babies look.
The next thing you want to do is:
1. Lay your napkin flat and cut the edges off.2. Fold your napkin into fourths and cut the sides. We are just creating small squares. If you want to do this differently you can. Also, remember you can make your squares smaller than what I did in the picture.
3. After you cut your sides, pull the fabric around all four sides. This will make the edges look frayed.
4. Tadahh! You will be left with a stack of frayed fabric.

P.S. The one thing I love about the Tulip Fabric Markers is...they have two sides! One side is a brush tip and the other side is a fine tip. This is so smart! You can really put those little details in your work now.

I started by drawing my flowers on the fabric squares with the black fabric marker. I figured that would be the easiest thing to do. When you are done it will kinda feel like a coloring book sheet. Have fun with your colors.
I tested the colors on the scrap sheets of fabric to make sure the colors went well together. Set aside for 15 minutes to dry.

After the fabric markers are dry I outlined the flowers with Scribbles 3-D Paint. This was the final touch that was needed. Big SIGH. I am in love with them. This takes about 3 hours to dry completely.

Last step is to coat the fabric with some Tulip fabric spray paint.

It adds a subtle coat of fine glitter on them. You know me, I love glitter.

This is the fun part, putting it all together. You can use bias tape or twine for this step. I like bias tape because it makes them look more elegant and finished. and it comes in ton's of colors.
*If you want twine just put a line of hot glue on the back on a square then place the twine on top.
*If you use the bias tape open it up and put a line of hot glue inside then place fabric on top. I put a little more glue on top of fabric then fold the top flap of bias tape on top of it.

I can't begin to tell you how much fun your kids would have making these.

The only rule for this project is to have FUN. You could do this project for special occasions and get a group of friends to each make a square. I think that is so special. Make your kids birthday flags, holiday flags or whatever you can think of. I love all of you "Tye-Dyers" big big!
Huge hugs from my craft room to yours!
See you in the next post.P.S. I promise when you start playing with Tie-Dye you won't be able to stop, hehe!
*Find more of my DIY decor at JADERBOMB.COM*
Oh and check out my other posts for iLoveToCreate below!

.png)


