Showing posts with label Aleene's Fast Grab Tacky Spray. Show all posts

DIY Dipped Glitter Vase

Tuesday, May 14, 2013
While I enjoy intricate crafting, it's also really fun to find a simple project you can create in a few minutes.  This dipped glitter vase can be made in about five minutes.  It would make a great wedding centerpiece or just a pretty decoration at home.
To Create This Project You Will Need:

- a glass vase
To begin, I taped off the vase with paper about 1/3 of the way up.  I headed outside and sprayed the bottom of the vase with Aleene's Fast Grab Tacky Spray.  
I poured the glitter onto the bottom of the vase.
After enough pouring, the glitter starts to accumulate on the paper and you can roll the vase in it as well.  That makes it easier to really get the glitter pushed on tightly.
 Once the glitter is on you can protect it with Aleene's Spray On Glitter Sealer.  
Then simply remove the paper.
 Now you have a one-of-a-kind vase with some extra glam.

Vintage Wallpaper Covered Message Center

Thursday, March 14, 2013

If I forget to grab butter one more time at the grocery store, my kids might kill me. Grilled cheese is just not the same without it. If only I had a message center of some sort in my kitchen where I could keep a running grocery list at all times. Out of honey, put it on the list. About to have a milk-mergency, put it on the list. Then there is that whole stainless (AKA not magnetic) fridge thing. My kids are crafty and proud and want their handiwork on display. Something had to be done. I was flipping through the first issue of Kids Crafts 1-2-3 and remembered a great project from Jaime Favors of Raising Up Rubies. She made a message center out of a cookie sheet. Hmmm, my wheels were turning.

I didn’t have a spare cookie sheet on hand, but I did have a metal board I had picked up from Ikea. I intended to hang it in my son’s room, but I was never able to find a spot for it. Instead of having this magnet board gather dust I decided to give it a face-lift with some vintage wall paper.


SUPPLIES
Aleene's Tacky Glue
Vintage Wall Paper (you could also use wrapping paper, fabric, scrap booking paper)
Magnets
Scissors
Aleene's Fast Grab Tacky Spray
Ruler
Clip Board
Basic Grey Embellishments
Clothespin

I didn’t have a piece of wall paper quite large enough to fit on my board. No worries I just got creative with a ruler and scissors and made it work. I also cut a piece to fit on my clipboard. Luckily, the pattern is busy enough where it is not really an issue.

Using Aleene’s Tacky Spray Glue (man, I love this stuff) I attached the wall paper to the board and clipboard. Allow to dry 30 minutes (ish).

Once everything is dry trim any rough edges. After that I used plain old Tacky Glue to attach the clipboard and clothespin to the magnet board.

It seemed only fitting to make some custom magnets for my new message center. I'm kinda obsessed with paper crafting lately so I just happen to have some fun embellishments from Basic Grey on hand. I used Tacky Glue to attach the embellishments to the magnets.

I'm lovin' the way my new message center turned out. So much so it is kinda breaking my heart to cover the groovy wrapping paper with soy sauce stained menus.

Happy Easter! Cool2Craft TV

Friday, February 22, 2013

Join us for a new episode of Cool2Craft TV February 25, 2013 - the Cool2Craft team is sharing some fun new Easter crafts! Tiffany is creating Embellished Eggs featuring Aleene's Fast Grab Tacky Spray and Heidi is crafting Sock Egg Chicks with Aleene's Flexible Stretchable Glue.


Learn new techniques, chat with us while watching the show and ask questions about all your favorite Aleene's products!

Airing Monday February 25, 2013 9 am Pacific/10 am Mountain/11 am Central/Noon Eastern.

How do you join us? Go to Cool2Craft.com and you'll see the link to the Livestream player and chat box where you can join right in. See you in the chatroom on Monday or drop by anytime this week to watch these cool video tutorials!

Visit us on Facebook! Watch our video tutorial archives on YouTube! Get creative! Get inspired! Be cool!

5 New Paper Craft Ideas! Cool2Craft TV

Friday, February 15, 2013

Join us for a new episode of Cool2Craft TV February 18, 2013 - the Cool2Craft team is sharing five new 'crafting with paper' ideas! EcoHeidi is digging into the Momma Aleene archives to create Crunched Tissue Flowers with Aleene's Fast Grab Tacky Spray and Tiffany is sharing Paper Decoupage Clay Pots finished with Aleene's Decoupage Glossy. 


Learn new techniques, chat with us while watching the show and ask questions about all your favorite Aleene's products!

Airing Monday February 18, 2013 9 am Pacific/10 am Mountain/11 am Central/Noon Eastern.

How do you join us? Go to Cool2Craft.com and you'll see the link to the Livestream player and chat box where you can join right in. See you in the chatroom on Monday or drop by anytime this week to watch these cool video tutorials!

Visit us on Facebook! Watch our video tutorial archives on YouTube! Get creative! Get inspired! Be cool!

Cool NEW Say it with Words Projects! Cool2Craft TV

Friday, February 8, 2013


Join us for a new episode of Cool2Craft TV on February 11, 2013 - the Cool2Craft team says Say it With Words! Tiffany is crafting a Happy Day Flower Arrangement with Aleene's Fast Grab Tacky Spray and Heidi is making F-U-N Soda Can Wall Art with Aleene's Platinum Bond 7800.

Learn new techniques, chat with us while watching the show and ask questions about all your favorite Aleene's products!

Airing Monday February 11, 2013 9 am Pacific/10 am Mountain/11 am Central/Noon Eastern.

How do you join us? Go to Cool2Craft.com and you'll see the link to the Livestream player and chat box where you can join right in. See you in the chatroom on Monday or drop by anytime this week to watch these cool video tutorials!

Visit us on Facebook! Watch our video tutorial archives on YouTube! Get creative! Get inspired! Be cool!

4 Fun New Yarn Ideas - Cool2Craft TV with Heidi & Tiffany

Friday, February 1, 2013


Join us for a new episode of Cool2Craft TV on February 4, 2013 - the Cool2Craft team is sharing some fun yarn crafting ideas! Heidi is showing how to use Aleene's Fast Grab Tacky Spray to make a Yarn Votive & Pen Holder and Tiffany is crafting a Yarn Bracelet with Aleene's Tacky Dot Singles and Aleene's Turbo Tacky Glue.

Learn new techniques, chat with us while watching the show and ask questions about all your favorite Aleene's products!

Airing Monday February 4, 2013 9 am Pacific/10 am Mountain/11 am Central/Noon Eastern.

How do you join us? Go to Cool2Craft.com and you'll see the link to the Livestream player and chat box where you can join right in. See you in the chatroom on Monday or drop by anytime this week to watch these cool video tutorials!

Visit us on Facebook! Watch our video tutorial archives on YouTube! Get creative! Get inspired! Be cool!

4 Cool New Brown Bag Crafting Ideas! Cool2Craft TV

Saturday, January 5, 2013


Join us for a new episode of Cool2Craft TV January 7, 2013 - the Cool2Craft sisters are sharing some super cool brown bag projects!

Heidi is transforming brown bags into a fabulously feminine Shabby Chic Heart Frame with Aleene's Tacky Dot Rolls and Aleene's Fast Grab Tacky Spray and Tiffany is making a Look of Metal Embossed Brown Bag Box with Aleene's Tacky Glue.

Learn new techniques, chat with us while watching the show and ask questions about all your favorite Aleene's products!

Airing Monday January 7, 2013 9am Pacific/10 am Mountain/11 am Central/Noon Eastern.

How do you join us? Go to Cool2Craft.com and you'll see the link to the Livestream player and chat box where you can join right in. See you in the chatroom on Monday or drop by anytime this week to watch these cool video tutorials! Visit us on Facebook!

Watch our video tutorial archives on YouTube! Get creative! Get inspired! Be cool!

ILoveToCreate Teen Crafts: Joyful Christmas Ornament

Wednesday, December 22, 2010


ILovetoCreate: Joyful Christmas Ornament

Avalon Potter
"Teen created, Mom approved."

I thought I would squeeze in one more holiday project because it is one of my favorite seasons. A few years ago my mom took a clear glass Christmas ornament and put crystals inside making a snow globe for your tree. It was one of my favorite projects she ever made, so I thought why not adapt her old project into something new! My project is a clear ornament that you spray wit Aleene's Tacky Spray Glue and coat the inside with Crafty Chica glitter! I enjoyed making these as gifts for my little cousins because it is fun, easy, and you can personalize each ball with different colors and tag to make it special for the person you give it to.

Materials
Clear ornament with opening top (preferably plastic in case of accident)
Aleene’s Fast Grab Tacky Spray
Tulip Fashion Glitter (green and red or colors of choice)
Colored paper to match glitter
White printer paper
Paper to make funnel
Aleene’s Original Tacky Glue Stick
Ribbon to match color of ball

Tools
Printer
Hole punch
Scissors

Instructions

1. Gather your materials.


2. Open up your ornament and lightly coat the inside with the Aleene’s Fast Grab Tacky Spray.

3. Make a funnel with a piece of paper and insert the bottom into the opening of the ball.

4. Pour a sufficient amount of the color(s) of glitter you choose into the ball. Feel free to mix colors or choose different colors then I used.


5. Close the ornaments top and shake until the ball is completely coated with sparkles. Shake the excess sparkles out of the ball.

6. Using a font you like print out in large letters the word or name you want as the tag. Use a similar color as the one you used in the ball. If you used two or more colors chose one for the font and another for the colored paper behind it.

7. Cut out the word and cut out your colored sheet of paper a slightly bigger into a rectangular card for the word to sit on.

8. Use your Aleene’s tacky glue stick to glue the word to the colored paper.

9. Punch a hole in the corner of the tag.

10. String some colored ribbon that matches the ball through the hole and tie a knot.

11. Tie onto the top of the ornament in a bow to complete the ornament.


Golden Girl Bracelet

Tuesday, November 23, 2010
Designed by Allee Marderosian for iLoveToCreate
When it comes to accessories, go for the gold! Turn an ordinary bangle into an ultra girly accent with gold ribbon and lace, and a little help from Aleene’s® adhesives.

Materials List

  • Aleene's® Fabric Fusion® Permanent Dry Cleanable Fabric Adhesive

  • Aleene’s® Crystal Clear Tacky Spray™

  • Miscellaneous

    •   Newspaper
    •   Clip
    •   Gold lace – ½ yard
    •   Wood bangle
    •   Gold ribbon – 2 yards 

    Instructions

    1. Squeeze a dot of Fabric Fusion on inside area of bangle then place end of ribbon in glue. Wrap gold ribbon tightly around bangle, overlapping edges so bangle is completely covered.
    2. Squeeze a dot of Fabric Fusion at stopping point (on the inside of bangle) then press end of ribbon into glue and use clip to hold ribbon in place while glue sets.
    3. Cut up random pieces of gold lace.
    4. Lay down newspaper in a well-ventilated area and place lace pieces on newspaper.
    5. Spray Crystal Clear Tacky Spray onto lace pieces then place pieces sticky side down onto bangle, wrapping around edges as shown. Let dry completely.
Craft on! Click here for today's daily giveaway!

The Right Glue for the Job

Thursday, July 29, 2010

When embarking on any craft project involving sticking two things together choosing the right glue for the job is crucial. One glance at the adhesives aisle in your local craft store and you can see sometimes choosing which glue you should use can be a daunting task. Don't worry, today for I Love to Create I am going to hold your hand through the entire selection process plus throw in a few gluing tips.
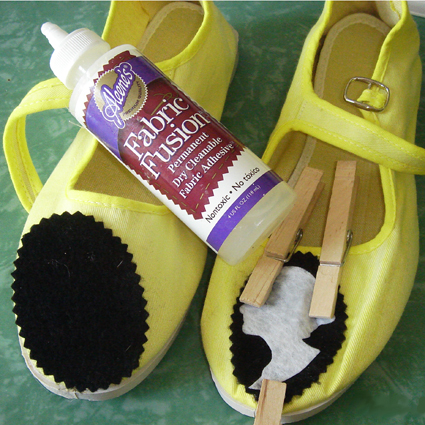

Fabric Glue
For those that don't sew a fabric glue like Aleene's Fabric Fusion can be your best friend. Without ever threading a needle you can often times fake a stitch or add an applique like on Customizing Your Kicks with just a dab of glue. One word of warning is to be careful not to get too heavy handed when gluing fabrics together as some things will darken from the glue.
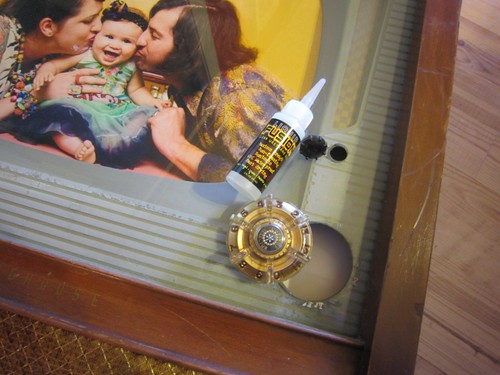

Decoupage
Yup technically it's a glue with a fancy French name. If they sold Collage Pauge Instant Decoupage Medium in Gallon Jugs I'd buy it that way. Unlike most glues that don't show, decoupage can say it loud and proud on your craft project in glossy like I used on my terrarium picture frame, matte or my personal fave glittery!
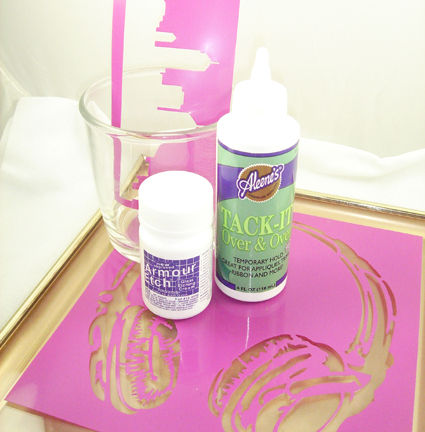

Temporary Hold
Sometimes as odd as it sounds, you don't want your glue to stick forever. Aleene's Tack It Over and Over is the perfect temporary hold glue for projects like appliques or in my case holding a stencil in place for glass etching.


Fabric Stiffener
Not only does glue adhere things, it also stiffens things. Sometimes you want the stiff without the sticky and that is where Aleene's Fabric Stiffener and Draping Liquid comes in handy. Very handy when making things like say string lamps or doily bowls. Did I mention you can add paint and dye to it to give it color.


All Purpose Glue
No crafty home is complete without a good all purpose go to glue around. Aleene's Original Tacky Glue is one of my favorites. Now that I have a kiddlet using non-toxic glues is important to me. Liquid Fusion Glue is put to use more often than any other glue in jewelry studio. Not just on jewelry I use Liquid Fusion on majority of my craft projects from turning TVs into picture frames to my neighbors trash into a toadstool. Remember when gluing things together like for jewelry lightly sand the surface when you can to give everything tooth.
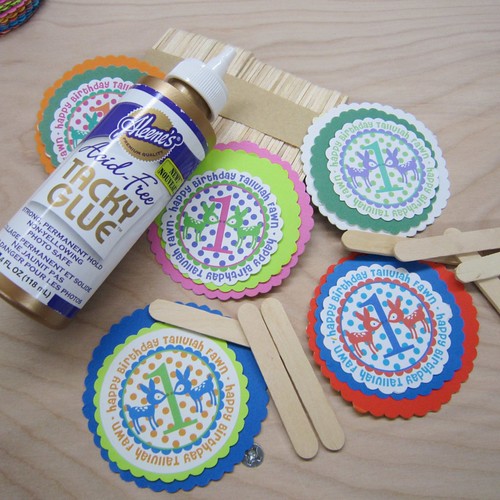

Acid Free Glue
And you thought gluing paper was the easiest of all gluing tasks, wrong. When embarking on a paper crafting journey like perhaps scrapbooking or anything involving photographs you want to be sure and opt for an acid free glue like Aleene's Acid Free Tacky Glue.
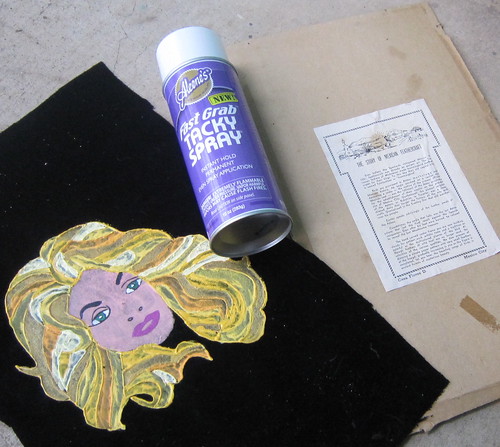

Spray Glue
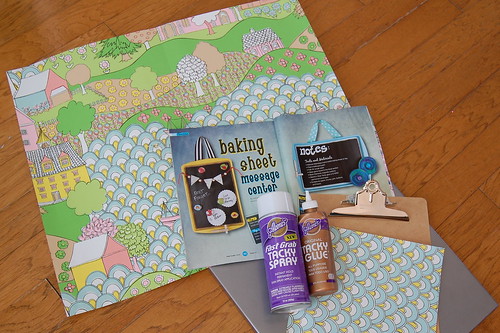
I must admit I have only recently discovered spray glue and all I can say is Aleene's Tacky Spray, where have you been all my life. Sometimes you have a lot of surface to glue like when attaching a piece of painted black velvet to a canvas and a spray glue can be a life saver.

This is just the tip of the adhesive iceberg. There are metal glues, industrial glues foam glues and more. Just remember there is always a specific type of glue for each project.

NEW Fast Grab Tacky Spray - Time to get schooled!

Monday, July 12, 2010
Pay attention, class!

LINK

Quick-Fix Toy Decals

Wednesday, April 28, 2010
DSC00109

I've recently been turned on to buying toys from thrift stores. In the past, this was I practice I admittedly turned my nose up at--I mean, I've been buying second-hand clothes and housewares for myself since high school, but for some reason used toys for my babies made me sad. I realized though, that it was only if the toys looked overly tired that it bothered me.

My friend Jennifer clued me in to the fact that you can often order replacement parts from toy store manufacturer's website for super cheap (I got all new accessories for the toy house above for under $7!), and my friend Noelle turned me on to the wonder that is the Magic Eraser which easily rids plastic of scuff marks. Now, the only solution I needed was for fixing the icky, torn stickers that most, thrift-y toys seem to have. So, I came up with these quick-fix, vinyl decals!

Is all of this effort worth it, you're asking? Well, the bigger toy in this post retails for around $80--and when all was said and done, my refurbished version cost less than $20. You be the judge. :)


Materials
Tracing Paper
Oil Cloth or Vinyl
Pencil
Craft Knife
Scissors

Thrifted Toy Before (With Torn Stickers)
DSC00902

Close-Up of Before
DSC00900

How-to Toy Refresh Decals
  • Create a decal pattern by laying a piece of paper over area of toy where torn sticker is; use a pencil trace the needed shape. Cut out paper pattern.
  • Trace around pattern onto oil cloth or vinyl; cut out to create decal.
  • In a well-ventilated area, spray back of decal with Fast-Grab Tacky Spray; press piece in place on toy.
  • Since most stickers on toys go in indented areas, it's likely that the decal will not fit perfectly in its new home. To fix this, take a craft knife and trim off excess.
  • Repeat process for as many decals as desired.
Thrifted Toy After (With Oil Cloth Decal Replacements)
DSC00903

Close-Up After
DSC00905

Another Toy After Decals
DSC00110

Ok, now I'm off to the thrift store again!

Craft.Rock.Love,
Vickie